Are you dreaming about sprucing up your outdoor space but don’t know where to start? Well, you’re in luck. I’ve got some fresh garden design ideas that’ll make your backyard the envy of the neighborhood. Ever thought about using vertical planters to save space, or maybe creating a cute herb spiral? Trust me, it’s a game-changer. Let’s explore these concepts together, and you might just find the perfect fit for your little slice of paradise.
Gardening Essentials for Inspiration
When it comes to gardening, you need a few essentials that can spark your creativity and breathe life into your outdoor space.
Imagine your home garden ideas blossoming right before your eyes. First, gather some quality soil—it’s like a flavorful base for your garden stew.
Envision your garden flourishing as you start with quality soil—it’s the essential ingredient for your vibrant, green masterpiece.
Next, invest in vibrant seeds or seedlings. Want to make a statement? Go for bold colors that make you smile.
Don’t forget your tools: a trusty trowel and gloves that’ll keep your hands clean, at least for a little while.
Finally, add a comfy chair—because what’s the point of a beautiful garden if you can’t kick back and enjoy it?
Trust me, it’s where the magic happens.
1. Vertical Garden Planters
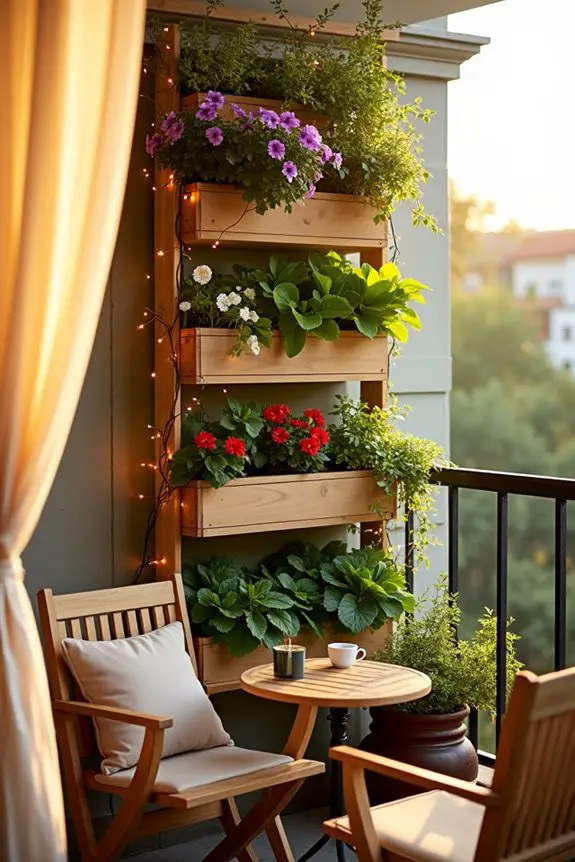
If you’re itching to add a splash of greenery to your life without sacrificing too much space, vertical garden planters might just be your new best friend. These ingenious designs not only help you maximize every inch of your backyard or balcony but also create a stunning vertical canvas that can end up being a real eye-catcher. You can grow flowers, vegetables, or even herbs, all while showcasing your personal style. Imagine a bold tapestry of colors and textures climbing upwards—now that sounds like a vibe, right?
So, how do you get started? First, choose your planter style. There are stackable planters, wall-mounted systems, or even DIY pallets that you can repurpose. Don’t worry if you’re not a crafty genius; any of these options can be assembled with a simple instruction sheet or a quick video tutorial.
Next, pick the right plants! If you’re new to the gardening game, stick with easy-to-grow options like lettuce, strawberries, or trailing flowers like petunias.
When it’s time to plant, make sure to use high-quality potting soil as this can really make a difference. You’ll want to fill each pocket or tier with a generous amount of soil, leaving room for your plant’s roots to breathe.
A quick tip: water your plants well after planting; it helps settle the soil and guarantees your new pals are comfy in their new home. After that, it’s all about maintenance. Regularly check for pests and water your vertical garden as needed—this can vary, but think once or twice a week depending on your climate.
And here’s where the fun part comes in: customize your vertical garden! Personalize it with decorations or paint the planter to match your aesthetic. You could even hang twinkling lights around it for that magical evening touch. Additionally, consider adding some hanging planter baskets to create layers of lushness and enhance the visual appeal.
Trust me, nothing says “I’ve got my life together” like sipping tea in front of your thriving vertical garden. Plus, it’s nice to feel like an urban jungle manager, even if you occasionally forget to water a few plants (sorry, cilantro).
2. Herb Spiral Garden Design
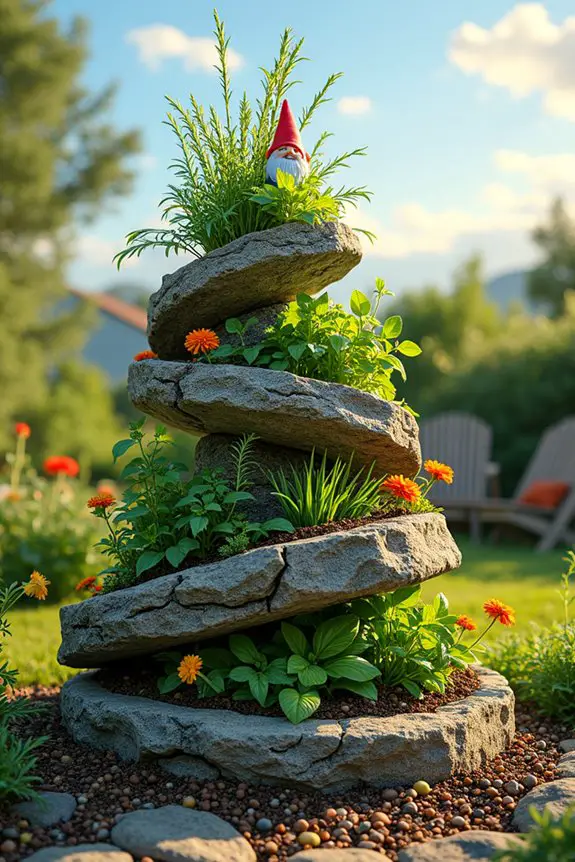
If you’re looking to create an herb garden that’s as functional as it’s visually stunning, then an herb spiral design is your go-to choice. This unique setup not only saves space but also gives your garden a beautiful, whimsical vibe. Imagine a twisting, spiraling garden that not only looks like art but also brings fresh flavors to your kitchen.
Create a stunning herb spiral garden that’s both functional and visually enchanting, bringing fresh flavors right to your kitchen!
It’s a conversation starter, an eco-friendly solution, and let’s face it, it’s just plain cool to boast about your own mini herb ecosystem. Additionally, getting your kids involved with kids gardening tool set can turn them into young green thumbs and make gardening a family affair.
Creating an herb spiral is easier than you think and can be a fun DIY project. Start by deciding on a spot in your yard or balcony that gets plenty of sunshine—herbs are sun worshippers. You’ll want to mark a circular area on the ground, around 4 to 6 feet in diameter. Don’t stress about nailing the perfect circle. A little imperfection adds character, right?
Now for the fun part: gather your materials. You can use stones, bricks, or even repurposed wood to build the spiral wall. Begin by stacking your chosen materials into a spiral shape, creating a height difference that allows for better drainage and varied moisture levels. Higher levels will be drier, which is perfect for herbs like rosemary, while lower levels will hold more moisture, ideal for basil or mint.
Once your spiral is built, it’s time to fill it with soil. Grab some quality potting mix and fill each tier, making sure to pack it down gently. Leave some room at the top for planting.
Now it’s planting time! Choose a variety of herbs based on your cooking preferences—maybe cilantro, chives, or thyme? As you plant, think about their light and moisture needs; place the sun-loving herbs at the top and those that prefer moister soil lower down. A quick tip: try grouping them in clusters so they can thrive together like good friends at a party.
After planting, be sure to give your herbs a good watering. Keeping an eye on them is essential, especially in those hot summer months; think of it as a new hobby of “herb parenting.”
And if you forget to water one day, don’t sweat it. I mean, has anyone else accidentally watered their indoor plants with soda? Just me? Okay, moving on.
Now, here’s the best part—don’t be afraid to get crafty and add your personal touch to the herb spiral. You can decorate with little garden gnomes, wind chimes, or even mosaic tiles.
Sprinkle in some colorful stones or plant a few edible flowers for flair. The idea is to express yourself while creating a relaxing, fragrant space where you can let your inner chef flourish.
3. Container Garden Ideas
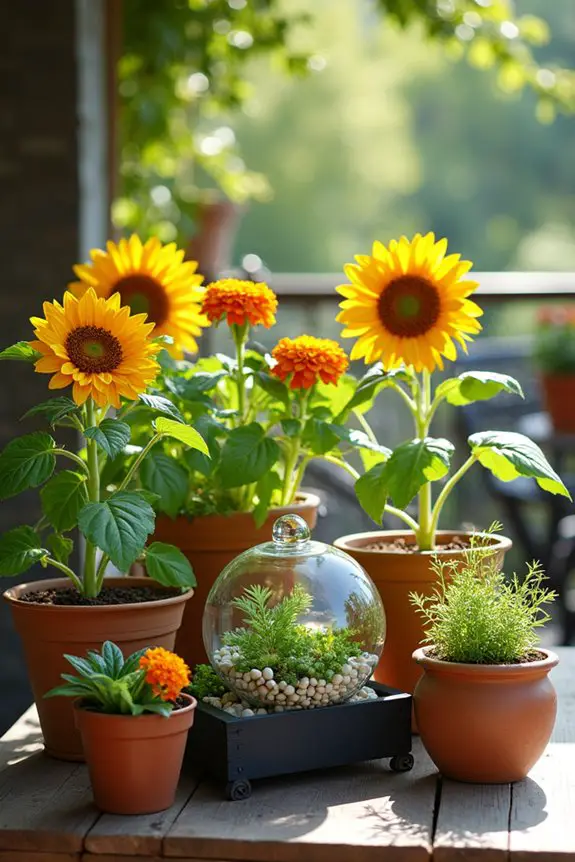
So, you may not have a sprawling backyard—or maybe you just prefer the cozy feel of container gardening. Either way, let me tell you, container gardens are like the cool, trendy cousins of traditional gardens. They’re super versatile, perfect for small spaces, and they add an enchanting vibe to any nook of your home. Plus, who doesn’t want a little greenery on the patio or balcony?
Here’s how to get started with your own container garden. First, pick your containers. Think pots, boxes, or even repurposed items like old wheelbarrows or wooden crates. The possibilities are endless! Just make sure whatever you choose has drainage holes at the bottom. We don’t want your poor plants sitting in water, looking like they just got caught in a rainstorm without an umbrella, do we?
Next, grab some good potting soil—not the stuff that looks like dirt from the backyard, but quality stuff that’s light yet nutrient-rich. Fill your containers about three-quarters full. It’s like giving your plants a cozy bed to snuggle into.
Now comes the fun part: choosing your plants. Herbs, flowers, or even vegetables like cherry tomatoes or peppers—they all thrive in containers. Think about what you love to eat or what’ll bring you joy when looking out your window. Consider incorporating an open glass terrarium bowl for a stylish display that adds depth and character to your container garden.
When planting, allow some space between each plant, and think about their height. For instance, place tall plants, like sunflowers or tomatoes, toward the back and smaller ones, like basil or marigolds, in front. That way, everything gets its share of sunshine and can show off its beautiful blooms. Pro tip: try mixing in some trailing plants, like ivy or sweet potato vines, to cascade over the edges. It creates this gorgeous flowing effect that makes your containers look like something straight out of a gardening magazine.
Now, remember to love and nurture these little green friends. Water them regularly, checking the top inch of soil. If it feels dry, give it a drink—sort of like reminding your friends to stay hydrated. And don’t forget to fertilize every few weeks. It’s like your plants’ version of a protein shake; they’ll thank you later when they keep flourishing.
Oh, and let’s talk about placement. Group your containers together for a fuller look or spread them around your space to draw the eye. You can even use them to frame pathways, entranceways, or patios—like nature’s perfect décor.
And here’s a hilarious little moment from my container gardening journey: I once planted a beautiful flower, only to find that my dog thought it was his new chew toy. So, consider placing your containers in spots where curious pets (or kids) can’t reach them.
With container gardening, the sky’s the limit. You get to express your style, play with colors, and enjoy the bounty of home-grown goodness—all while you sip on your iced tea and feel like the gardening superstar you are.
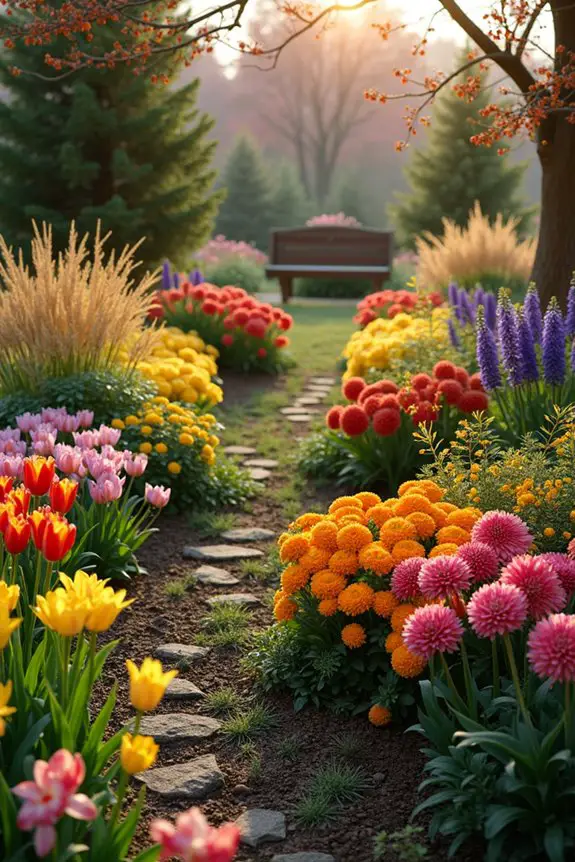
4. Garden Pathway Inspirations
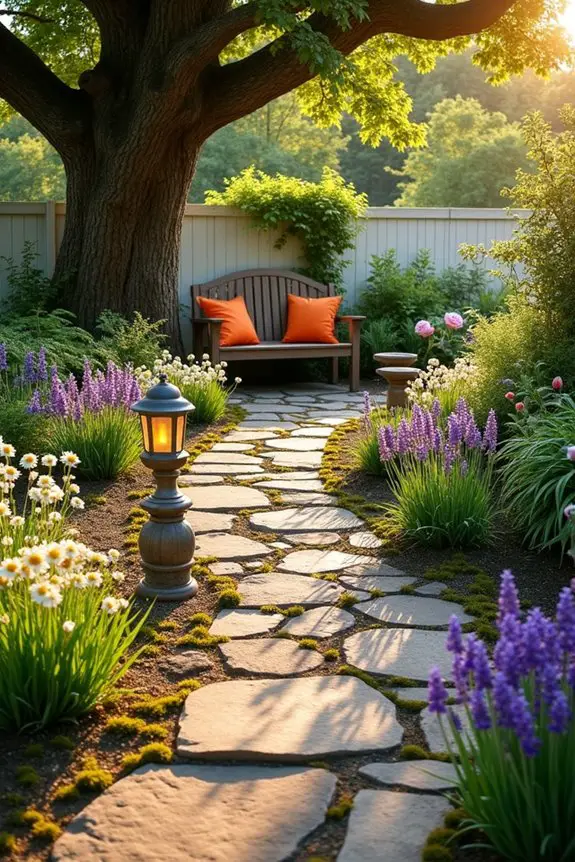
Creating a beautiful pathway in your garden isn’t just about functionality—it’s also about the vibe it brings to your outdoor space. A well-designed pathway not only directs visitors through your garden but also adds structure and charm, giving your leafy haven an air of sophistication. Imagine strolling along a rustic stone path, surrounded by blooming flowers and the gentle rustle of leaves. It’s like walking through a little piece of paradise right in your own backyard.
To get started on your pathway, think about material options. You can use everything from gravel and pebbles to bricks and stones—each brings its own flair. I used to think gravel was simply a cheap option, but let me tell you, it’s a fantastic choice! It gives off a laid-back vibe, plus it allows for great drainage. Additionally, using sprinkler stakes in your planters can help maintain proper moisture levels while you enjoy your new pathway. If you’re going for a more upscale look, consider using flagstone or reclaimed wood. They exude a rustic charm that makes your space feel inviting.
Just remember, uneven surfaces can feel a bit like maneuvering a stilted dance, so keep it level where you can.
Now, let’s figure out where you want that path to go. Maybe you want it to meander through your flower beds, guiding guests to your favorite seating area? Or perhaps leading to a cozy nook where you can sip your morning coffee? Visualization is key here. Grab some garden hoses or even some string to lay out the path before committing to any hard work. It’s like sketching a masterpiece before putting pencil to paper.
I once spent an hour adjusting my hose only to realize I was going in circles—literally. So, save yourself that headache and play around with the layout first.
Once you’ve got your design, it’s time to get your hands dirty. Begin by marking the outline of your pathway. A shovel will help you dig out any sod or soil where the path will lie. Aim for a depth of about 4 to 6 inches, depending on the material you’re using. Remember to account for some landscaping fabric if you’re using gravel—it’s like putting on a good primer before painting. It helps to keep those pesky weeds at bay.
When filling in your pathway, start from the edges and move toward the center. If you’re using stones or bricks, make sure to lay them tightly together—nothing says “I just gave up” like a lopsided path. Additionally, consider investing in brick garden edging to create a polished and defined look for your pathways, enhancing the overall appearance of your garden.
And don’t forget the finishing touches; a sprinkle of sand between pavers or a little decorative border can elevate your pathway from “meh” to “marvelous.”
In the end, remember that pathways are like the roads of your garden—they guide the way and create a sense of adventure! So, don’t hesitate to add a few personal touches that reflect your tastes, whether it’s whimsical garden ornaments or charming lanterns along the sides. After all, your garden should feel like a cozy hug, right?
Happy gardening!
5. Succulent Terrarium Creations
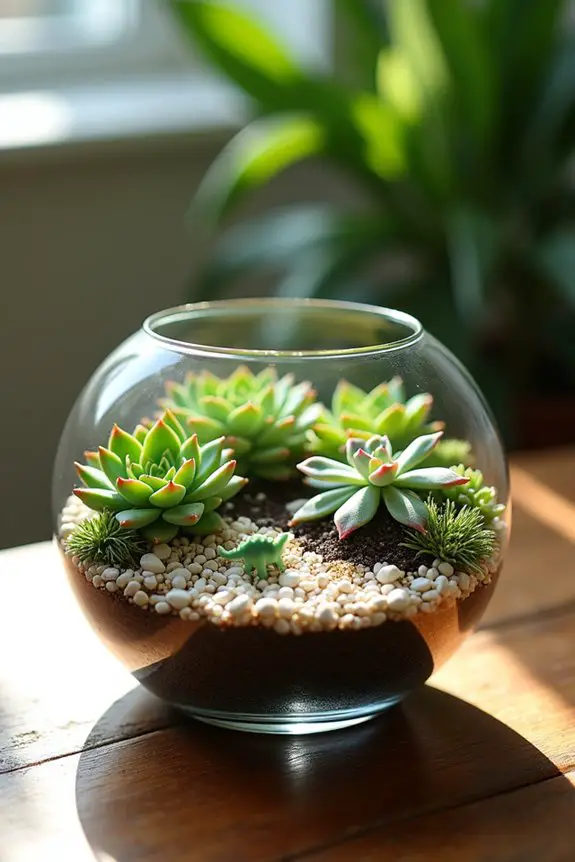
Creating a succulent terrarium is like crafting a tiny world that thrives right on your tabletop. These little ecosystems aren’t only whimsical and enjoyable to look at, but they also bring a touch of greenery into your space without demanding too much attention—perfect for those of us who may not have a green thumb.
Crafting a succulent terrarium brings a whimsical touch of greenery to your space, perfect for anyone lacking a green thumb.
Plus, there’s something incredibly satisfying about watching your mini garden flourish. So, ready to explore the delightful world of terrarium-making?
Let’s get started! First, gather your supplies. You’ll need a clear glass container—anything from a fishbowl to an old mason jar works just fine. And don’t worry if the one you pick is dusty; a little vintage charm never hurt anyone.
Next, grab some pebbles, activated charcoal (yep, the kind people use for detox—they also help with drainage), potting soil suited for succulents, and, of course, your selection of little succulent plants. You can choose a variety of shapes and sizes to keep things interesting, but be cautious about pairing aggressive growers with slow pokes.
Once you have everything laid out, it’s time to get your hands a little dirty. Start by layering the pebbles at the bottom of your glass container. This layer, about an inch deep, helps with drainage.
Sounds easy, right? The trick is to resist the urge to just dump them in and hope for the best; you want it to be even. Then sprinkle a layer of activated charcoal on top of the pebbles. This helps keep your terrarium fresh and odor-free. At this point, I often find myself wishing I’d the granular dexterity of a seasoned chef. Spoiler alert: I don’t.
The charcoal will look a bit like you’ve crafted a beach for ants, but that’s how you know you’re on the right track.
Now, it’s time for the potting mix. Add a layer of soil about two to three inches high. Gently create little dips where you’ll place your succulents, as if you’re tucking them into bed.
When you’re ready to transplant your succulents, carefully remove them from their nursery pots and shake off any excess dirt. Place them in the dips and pat down the soil around their base—like giving them a nice, cozy hug. If your plant starts looking a bit like it’s auditioning for a horror movie, don’t panic. A little soil adjustment will do wonders.
Watering is essential but also a bit tricky, since succulents are prone to overwatering (which, fair warning, I learned the hard way. My first terrarium looked more like a failed science experiment than a serene desert ecosphere).
Instead of pouring water on top, consider using a spray bottle to lightly mist the plants. This way, you won’t drown them—think of it as a spa treatment rather than a swim session.
Finally, get creative with decor. Add some decorative stones, sand, or even tiny figurines to give your terrarium personality. I once added a tiny dinosaur because, well, who doesn’t love a good dino surprise?
Just remember to keep it balanced—too much clutter can overshadow your succulents.
Once you’re done, place your terrarium in an area with bright, indirect sunlight, and watch as it grows. These little beauties not only spruce up your home but also give you a sense of accomplishment.
Plus, they make for great conversation starters—who doesn’t want to explain that their coffee table is home to a mini Jurassic park? So go ahead, release your inner gardener. You got this.
6. Garden Lighting Solutions
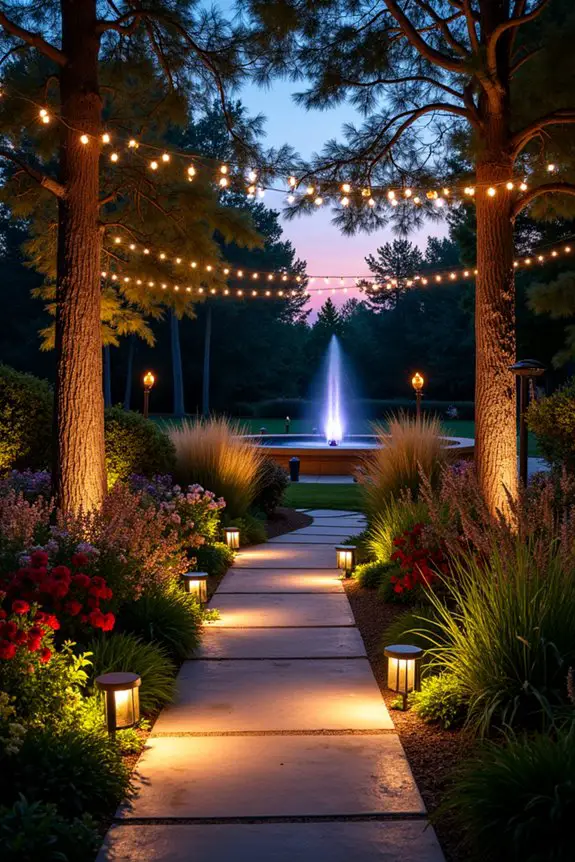
Creating the perfect atmosphere in your garden doesn’t stop with the arrangement of plants and flowers. Enter garden lighting—a fantastic way to enhance the beauty of your outdoor space while also making it functional. Imagine basking in the soft glow of lights during an evening gathering, or simply enjoying your backyard sanctuary at night while sipping tea. It adds a whole new dimension to your garden experience.
So, how do you go about illuminating your garden without feeling like you’ve turned it into a spaceship launch pad? First things first, consider the types of lighting you want to use. String lights—those magical little twinkling gems—are a great choice. They can be hung between trees or along fences to create a cozy, inviting atmosphere. Plus, they’re super easy to install; just drape them and plug them in.
I mean, if I can turn my backyard into a magical fairyland in under an hour, so can you. Pro tip: opt for solar-powered string lights. They charge during the day and shine bright come nightfall, saving you on electricity bills.
Next up are ground lights—also known as pathway lights. These come in various designs, from sleek and modern to whimsical tiki torches that might make you feel like you’re on a tropical vacation. Place them along walkways or around flower beds to provide direction and security.
Just be mindful of the installation. Digging holes for the stakes made me feel like I was training for an off-season gardening Olympics. Ah, the joys of being slightly overambitious with gardening projects.
Let’s not forget about accent lights. Spotlights and uplights can highlight your favorite plants or features, like a magnificent tree or a beautiful fountain. The trick here is to position them at an angle so the light washes downwards, casting beautiful shadows and adding depth without making your garden look like a scene from a horror movie.
Experiment a bit—remember, lighting is an art, not an exact science. If things don’t turn out as expected, just remind yourself that even the best artists had their off days.
Lastly, think about the mood you want to create. Warm white lights offer a calming vibe, while colored lights can transform your space into the ultimate party zone. You could even switch it up for different occasions; red for that cozy autumn gathering, or a cheery yellow for summer barbecues.
Just remember to keep it classy and not feel like you’re throwing a rave in your backyard, unless that’s the actual plan.
To sum it up: focus on layering different lighting types, use solar when you can, and most importantly, have fun with it. Designing your garden lighting should be an expression of your personality!
7. Garden Furniture Ideas
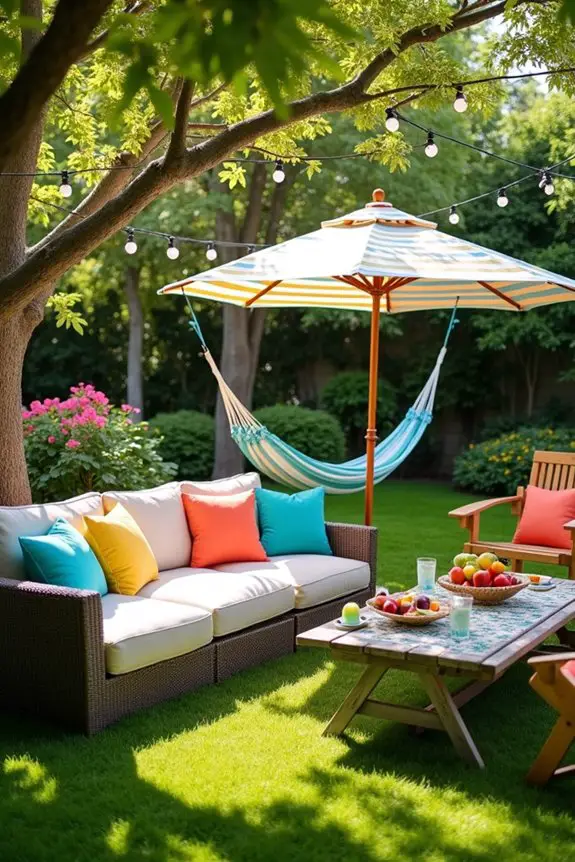
When it comes to garden furniture, think of it as the cherry on top of your outdoor cake. The right furniture not only provides functionality but enhances the overall vibe of your space, making it a cozy retreat for relaxation, entertaining, or simply enjoying nature. So, let’s explore some fun and practical garden furniture ideas that will have you lounging outside in style—without the need to bring your living room sofa into the great outdoors.
First and foremost, consider investing in a comfy outdoor sofa. It’s like having a living room under the stars, inviting you to kick back with a good book or enjoy a lazy afternoon nap. Look for weather-resistant materials that can withstand the elements—because let’s be honest, we all know how unpredictable Mother Nature can be.
A quick tip: pair it with soft, colorful cushions to give it a cheerful pop. Trust me, sitting on a pile of fluffy cushions adds an extra layer of comfort that will have you feeling like you’re at a spa instead of your backyard.
Now, if space is limited or your gardening gets a bit too ambitious (no one wants to knock over a beautiful rose bush while trying to squeeze in a table), think about using folding chairs and tables. These clever little gems can be tucked away when not in use and instantly set the scene for a garden gathering. It’s like having a built-in ‘party on demand’ option.
Plus, you can choose from a variety of styles—wooden, metal, or even colorful plastic sets that scream “fun times ahead!” Just remember to pick designs that complement your garden’s aesthetic.
If you’re feeling a bit more adventurous, a hammock could be the ultimate addition. Imagine this: you, swinging gently in your hammock, sun beaming down, a cool drink in hand. Sounds dreamy, doesn’t it?
Hammocks add a touch of whimsy and relaxation. Hanging one between two sturdy trees creates a picturesque nook where you can daydream or sneak in a nap. Just make sure it’s at the right height—nothing ruins a relaxing day more than a hammock that’s too low and leads to the sudden realization you’re basically on the ground.
Lastly, consider adding a chic outdoor dining set if you see yourself entertaining frequently. An inviting table and chair set make those summer barbecues or brunches feel somewhat fancy. To keep it approachable, I recommend mixing and matching chairs for a unique look. It’s like gathering your favorite friends around the table.
Be sure to include a large umbrella or a canopy if your garden gets too much sun—nothing says “I regret my life choices” like trying to eat a salad in 90-degree heat with no shade in sight.
And let’s not forget those little touches, like string lights or a colorful tablecloth, that can turn an ordinary meal into a memorable garden feast.
8. Water Feature Inspirations
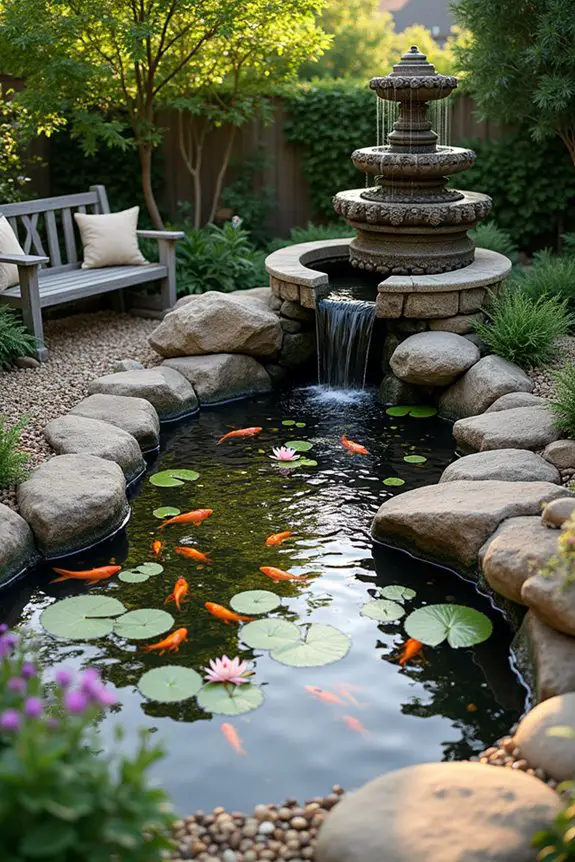
Ready to take your garden from ordinary to extraordinary? Adding a water feature can do just that. Imagine the soothing sound of water gently trickling by, inviting you to unwind and reflect. Whether it’s a small pond, a trickling fountain, or a statement waterfall, water features not only look stunning but also create a calming ambiance—perfect for those moments when you need to escape the chaos of everyday life.
Let’s dive right into some ideas for creating your own backyard oasis. One delightful option is a small tabletop fountain. If you’re short on space or don’t want a labor-intensive project, a tabletop fountain is your best friend. It can fit almost anywhere—on a patio table, a window ledge, or even a sturdy garden shelf.
When choosing your fountain, opt for one with multiple tiers, so the water cascades down in a soft, soothing manner. Plus, add some pebbles or colorful stones around the base to enhance its earthy vibe. Talk about instant zen!
If you’re feeling a bit more ambitious, think about installing a pond. This requires a little elbow grease, but trust me, the payoff is worth it. You’ll need a good spot in your yard that gets both sunshine and shade. Grab a shovel (or call a friend with one, no judgment here), and outline your pond’s shape.
A kidney shape is always trendy, creating natural flow. Here’s the fun part: once your pond is dug out, line it with a pond liner and fill it with water. You can layer in rocks and plants, and even add fish for that tranquil touch. Imagine sipping your morning coffee, gazing at the darting fish—nature therapy at its finest.
For a more dramatic effect, consider a waterfall feature. If you’re going all out, you can integrate a waterfall into a pond, creating a gorgeous focal point. Start by selecting stones for the waterfall. Stacked stones, ledgerocks, or even smooth river rocks can do wonders.
The idea is to arrange them so that the water flows from one rock to another, allowing it to spill gently over the edges. Remember, the key to a mesmerizing waterfall is to make sure it looks natural, as if it just appeared out of nowhere—Mother Nature, eat your heart out.
And let’s not forget the lights. Adding soft underwater or garden lights can transform your water feature into a magical evening escape. They create reflections that dance on the water’s surface, making everything look enchanting. It’s like bringing a little fairy tale into your backyard.
9. Outdoor Fire Pit Designs
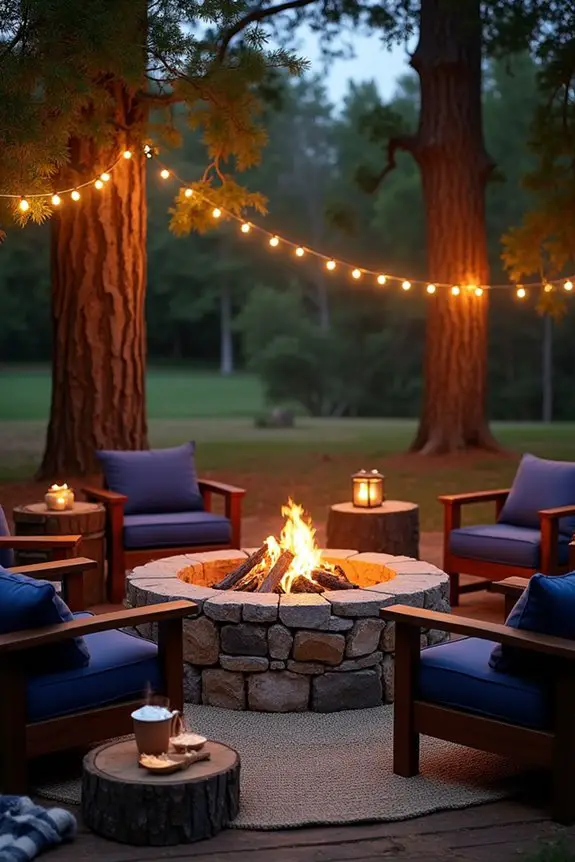
When it comes to creating a cozy and inviting atmosphere in your backyard, nothing beats an outdoor fire pit. Not only does it provide warmth during cooler evenings, but it also serves as a fantastic gathering spot for friends and family. Envision this: the sun sets, the air cools, and you’re all sitting around the fire, roasting marshmallows and sharing stories. Sounds perfect, right? Let’s explore how to create your own fire pit and make those dreamy nights a reality.
First, you’ll need to pick a prime spot in your yard. Look for a flat area away from any overhanging branches or structures. Safety first, folks! (We don’t want a tree catching fire—that’s some serious unintended drama.)
Once you’ve chosen the right location, it’s time to decide on the type of fire pit you want. There are simple ones you can buy or even DIY styles made of bricks, stones, or metal. If you’re feeling crafty, grab some medium-sized pavers and create your own circular design. Just make sure to leave enough space for yourself and your guests to gather around comfortably.
Now, onto the fun part—building it! If you’re going the DIY route, you’ll want to create a circle about three feet in diameter. Start laying the stones or bricks in a ring, stacking them if you want a bit of height. To really make it pop, take into account adding a decorative edge or incorporating some mosaic tiles. If you mess up, don’t worry. Just embrace the chaos. Who said a little unevenness can’t add character?
Now that you’ve got your fire pit looking as fine as a fall day, remember to prioritize safety. A good foundation is critical, so fill the bottom with gravel or sand before adding your firewood. It helps with drainage and keeps everything stable.
For the ultimate fire experience, use medium-sized logs—smaller sticks might just burn too quickly, leaving you with a sad, smoky pile of ashes. And don’t even think about burning treated wood or paint-covered furniture; that’ll just turn your relaxing evening into a hazardous one faster than you can say “flame.”
And let’s talk ambiance. Once your fire pit is up and running, why not add some comfy seating around it? Imagine it: some cozy chairs, throws for those chilly nights, and maybe even a roasting stick or two for those campfire classics.
But also think about the lighting. String up some fairy lights or lanterns to add a magical touch—you know, to create that romantic ‘dropped-from-a-movie’ vibe. Who doesn’t want to feel like they’re wrapped in a cozy fairytale while sharing their best ghost stories?
10. Seasonal Plant Selection Guides
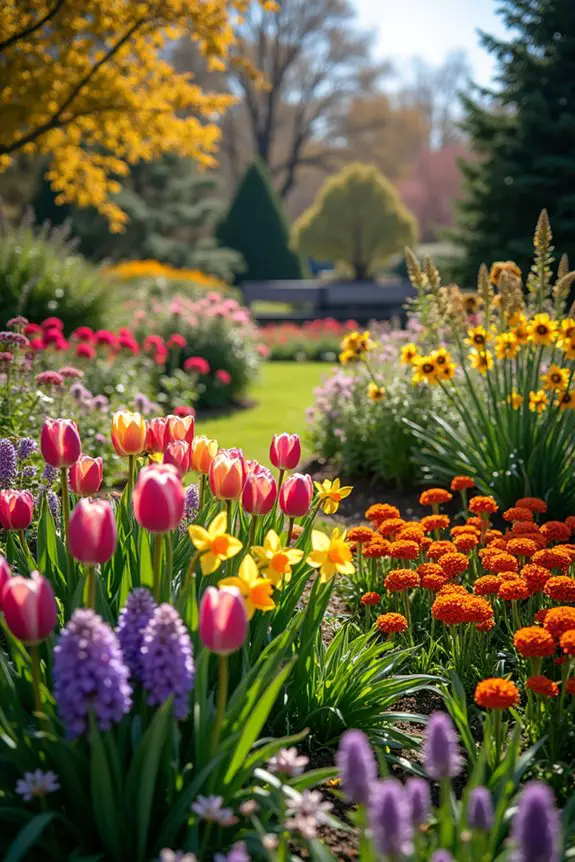
When spring rolls around and the flowers start blooming, it’s like a giant wake-up call for your garden. Choosing the right plants not only makes your outdoor space burst with color but also guarantees that your garden is thriving throughout the year. It’s like a show—and you want to be the star of it, right? So let’s plunge into how to select the best seasonal plants to elevate your garden game, both in beauty and in health.
First off, knowing your local climate is essential because plants are like people—some thrive in the heat while others are all about that cool, crisp air. Take time to check the USDA Plant Hardiness Zone Map, which can help you figure out which plants will flourish in your region. Once you’ve nailed that down, make a list of the seasonal plants available, grouped by their growing seasons: spring, summer, fall, and winter. Yes, I know it sounds like homework, but it’s much more fun when you get to pick shiny new plants instead of cramming for a test.
For spring, think about vibrant colors like tulips, daffodils, and hyacinths. These guys aren’t only beautiful but also bring a sweet scent that can cheer you right up after those long winter months. To plant them, pick a sunny spot, dig a hole about twice the size of the bulb, pop it in with the pointed side up (trust me, it does matter), and cover it back up. Water that baby well but don’t drown it—I once drowned a poor bulb and regretted it ever since.
As we head into summer, it’s time to switch gears and think heat-loving plants like zinnias, marigolds, and sunflowers. They thrive when the temperature rises and bring a joyful, sunny vibe to your garden. When planting, space them out as indicated on the seed packets—this is your chance to practice social distancing in the garden. Remember, crowded plants often end up stunted. It’s like trying to have a thoughtful conversation in a room full of shouting people—chaotic.
When fall approaches, consider adding seasonal favorites like asters, goldenrods, and ornamental grasses. These plants not only look gorgeous but also provide habitats for birds and other wildlife, adding variety to your garden ecosystem. Regarding planting, you can actually plant a bit earlier in the fall to help them establish roots before winter comes knocking. Just remember to mulch afterward; it’s like giving your plants a cozy blanket to snuggle in.
And let’s not forget winter. Evergreens, holly, and winterberry can keep your landscape lively even in the cold months. They act as beautiful accents in your garden while providing shelter for birds. Plus, those bright red berries? They add a pop of color against the snow. When planting, make sure to give them enough space to grow, and if you’re in an area with high snowfall, use windbreaks to protect them from the harsh winter winds.
Gardening Tools for Every Budget
After you’ve put some thought into choosing the right plants for each season, it’s time to chat about the tools that can make gardening a little easier and a lot more enjoyable.
Whether you’re on a tight budget or ready to splurge, there’s something for you. A sturdy trowel and a pair of good gloves are essential, but you can also find budget options that hold up beautifully.
Think about a compost bin or basic watering can—little investments that make a big difference. Ever tried to dig with a flimsy shovel? Not fun. So, splurge a bit on a solid one. Trust me, your back will thank you.
Find joy in the process, and get the tools that speak to your gardening soul.

