So, you think about sprucing up your home with a herb garden, huh? Whether you’re an aspiring chef or just love the smell of fresh basil in the kitchen, there’s a design that fits your space perfectly. From raised beds to the artful chaos of a spiral arrangement, each option can transform your cooking—and your vibe. Curious about how to blend beauty and practicality in your very own herb oasis? Let’s explore those designs that might just inspire your next project.
Creative Vertical Garden Ideas
Ready to spice up your herb garden? You don’t have to stick to the ground—creative vertical garden ideas like raised beds or herb spirals can breathe new life into your space.
Whether you’re container gardening or going for a themed layout, there’s a whole world of lush edible landscaping to explore, and trust me, your meals will thank you later.
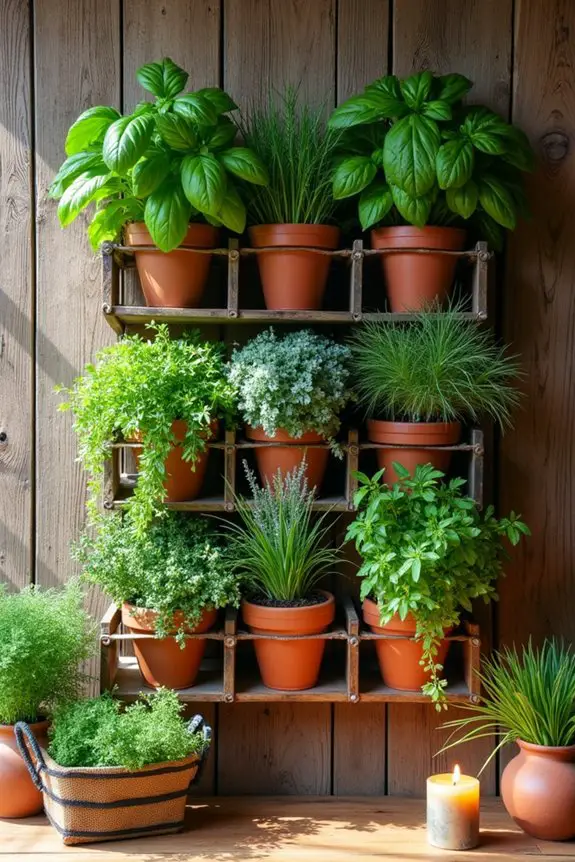
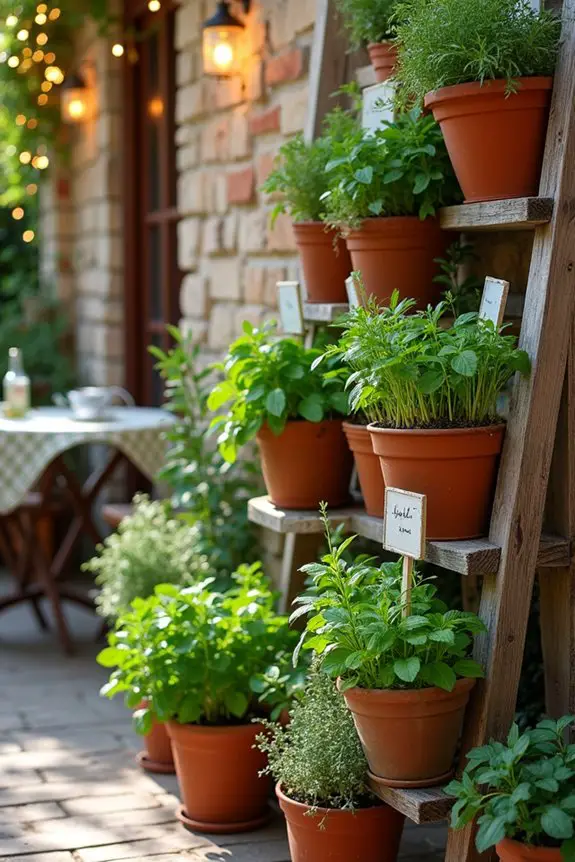
1. Raised Bed Arrangement
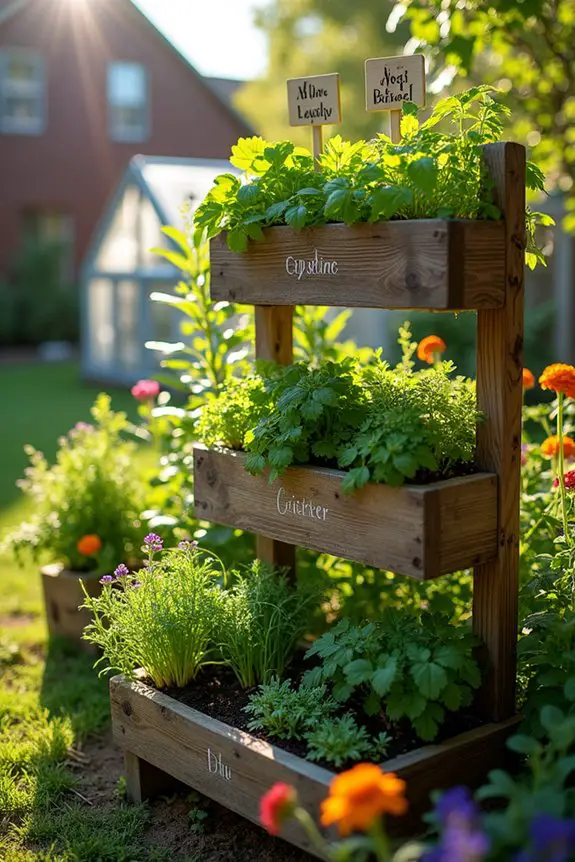
Are you ready to elevate your herb garden game? Let’s chat about raised bed arrangements that not only save your back when planting but also bring a stunning visual element to your outdoor space. Envision this: vibrant greens and fragrant herbs growing upwards, turning your garden into a mini botanical paradise. It’s not just functional; it’s downright charming.
So, how do you make this happen? First, start with some wooden pallets or tiered planters. These are perfect for creating that vertical garden look. If you’re feeling fancy (and let’s be real, who doesn’t want to feel fancy?), consider building a multi-level planter with different compartments. Then, fill each section with your favorite herbs like basil, cilantro, and chives. Not only does this save space, but it also gives you a beautiful display that draws the eye and makes your yard feel lush and inviting.
When assembling your raised beds, make sure to stagger them for visual interest. Think of it like a well-placed stair step leading your guests’ eyes up to deliciousness.
And here’s a tip: use a good mix of soil! You want something rich and fluffy, which keeps your plants happy and reduces the chance of pesky weeds showing up. Speaking from experience, having a solid soil mixture is like having a good friend—you can’t do life without them, especially when you’re elbow-deep in dirt.
As you plant, remember to think about light. Some herbs love sunshine, while others prefer a bit of shade. So, arrange accordingly—some like it hot, while others are more about that chill vibe. Adding a mini pop-up greenhouse can also help in creating an optimal environment for your herbs to thrive throughout different seasons.
And don’t forget to add a little flair. You can personalize your garden with cute labels for each herb. Trust me, nothing says “gourmet chef” quite like having fresh basil labeled with an adorable stake.
Lastly, keep it fun. Experiment with the herbs you like and don’t be afraid to swap things out as the seasons go. I’ve tried to grow mint before—and let me tell you, it took over like an enthusiastic party guest.
But hey, mint in your iced tea? Divine. So, get creative, embrace the mess, and enjoy the process of cultivating your own magical herb garden.
2. Herb Spiral Arrangement

Looking for a way to bring a unique touch to your herb garden while making the most of space? Consider the herb spiral arrangement. This design not only maximizes your planting area but also creates a stunning visual centerpiece that’s sure to impress.
Imagine spiraling greens that look like they were plucked straight from a Pinterest board—it’s both functional and downright artsy.
So, how do you get started with this creative vertical garden idea? First, you’ll want to choose your location wisely. Pick a spot that gets plenty of sunlight—especially for those sun-loving herbs like rosemary and oregano.
Build a spiral structure using stones, bricks, or even wood. The idea is to create a spiral shape that rises upward, with the base wider and the top narrower. It’s like creating a cozy spiral staircase for your plants.
Once your base is ready, it’s time for the fun part: planting! Start at the bottom, where the soil will stay moist longer, and place herbs that enjoy more water, like basil and parsley. Installing a soaker hose system can help provide consistent moisture to these water-loving herbs.
As you spiral up, opt for the drought-tolerant herbs like thyme and sage—these guys love a little dryness. This setup not only looks great but also allows each plant to thrive in its ideal conditions.
Don’t forget about the colors and textures of your herbs. Mixing the different shades of greens with bursts of purple basil or the silver tones of sage gives your spiral a lively character.
Plus, consider adding some flowers, like nasturtiums, to attract pollinators and provide an extra pop of color. Who wouldn’t want buzzing bees and fluttering butterflies in their garden?
As you plant, make sure to keep the spacing in mind so you don’t end up with a jungle of herbs fighting for room. I’ve made the rookie mistake of cramming too many plants into one spot, and it was like a vegetable version of the Hunger Games.
Touching on maintenance, verify you regularly check for weeds and keep your herbs pruned—they’ll thank you by flourishing like a celebrity on vacation.
And here’s a tip straight from my garden mishaps: label your herbs if you plan on growing similar varieties. Nothing is more awkward than mistaking your cilantro for parsley in the middle of cooking.
Trust me; I once made that mistake during taco night and let’s just say the flavor was… unexpected. But hey, that’s part of the learning process, right? Additionally, consider implementing a liquid fertilizer dispenser to simplify the feeding process and ensure your herbs receive balanced nutrients consistently.
3. Container Style Layout
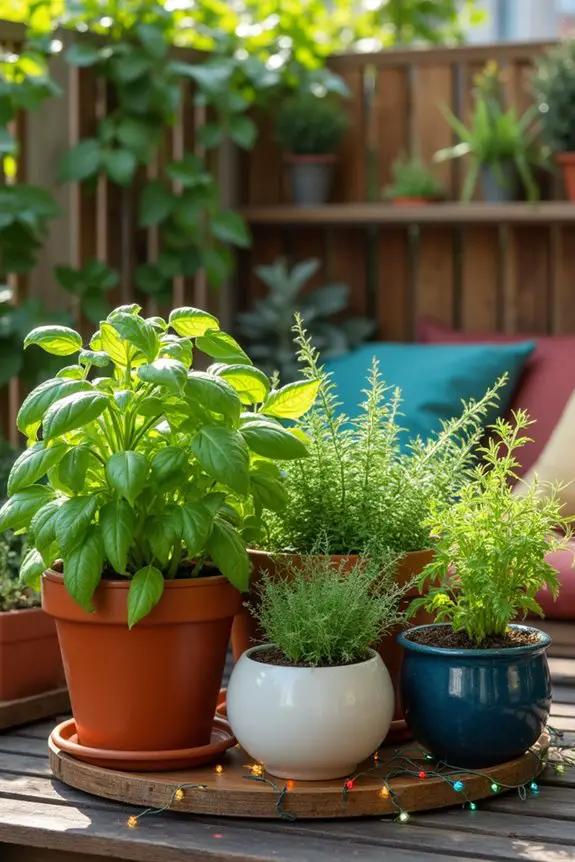
When it comes to maximizing your gardening space while keeping things stylish, nothing beats the versatility of a container style layout. This approach allows you to arrange your herbs beautifully, whether you have a tiny balcony or a spacious patio. You can mix and match pots, creating a visually dynamic and cozy vibe, perfect for showing off your culinary green thumbs.
To engage with this creative layout, start by gathering an assortment of containers in various shapes, sizes, and materials. Terracotta pots, ceramic planters, repurposed wooden crates— the possibilities are endless. Arrange them in a way that feels natural and inviting, maybe clustering them together or placing them along a garden path to guide the eye.
And hey, don’t stress too much about symmetry; a little chaos can make your herb garden feel more organic and alive.
Next, think about what to plant in each container. Take a quick inventory of the herbs you want to grow—basil, mint, chives, and dill could all make it on your list. One handy tip: group herbs with similar water and light needs together. For example, keep mint in a pot by itself because this guzzler tends to invade any container it shares. Oh, the horror of mint takeover—it’s like an uninvited guest at a party that just won’t leave.
As you start planting, layer in some good-quality potting soil, and don’t skimp on the nutrients. Your herbs will thrive with a mix that keeps them happy, just like we do with pizza and ice cream. When planting, make sure to leave some space at the top of the pot; this prevents soil spillage during watering and lets your herbs breathe. Water them gently but thoroughly—like giving them a revitalizing drink after a long day.
One personal tidbit: I once placed a tiny little basil plant in a gigantic planter expecting it to flourish as a solitary star. Spoiler alert: it turned into a big pot of disappointment. Remember, size matters in the container world—pick a pot that fits the herb’s potential. Herbs like cilantro might appreciate a bit more room, while smaller herbs like thyme can thrive in compact spaces.
For style points, consider adding twinkling fairy lights around your containers or bright-colored plant markers. These little touches can really bring your garden to life as the sun sets, creating a magical herb oasis.
And don’t forget to give your containers a little TLC; check for draining holes, remove any dead leaves, and make sure they don’t become waterlogged.
Lastly, make a habit of rotating your herbs occasionally to prevent them from leaning toward the sun. Trust me, they’ll grow stronger and straighter with this little workout, leaving you with the most impressive herb garden on the block.
4. Lush Edible Landscaping Techniques
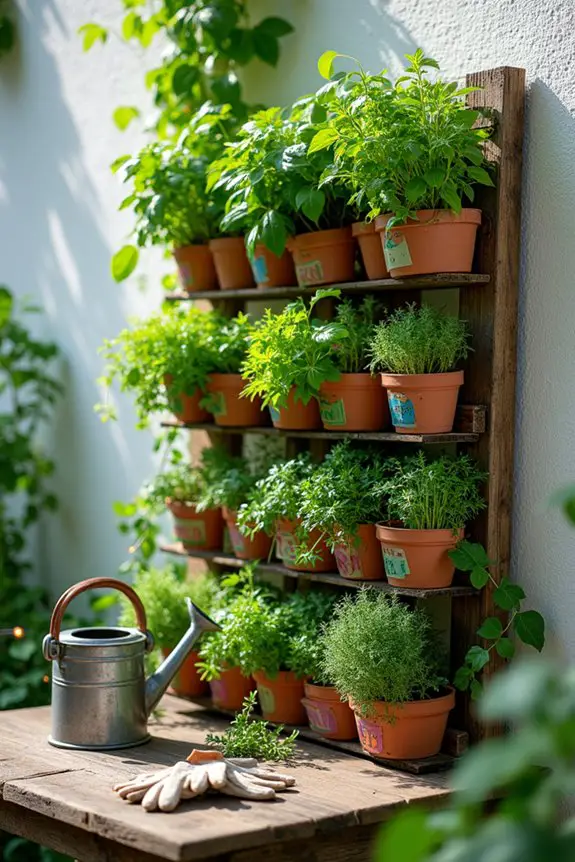
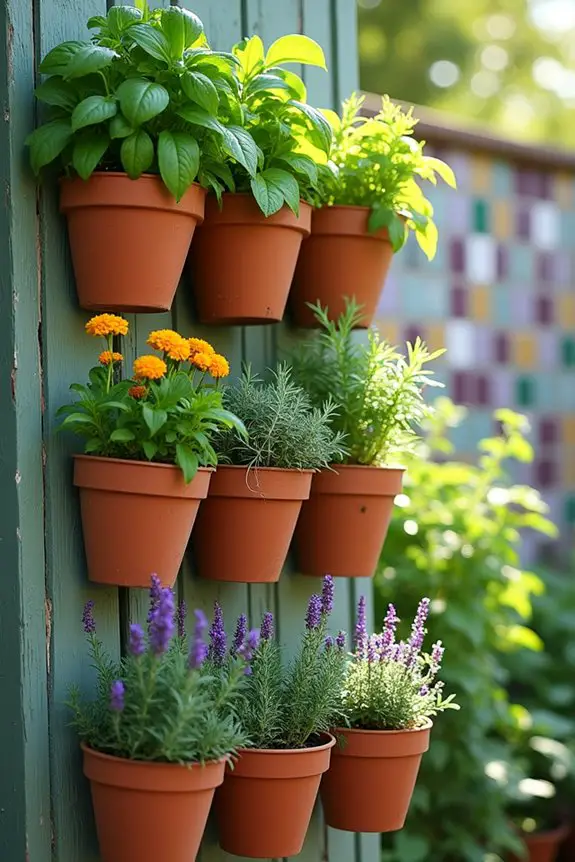
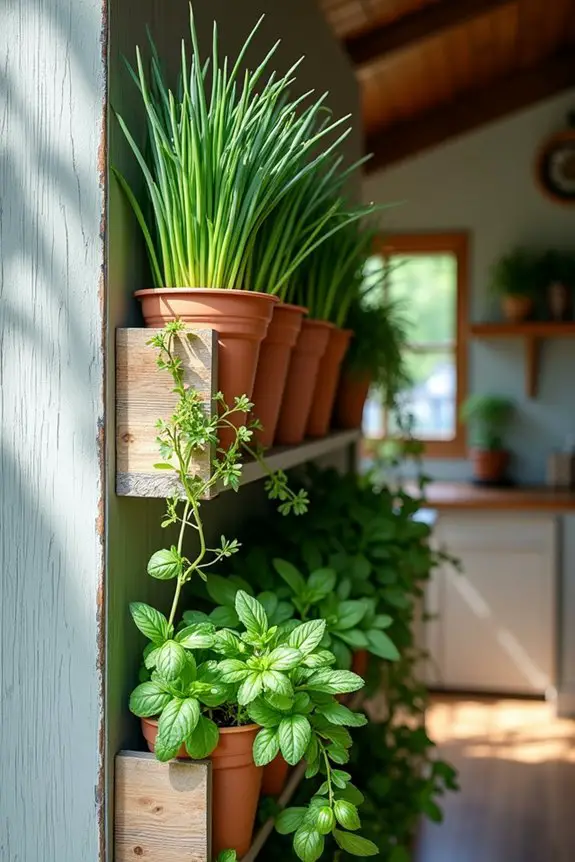
When it comes to creating a lush and inviting edible landscape, vertical gardening is a fantastic approach. It not only saves space but also adds an eye-catching element to your garden that just feels fresh and vibrant. Imagine lush herbs cascading down from a wall or climbing up a trellis—it’s like bringing a piece of nature into your home while also treating your taste buds.
To nail this vertical garden idea, start by selecting a wall or fence that gets good sunlight. You could also use a sturdy balcony railing or even hang planter boxes. Once you’ve chosen your spot, it’s time for some creative planning. You can use wall-mounted planters, vertical garden kits, or hanging pots. I personally love the look of repurposed wooden pallets—just give them a coat of weatherproof stain, and you instantly have a rustic herb display. Who knew old wood could look so good?
Now, let’s get into the nitty-gritty of planting. Choose herbs that can thrive in a vertical setting, like climbing varieties such as peas or even espaliered tomato plants. For the folks who want a variety, even compact herbs will work wonders; think parsley, rosemary, and chives.
Just remember to plant the sun-lovers higher up and move the shade-preferring herbs lower. Otherwise, you might end up with a scenario where your shady herbs are sulking while their sun-loving pals bask in glory—talk about drama.
Here’s a fun tip: when securing your vertical garden, don’t forget about proper drainage. Verify your pots or containers have holes at the bottom, or else you might create a soggy herb soup, which isn’t what we’re aiming for here.
Watering them can be a bit tricky, so consider an irrigation system or a drip watering setup. It’s like setting up a small spa day for your plants; who wouldn’t enjoy that?
And here’s a little secret that might save you some tears: don’t overcrowd your plants. Each herb needs its fair share of space to grow and breathe. When I first started my vertical garden, I crammed in too many herbs, and it turned into a tangled mess that could rival Rapunzel’s hair.
So, to avoid my mistake, be generous with spacing.
Finally, let your personality shine through by decorating your vertical garden with unique plant tags, fairy lights, or even colorful pots. It’s great to place your herbs in a way that complements your outdoor décor; after all, they’re not just there for eating—they’re also part of your style.
Creating a vertical garden isn’t just about food; it’s about embracing a lively atmosphere that soothes the soul, one herb at a time. Now, get out there and start stacking those greens!
5. Theme-Based Herb Garden Layouts
When it comes to sprucing up your vertical garden, think theme-based layouts! This approach not only gives character to your space but also makes it functional and fun. Imagine a Mediterranean herb corner, bursting with vibrant greens and familiar aromas, or a sweet little tea herb nook right on your patio—how delightful does that sound?
So, how do you create these themed spaces? First off, choose a theme that excites you—maybe “Italian Bistro” with basil, oregano, and thyme, or “Herbal Tea Haven” featuring chamomile, lemon balm, and lavender. Envision what you’ll cook or brew, and go from there.
Next, find a suitable vertical structure—think wall-mounted pockets, tiered planter racks, or hanging containers—something that matches your style and theme. For my Italian Bistro garden, I used rustic terracotta pots that reminded me of little cooking adventures in Florence.
Now, onto plant selection. Read up on each herb’s growing conditions so they can coexist happily. For instance, the bold and sunny basil loves its sunshine and should be positioned higher up, while the more laid-back oregano can lounge below. When I tried to grow them all together haphazardly, I ended up with a showdown for light, and let me tell you, it wasn’t pretty.
Spacing is vital—give each herb room to breathe. A good rule of thumb? About six inches apart. It keeps them from getting too cozy, ensuring they can grow tall and strong instead of turning into a tangled mess. Trust me; I once ignored this tip and ended up with a planter that looked like it was suffering from an identity crisis.
Add personality to your theme by incorporating decorative elements. Some twinkly fairy lights can turn your herb haven into a dreamy spot at night, and unique plant markers can help you remember what’s what—unless you want to play “guess the herb,” which can get confusing. I mean, really, who wants to mistake rosemary for thyme in the middle of cooking?
Finally, let’s talk maintenance—it’s your gardening love language. Regularly pruning and harvesting not only keeps your herbs healthy but also encourages growth. Think of it as a way to connect with your plants, snipping away to promote freshness. And believe me, there’s nothing quite like prepping dinner with homegrown herbs in your sauce—a true culinary win.
With each themed vertical garden you create, not only do you enhance your space, but you also cultivate a little piece of joy that reflects your personality. So why not start planning your herb garden layout today? After all, every culinary adventure deserves a beautiful, fragrant backdrop.
6. Culinary Herb Garden Design
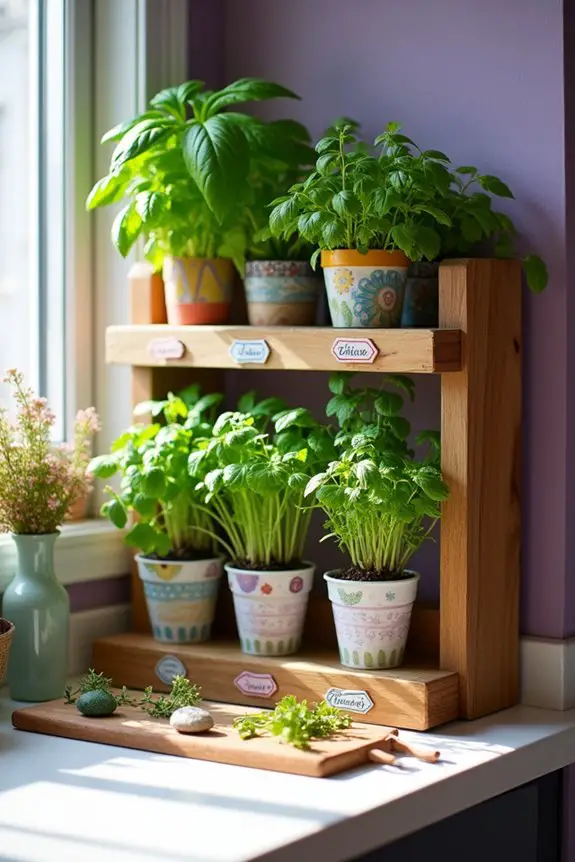
When it comes to cooking, having fresh herbs at your fingertips can turn a simple dish into a culinary masterpiece. That’s why creating a culinary herb garden isn’t only functional but also delightful. Envision this: stepping into your kitchen, grabbing a handful of vibrant basil or a sprig of mint, and knowing it’s all just a short reach away. It’s like a mini adventure every time you cook!
To get started, choose a vertical planter that matches your kitchen’s style. Do you have a modern aesthetic? A sleek metal rack could be just the thing. Maybe you lean toward rustic charm? Then a wooden tiered planter might be your best friend. Whichever you pick, make sure it’s sturdy enough to hold your herbs, as those little green wonders tend to get quite leafy.
Next up is the all-important plant selection. Opt for herbs that you enjoy cooking with the most—basil, parsley, dill, and cilantro are always crowd-pleasers. When I started my culinary herb garden, I made the rookie mistake of planting all my herbs together, thinking they’d get along—oh, the drama. Some herbs thrive in sun, while others prefer a bit of shade, so it’s essential to do your homework on each herb’s needs. Basil loves its sunny spotlight, while cilantro is a bit shy and prefers cooler temps.
Remember, knowing your herbs is key. And read up! Trust me, no one wants to be surprised to find their basil wilting in the corner of the garden.
Spacing is another important detail. I once crammed five herbs into a space meant for three, hoping it would look lush and vibrant. Instead, it looked like a messy hairball. A good rule is to give each herb about six inches of space—this way, each plant can grow without competing for nutrients and light. Plus, this spacing allows you to easily reach for those aromatic leaves when you need them.
Now, let’s talk about aesthetics. Consider adding some fun decorative pots or unique plant markers—these can create a wonderfully whimsical vibe in your garden. I’ve found that painted rocks or playful tags not only add charm, but also help me keep track of where I planted what.
And, believe me, this is a lifesaver during busy cooking moments when I’m grabbing herbs at lightning speed.
Finally, don’t forget about the connection. Regularly harvesting and pruning your herbs isn’t just good for their growth; it’s a way to bond with your little green friends. I can’t tell you how satisfying it’s to snip some fresh thyme or remove a few leaves of basil, knowing they’re ready for my next culinary adventure.
Just be cautious. Over-harvesting can leave your herbs feeling a bit too skinny, and nobody wants that.
With your culinary herb garden in full swing, you’ll find that cooking becomes even more enjoyable. Imagine the fresh flavors hitting your dishes, and the extra pride you’ll feel knowing it’s all homegrown. A little creativity and care go a long way in making your kitchen a flavorful sanctuary, one fragrant herb at a time. Additionally, using galvanized raised beds can enhance your gardening experience and provide durability for your herbs.
7. Symmetrical Pathway Arrangement

When designing a garden, symmetry can bring a beautiful balance that’s both eye-catching and functional. Imagine strolling through a pathway lined with perfectly placed plants, all in neat rows as if nature itself decided to play a little bit of architect. Not only does this arrangement make it easier to navigate your garden, but it also creates a lovely aesthetic that feels ordered and purposeful.
To start your symmetrical pathway arrangement, first choose a zone in your garden where this design can shine. Ideally, you want an area that will be the focal point, maybe leading to your cozy seating area or the entrance to a charming shed. Once you have your spot, grab a garden hose or some stakes and string to outline your pathway—this will help you visualize the layout before you plunge into digging!
Now, let’s talk about the plants. A symmetrical garden thrives on repetition, so select a couple of herb varieties that you love and can plant in pairs or groups. Think about how mint’s bright green leaves could flank both sides of your path while rosemary adds an earthy touch.
When I first tried this with my garden, I aimed for a variety of herbs to create a mini jungle. Instead, I ended up with a clash of colors and textures. Stick to a few plants, spaced evenly apart—about two to three feet between each set should do the trick. This gives them room to grow and allows you to enjoy their beauty without a tangled mess.
Once your plants are in place, consider adding in some decorative elements to enhance that symmetrical vibe. Think about using stone pavers or bricks to create a defined path. I’ll never forget my first attempt at this—with mismatched stones and a few sharp edges, it looked like I was trying to recreate a mountain trail in my backyard.
So, be sure to measure your stones before laying them down to achieve that clean, polished look. Adding lighting or decorative lanterns along the sides can also amp up the charm in the evening, making for a peaceful stroll under the stars. Additionally, choosing the right garden hose length can save you time and effort when watering your herb plants.
Lastly, remember to keep things tidy. Regular maintenance is key to preserving symmetry. Prune your herbs so they stay well-shaped, and if one side seems to be growing faster than the other, a handy trim will help even things out.
It’s incredible how a little care can keep your garden looking like a beautifully orchestrated performance rather than a chaotic jam session. And while you’re at it, don’t forget to stop and appreciate your work. Grab a sprig of those herbs and think about how rewarding it’s to cultivate your very own balance of nature. Happy gardening!
8. Colorful Mosaic Tile Design
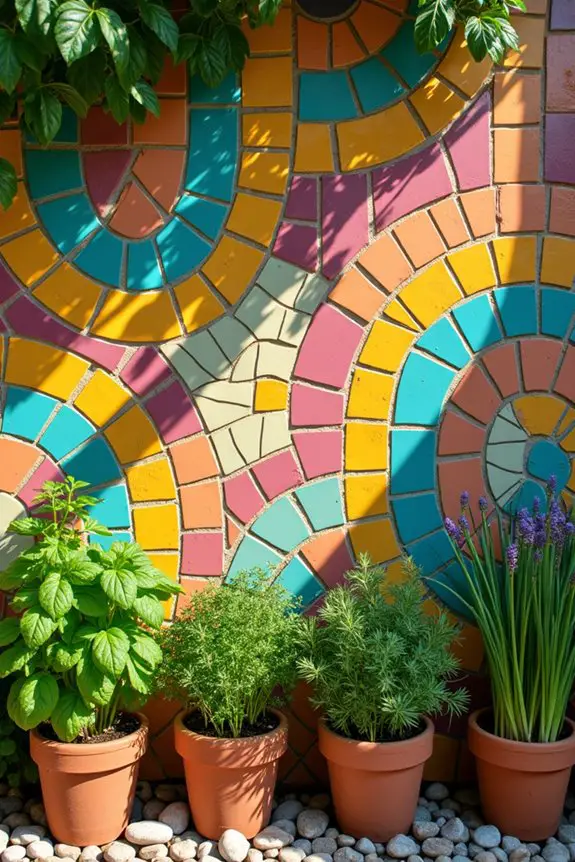
Creating a colorful mosaic tile design in your herb garden not only adds a splash of personality, but it’s also a fantastic way to maximize vertical space, especially if you’re working with a compact area. Plus, who wouldn’t want to showcase their culinary herbs with a backdrop that feels like a work of art? This design strikes a balance between functionality and artistic expression, drawing the eye and enticing you to wander through the vibrant space.
To create your mosaic tile masterpiece, begin by selecting a variety of colored tiles. You can visit your local hardware store or check out second-hand shops for some unique pieces. When I tried this out, I thought I could only use the traditional terra cotta tiles, but let me tell you—after mixing in turquoise, mustard yellow, and a cheeky splash of fuchsia, my garden transformed from mundane to marvelous. Just imagine a pretty pattern with the tiles leading up to an herb vertical wall!
Once you’ve gathered your tiles, sketch out a rough design on paper or in your mind. Don’t worry about being a master artist here; a simple geometric pattern or even an abstract swirl works. Picture arranging the tiles in a way that naturally draws your eye towards your flourishing herbs.
Next, prepare the area where your herb garden will sit. Dig a shallow trench that will hold your tiles. The depth of this trench should be about one inch; just deep enough to keep them secure.
Now, it’s time to lay down those beautiful tiles. Start at the bottom of your design and work your way up, like building a stylish staircase. Use a strong adhesive to set your tiles in place; make sure to leave small gaps between each tile for grouting later—think of it as giving them personal space. While working, I learned the hard way to level out each tile right away to avoid the dreaded “lopsided look.” No one wants their tiles appearing to slide off the wall like tired soldiers.
After the tiles are all glued into place, it’s grouting time. Use a premixed grout and apply it into the gaps with a grout float, smoothing it out until it’s even. If you’re anything like me, you might get grout everywhere at first, including your shoes and, quite possibly, your hair. But don’t sweat it; it washes off! Allow your grout to dry according to the package instructions. This is a great time to kick back with a cup of tea and admire your handiwork, not that you’re avoiding the cleanup or anything.
Finally, once everything is set and dried, you can plant your favorite herbs right in front of your stunning mosaic backdrop. Basil, parsley, and chives look particularly great against those colorful tiles. It’s amazing how the vibrant colors add a touch of joy and creativity to your garden while providing fresh ingredients at your fingertips.
In the end, embracing a colorful mosaic tile design can elevate your herb garden from basic to extraordinary. It’s a chance to express yourself and showcase your herbs in a way that brings both joy and functionality to your culinary adventures. So, gear up, get your hands dirty, and let your creativity run wild. Who knows, you might just end up with a garden that turns heads and sparks conversations.
9. Herb Garden Color Schemes
One of the most creative ways to design your herb garden is through carefully chosen color schemes. Not only do colors serve to beautify your space, but they also help define different areas or plant types, making it easier to navigate your garden. Imagine walking through your vibrant vertical herb wall, where the greens of basil and mint pop against complementary shades of lavender and marigold tiles—each pathway of color feels inviting, cheerful, and utterly revitalizing.
To start with this fun project, let’s think about the color palette you want to use. Are you feeling drawn to cool hues like blues and purples? Or perhaps warm tones like yellows and oranges speak to your sunny disposition? Either way, you’ll want a mix of colors that not only makes your herbs look fabulous but also reflects your personal style. A good rule of thumb is to stick to three or four colors that complement each other—kinda like a well-balanced plate of food, right? Too many colors can be overwhelming, so keep it simple.
Once you’ve decided on your colors, begin by selecting your herb varieties. Consider your space and the overall look you’re going for. For example, if you lean towards a tranquil vibe, think about incorporating soft greens and calming blues with herbs like rosemary and sage. On the other hand, if you want energy, grab bright basils and garnishes nestled next to vibrant marigolds. The contrast creates an eye-catching display that makes your herbs feel like they’re part of a bigger, living tapestry.
Next, focus on layout. If you’re utilizing vertical space, consider arranging your herbs according to their color. For instance, you can stack pots in a gradient that flows from light to dark or arrange them in clusters of similar colors. I once tried to create a rainbow effect, but in my quest for creativity, I misjudged the height of my pot arrangements, and suddenly, my rainbow looked more like a jumbled mess.
So, go for aesthetics but verify your plants get adequate sunlight. Don’t forget to put thought into your backdrop too! You can opt for painted wood panels, latticework, or even another mosaic tile design that complements your color scheme. Remember: the backdrop should enhance the vibe without stealing the show. It’s all about balance, just like that time I tried to make a salad without dressing—let’s just say it didn’t go as planned.
Lastly, as you plant your herbs, take a moment to enjoy the process. As you dig, plant, and water, you’re not just creating a colorful space; you’re also cultivating a little piece of joy that’s all your own. Even if the color scheme doesn’t turn out exactly as envisioned, the personal touch you add will keep the garden feeling vibrant and lively.
And hey, every little imperfection in your herb garden tells a story—like the time I forgot to label my plants and confused my cilantro for parsley. But that’s a story for another day.
10. Seasonal Herb Garden Layout
Creating a seasonal herb garden with a creative vertical layout isn’t just functional; it’s a game-changer for your gardening experience. By utilizing vertical space, you not only save room but also add layers of beauty and visual interest to your environment. Imagine a vibrant, green tapestry cascading down your walls, full of fresh herbs just waiting to be snipped for your culinary adventures.
To get started, consider using wall-mounted planters, which are perfect for herbs that love to climb, like thyme or creeping rosemary. You can easily assemble a vertical garden with simple materials like wooden pallets or repurposed crates. Just attach those containers to a sturdy wall, add your potting mix, and voila—your herbs are off to a great start.
I once thought I could just stick pots on my balcony railing… let’s just say a gust of wind turned that idea into an unintentional herb shower for the neighbors below. So, stick to secure setups.
Selecting herbs that thrive in your specific season is essential. In early spring, go for cool-weather crops like chives and parsley; they love a bit of chill. Once the heat of summer rolls in, you can bring in warmer options like basil or cilantro. It’s like rotating your wardrobe with the seasons—nobody wants to wear flip-flops in a snowstorm.
Keep in mind, too, some herbs like basil need more sun than others. Position them accordingly; nobody wants to play hide-and-seek with sunlight.
When you’re planning the arrangement, try pairing herbs with similar watering needs. For instance, put your water-loving mint directly below your drought-tolerant rosemary—just be cautious, or things could get swampy. And if you’re like me, and tend to forget about watering from time to time, consider self-watering containers. They’ll help keep your herbs happy while you live your busy life.
Do keep a seasonality theme in mind when planting. You can go all-out autumn with hardy herbs like sage and thyme that suit stews and roasts, or embrace fresh summer flavors with bright basil and dill. This creates not only a stunning visual but a delightful kitchen routine where you tailor your meals to whatever is flourishing outside.
Finally, as you enjoy the process, don’t hesitate to switch things up as the seasons change. Embrace your creativity! Maybe try creating a “herb wall” with a striking color scheme from the herbs and their containers, so your vertical garden looks chic while serving as an aromatic larder.
Maintenance and Watering Strategies
As you’re tending to your herb garden, you might wonder how to keep those plants happy and thriving.
Watering’s key—consistency is your best friend. Give them a soak once a week, but don’t drown them. Tailor your schedule to the seasons; herbs love sunlight but can get thirsty in the summer heat. If you’re like me, you might forget from time to time, so setting reminders can help.
Water your herbs weekly, keeping in tune with the seasons to ensure they thrive in sunlight and heat.
Fertilizing is just as important—use a balanced fertilizer every few weeks to really boost those flavor profiles. Think of it as a little spa treatment for your lovely herbs.
And remember, pruning isn’t just for looks; it encourages growth too. So, don’t hold back—trim those leaves and enjoy your delicious herb garden ideas.

