A dull, bare wall is like a blank canvas waiting for a masterpiece, while a vibrant garden wall bursts with personality and life. Ever thought about how a few plants could transform your space? You don’t need a green thumb to create an eye-catching display. Let’s explore some clever design ideas and tips that’ll turn your wall into a stunning living tapestry. Trust me, you won’t want to miss this transformation journey.
Vertical Garden for Limited Space
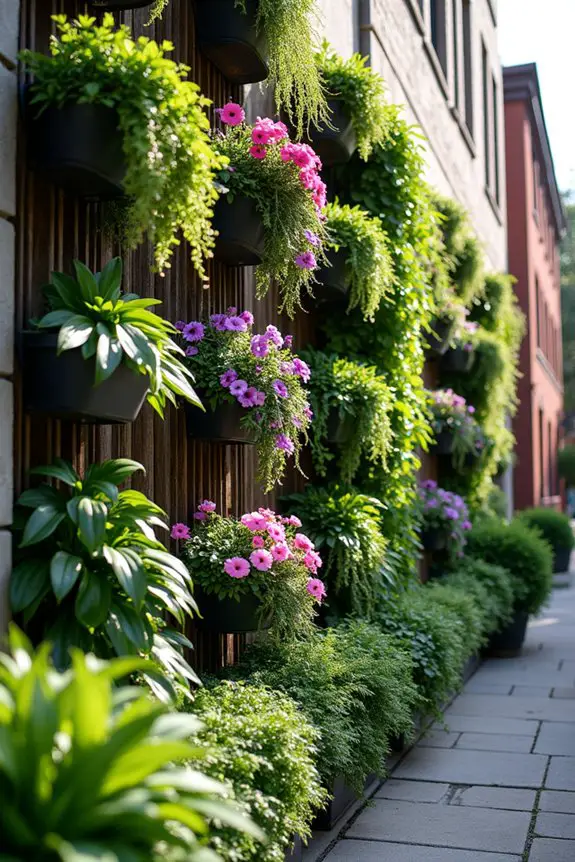
If you’re dealing with limited space, a vertical garden could be your best friend.
Think about how you can select and place your plants just right, creating a vibrant tapestry that draws the eye upward. You’ll want to play with different arrangements and consider nature-inspired colors to really bring the wall to life—and who doesn’t want a bit of fresh greenery to brighten up their small nook?
1. Plant Selection and Placement
When it comes to creating a stunning vertical garden in a tiny space, plant selection and placement are key. It’s like arranging your favorite ingredients in a dish; the right combination can make your garden feel vibrant and alive. Plus, carefully chosen plants can enhance not just aesthetics but also air quality. Who wouldn’t enjoy a revitalizing atmosphere while tending to their marvelous green wall?
First off, consider choosing a mix of flowering plants and foliage to create depth and interest. Think about adding some trailing varieties, like ivy or cascading petunias. They give a delightful drape that softens hard surfaces. Vertical garden wall planters can be a perfect solution for displaying your chosen plants in an organized manner.
Meanwhile, sturdy plants such as succulents or ferns provide that cushion of greenery that makes your eyes smile. Layering your plants from largest at the bottom to smallest at the top creates a sense of organized chaos, much like a well-stocked spice rack.
Now, let me toss in a little tip: don’t forget about sunlight! Different plants have different light needs, so make sure you match your leafy friends with the right amount of sunshine. If your space is shady, opt for shade-loving plants like ferns or certain types of philodendrons. They thrive in dim light and won’t sulk in the shadows. It’s all about finding that perfect match, like peanut butter and jelly, right?
Next, consider the actual placement of your plants. When arranging them, try grouping similar ones together for a cohesive look, and sprinkle in a few contrasting textures for visual pizzazz. This not only makes your design pop but gives your wall that trendy vibe that everyone’s talking about.
And let’s be honest, we all want to impress our neighbors with our green thumb skills, even if it’s just a tad inflated, like that one time I tried to grow tomatoes on my balcony. Spoiler alert: they didn’t quite make it.
Finally, think about your garden wall’s maintenance. Choose plants that aren’t only pretty but easy to care for. Like that mythical friend who always has their act together, simple-to-maintain plants can save you the hassle of constant upkeep.
Maybe choose a few vibrant, hardy varieties that look good even when neglected. Trust me, your future self will thank you every time you glance at that beautiful wall. Additionally, considering fabric aeration pots can enhance root growth and help your plants thrive even in compact spaces.
2. Plant Arrangement Strategy
When it comes to arranging plants in your vertical garden, strategy is key. Think of it like assembling a colorful plate of food; balance and variety create a visual feast. The right arrangement not only maximizes your precious space but makes your green wall a conversation starter, turning heads and raising eyebrows.
Start by organizing your plants in tiers, using the height of each variety to your advantage. Picture it: larger plants at the bottom—like big, hearty lettuces or tall ferns—creating a lush foundation. Then, stack medium-sized treasures, such as vibrant petunias or cheerful violets, above them. Finally, cap it off with smaller plants like aromatic herbs or dainty trailing vines that cascade down like a delicious drizzle of balsamic glaze. This layering creates depth and makes your garden wall feel alive, almost like a multi-layered cake.
Speaking of cakes, how about a little grouping magic? Cluster plants with similar care needs together as if they were old friends gathered at your favorite dinner spot. Grouping like this not only simplifies your watering schedule but helps each plant thrive happily in its environment.
And don’t forget to sprinkle in some surprise guests—a contrasting texture or color can really jazz things up! Maybe throw in a quirky succulent or a striking flowering plant to keep things exciting.
Now, here’s a secret: consider your wall’s light exposure when arranging. Those sunny spots need sun-loving plants, while darker corners deserve shady heroes. Imagine trying to bake a cake with the wrong oven temperature; it’s destined for a flop. Just like that, plants won’t shine unless they’re in their sweet spot of sunlight.
Lastly, take a moment to admire your work. It’s like the satisfaction of a perfectly cooked meal. Stand back, give it a look, and imagine how those plants will grow and fill out over time. Arrange them with an eye not just for today, but for how they’ll grow together—like a family at a big dinner table. Additionally, incorporating a pumpkin sling net in your garden setup can enhance your vertical space by supporting climbing plants, allowing for a unique aesthetic.
With a dash of strategy and a sprinkle of creativity, your vertical garden will flourish, and you might just become the envy of your gardening friends. Trust me, they’ll be asking for your secret recipe.
3. Plant Arrangement Techniques
When it comes to maximizing the beauty and functionality of your vertical garden, incorporating the right design elements is like layering flavors in a perfect dish. It creates a visual feast and transforms your space into a cozy green retreat that feels alive and vibrant.
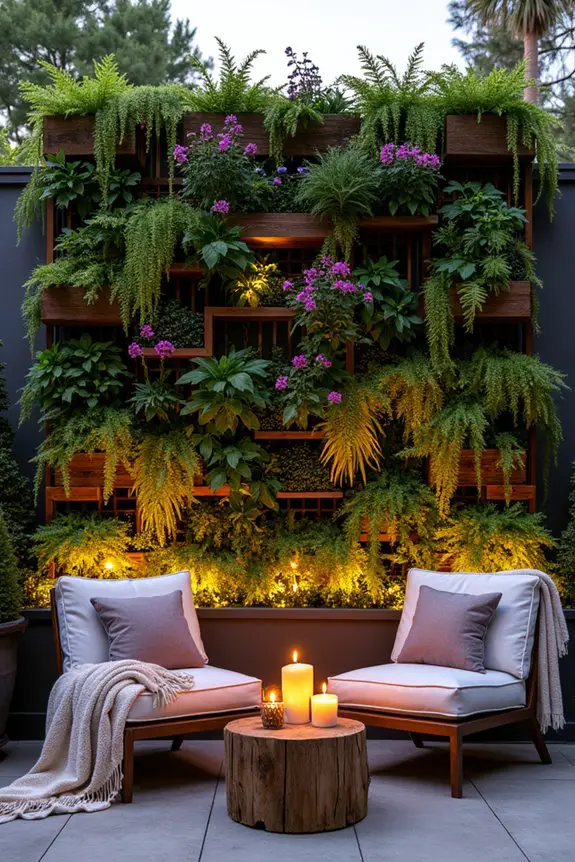
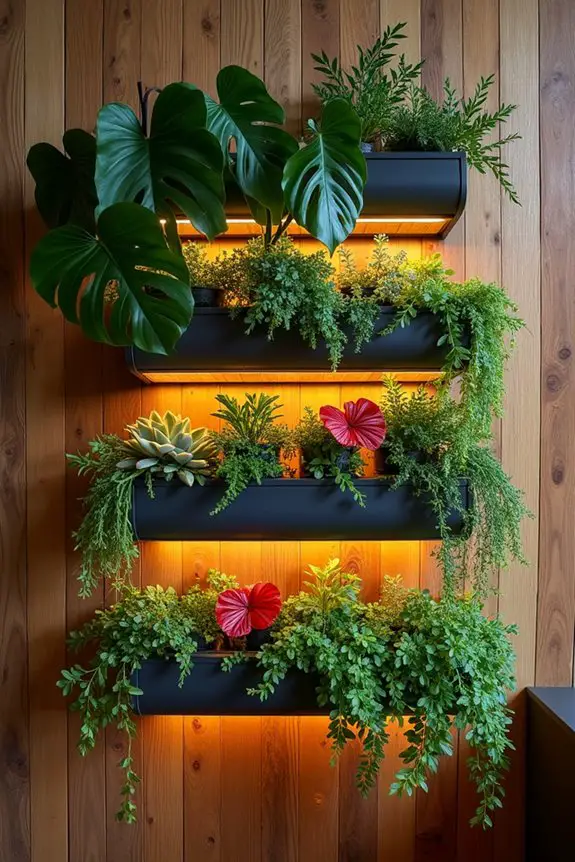
One genius way to enhance your garden wall is by adding a Built-In Lighting Wall. Imagine this: after a long day, you finally settle into your outdoor space, and bam, as the sun begins to dip, your garden sparkles with soft LED lights. It’s like magic—bringing warmth and dimension right where you need it. Not only does this type of lighting highlight your beautiful plants and textures, but it also creates an inviting ambiance that extends your evening hangouts.
Now, let’s break it down. First, think about the spots where you want to illuminate. You might want to draw attention to a stunning flower or a unique textured wall panel. Once you’ve decided, position your lights strategically, perhaps using wall-mounted fixtures or hidden LED strips that contour graceful lines along your plant arrangements.
Here’s a nifty tip: use warm-toned lights for a cozy feel, or cool whites for a modern edge.
Don’t worry if electrical work isn’t your forte; there are plenty of solar-powered options available that need no wiring at all. Just stick them in your soil or mount them on your wall, and voilà—easy-peasy evening magic.
Picture this: you’re hosting a small gathering, laughter ringing in the air, and your friends can’t help but admire how the light dances across your lush green wall. Suddenly, your garden becomes the highlight of the night, and you, my friend, are the superstar chef who cooked up a delightful atmosphere.
4. Biophilic Elements and Nature Integration
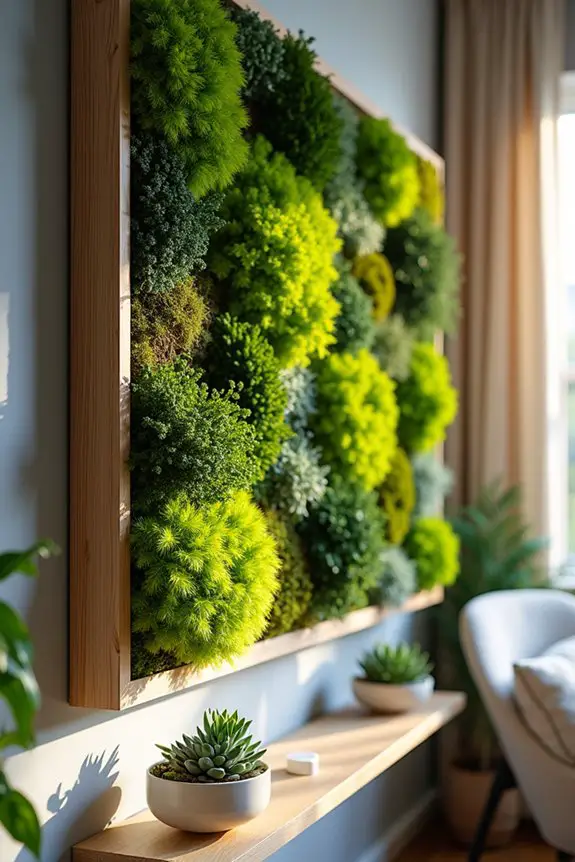
When we think about bringing nature indoors, one of the most delightful ways to do it’s with a Living Moss Wall. Imagine soft, lush greens adorning your space, creating an earthy, peaceful vibe that feels as if you’ve stepped right into a serene forest, without having to deal with pesky bugs or muddy boots. This design not only maximizes the greenery in limited spaces but also requires minimal maintenance—talk about a win-win situation!
So, how do you create one of these dreamy moss walls? First things first, you’ll want to choose your wall location. The perfect spot is one that gets plenty of indirect sunlight—moss can be a bit picky when it comes to light, after all.
Next, gather your materials: a wooden frame, some landscape fabric or wire mesh, and of course, your choice of moss. You can go for classic green moss or even mix in some colorful varieties for an added pop.
Secure the landscape fabric to the frame—this is where you’ll attach the moss later. Once your backing is ready, begin to gently press your moss into the fabric, ensuring it’s snug but not too tight. Think of it like assembling a fluffy pillow; you want it cozy and inviting. You can even layer different mosses for texture.
Then, sprinkle a little water over your masterpiece, and voilà—you’ve created a touch of nature that requires only the occasional misting to keep that rich green glow.
Now, picture it in your space: you stroll into your room, greeted by the serene sight of your moss wall. It not only adds depth and a natural element to your decor but also helps improve air quality, which is a nifty little bonus.
Plus, you’ll feel like an eco-warrior for bringing a slice of nature indoors—no superpowers required, just a little creativity and care. Embrace it; you’re a moss wall mogul now.
5. Nature-Inspired Color Palette
Now, let’s talk about how to create your own vertical garden wall. Begin by selecting a wall that gets some good indirect sunlight. Trust me, you want to avoid that awkward moment when your plants look like they’ve had a rough time—sunlight is key.
Next, gather your supplies: vertical planting pockets, a sturdy frame, or vertical planters. You can even make your own with pockets of fabric or repurposed pallets—get your creative juices flowing.
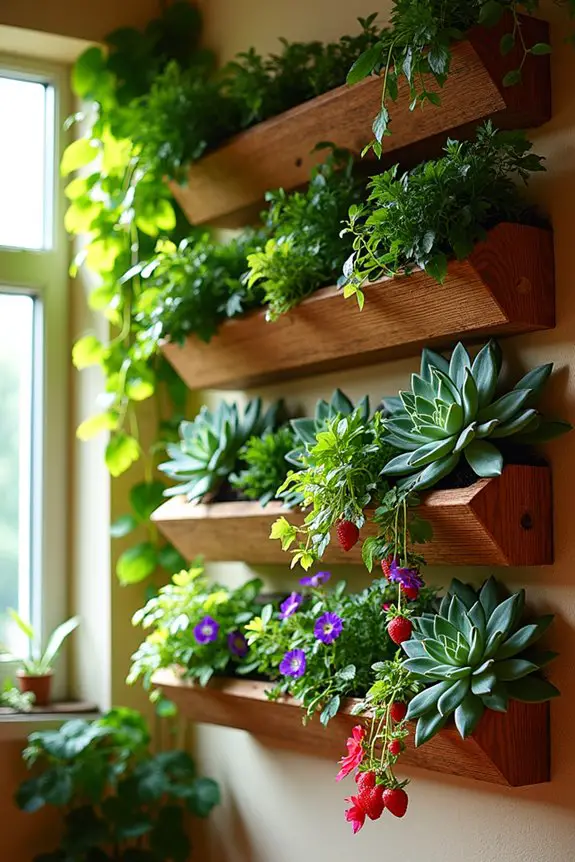
Once your planters are ready, it’s time to pick your plants. Opt for a delightful mix of herbs, succulents, or trailing flowers based on your taste and the amount of sun your wall will receive. Consider the heights, colors, and textures—playful plants like English ivy or colorful petunias can work wonders.
Need advice? The lighter plants go higher, while the heavier ones—think those luscious strawberries—are perfect for the lower pockets. Layering plants like a pro can really enhance the whole garden aesthetic.
Now, here comes the fun part—arranging your plants! It’s like a jigsaw puzzle but without the existential crisis. Make sure to secure everything well, giving your plants enough room to grow and breathe.
After that, give them a good drink of water. Here’s a little tip: don’t drown them. A gentle mist will do just fine.
And there you have it. Just imagine stepping into the room to see your vertical garden flourishing, each plant telling its story. It brightens up your space while giving you an impressive ‘I-am-nature’s-best-friend’ status.
You’ll be amazed at how easy it’s to weave a bit of green into your life; after all, who doesn’t want to feel like they’re living in their own little woodland retreat?
6. Seasonal Plant Color Schemes
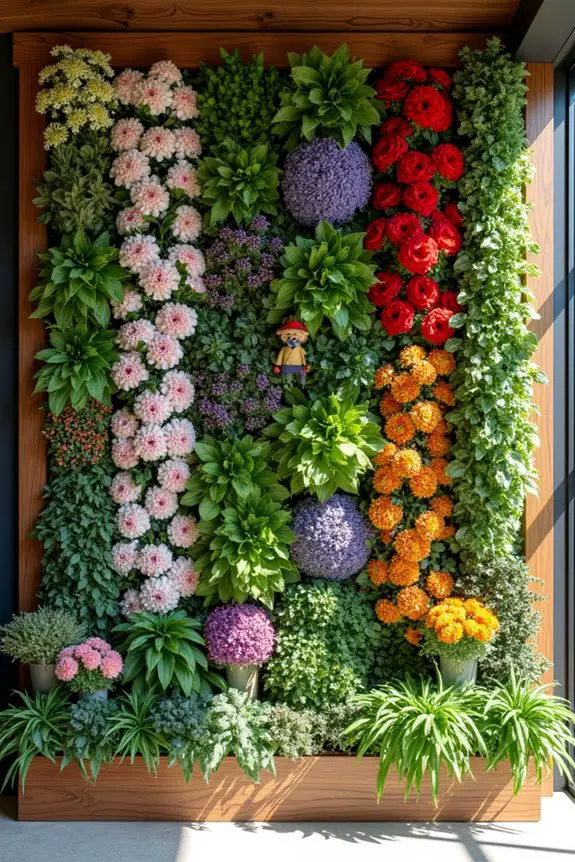
When it comes to decorating your vertical garden wall, using seasonal plant color schemes can completely transform the look and feel of your space. Not only does it guarantee your greenery stays vibrant throughout the year, but it also brings a lively, fresh vibe that mirrors the changing seasons. Imagine this: a burst of color in spring, warm hues in autumn — it’s like nature’s very own art gallery right in your living room.
To kick things off, think about your seasonal palette. In the spring, go for pastel blooms like soft pinks or yellows, along with some fresh green herbs that can take off in the sunlight.
Lavender, marigolds, and the ever-trendy pansies make delightful additions. They’ll not only look stunning but add a lovely fragrance too. But let’s be real; picking out plants is almost like deciding what ice cream to buy. So many options, and you want them all!
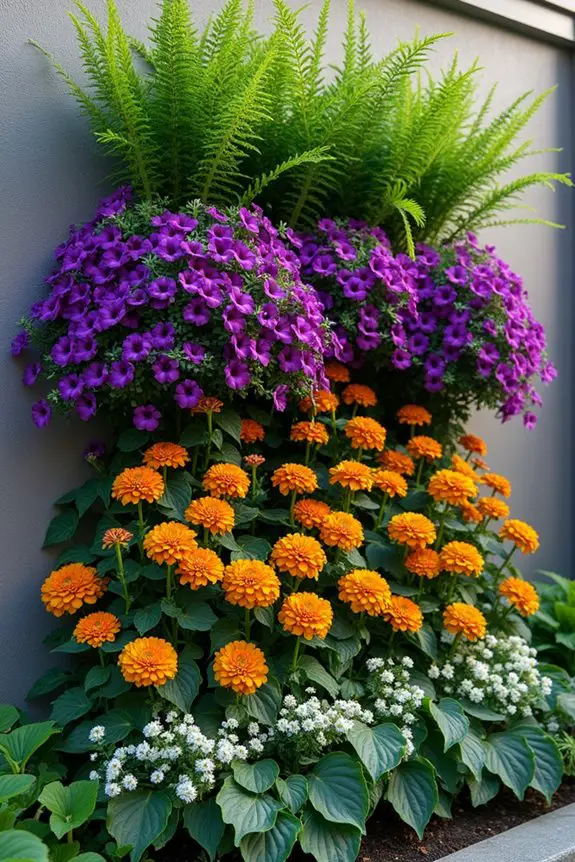
As summer rolls around, switch it up with some bold, vibrant colors. Think fiery reds, deep purples, and bright yellows.
Snapdragons, petunias, and zinnias can bring that dramatic flair. Make sure you consider sun exposure here. Don’t let your precious plants bake in the hot sun; patio-sitters get a more glamorous view, after all.
When fall comes knocking, embrace those warm tones—rich oranges, golds, and rustic browns. A touch of ornamental kale or colorful chrysanthemums can make your wall look like it’s dressed for a cozy autumn evening.
You might want to keep a pumpkin or two nearby for that extra seasonal charm, maybe even a cute scarecrow if you’re feeling adventurous.
Last but definitely not least, winter can be a tad tricky, but it doesn’t mean your vertical garden wall has to lose its charm. Opt for evergreens or colorful berries that provide texture and interest.
Dramatic pops of red from winter berry plants can evoke a festive spirit without turning your wall into a winter wasteland.
7. Vertical Layout Considerations
When designing a vertical garden in a limited space, the vertical layout you choose truly makes a difference. It not only allows you to fit more plants into tight spots but also adds layers of visual interest, making the whole area feel vibrant and alive. After all, who wouldn’t want to transform a mundane wall into a lush oasis that breathes life into your space?
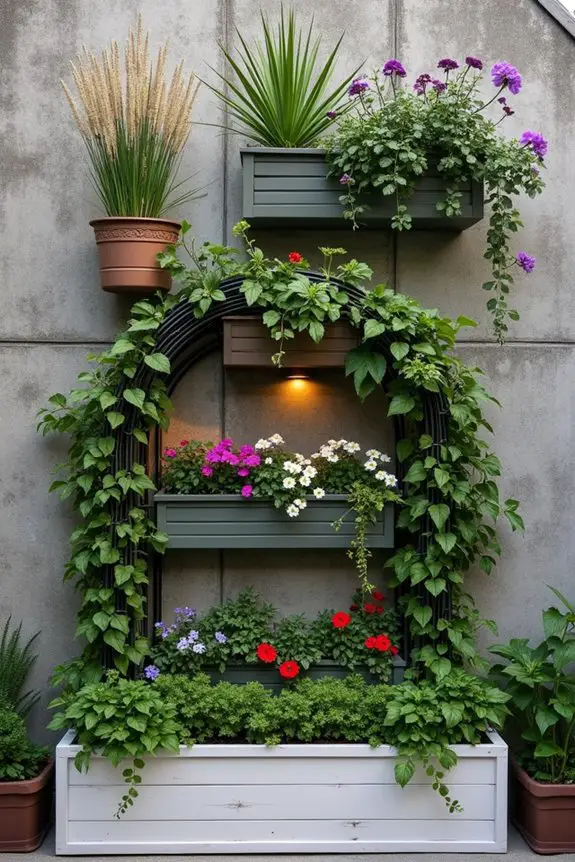
Start by selecting your wall. Is it smooth and boring? Add some texture with a textured concrete wall for added depth. Imagine how that would look, your plants climbing up a beautifully varied surface, catching light in all the right spots.
Next, think height—yes, you’re aiming up! Use tiered planters or wall-mounted pots, layering different sizes to create a cascading effect. Introducing a garden arch can also create a stunning focal point, drawing attention upward and enhancing your vertical design.
Consider using plant hangers that allow trailing ivy or even colorful flowers to drape downward. This way, you’re not just planting up high; you’re adding a waterfall of greens. It’s like creating a living sculpture, gradually revealing itself as it climbs.
And don’t overlook the power of built-in lighting. Ever tried to enjoy a garden at night? It’s like trying to read a cookbook by candlelight. With integrated LED lights, your plants will glow, making your garden a cozy evening retreat.
So let your leafy friends shine as brightly as your smile.
Finally, keep the balance. Just like in cooking, too many flavors can conflict. So pair tall, statement plants with filler plants to avoid that cluttered look.
Think about the visual flow—vary the shapes and colors, creating a rhythm that’s pleasing to the eye. The goal is harmony, not chaos.
In a small space, every inch counts, but with the right vertical layout, your garden will blossom in ways you never thought possible. Additionally, the use of bean trellis netting can support climbing plants, optimizing growth and maximizing your limited space. Who knew making the most out of limited space could be this rewarding?
8. Cascading Plant Arrangement Technique
When it comes to fitting a garden into a snug spot, the cascading plant arrangement technique is the secret weapon you never knew you needed. This method doesn’t just save space, but it also creates a stunning visual spectacle that feels like a living waterfall right on your wall. Imagine the magic of greenery flowing down like a gentle stream, bringing life to even the dullest corner.
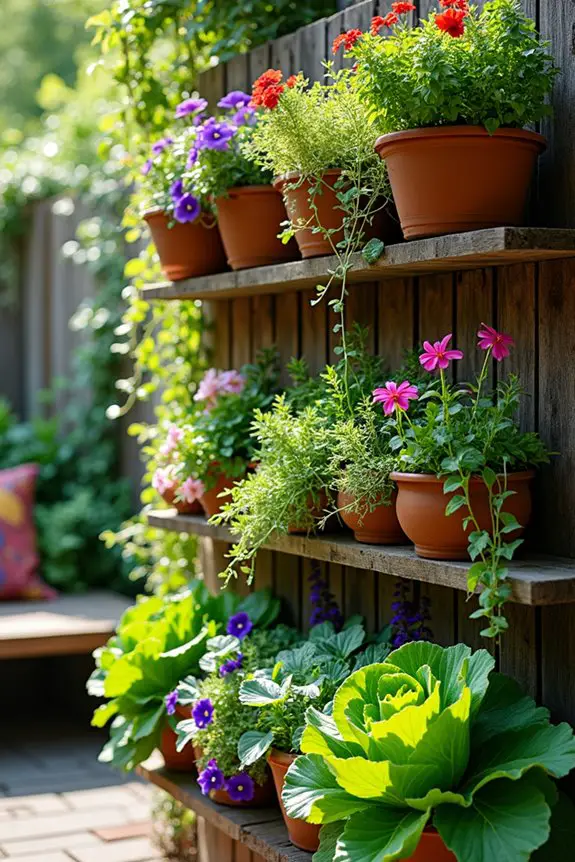
Start with some sturdy wall-mounted planters or tiered shelves. You’ll want to mix and match different heights, with taller plants on top, gently cascading down to shorter ones as you go lower. Think of it like a tiered cake—only instead of frosting and sprinkles, you’ve got lush leaves and colorful blooms.
If ivy is your jam, let it trail down; it’s like nature’s own curtain call, softening the hard edges of your home. Now, don’t just plant any old thing. Choose plants with varying textures and colors. Maybe start with a bold, tropical plant that’s a showstopper, then mix in some low-maintenance succulents. They’re like the crunchy granola in your favorite trail mix—delightfully interesting without stealing the show.
As they cascade, the drama unfolds, inviting compliments from your neighbors who might be shocked you even have a green thumb. Oh, and let’s not forget about maintenance. It’s like balancing a spoonful of sugar in your tea—too much can ruin the blend. Regularly trim back the runners and dead flowers, letting your plant army look their best.
Trust me, it’s much easier to keep your verdant waterfall in check than to set off on a rescue mission from plant neglect. Lastly, consider adding built-in lighting to highlight your cascading composition. Soft LEDs can create an ethereal glow at night, turning your garden into a whimsical retreat.
Who needs fairy lights when you’ve got your own natural wonder shining brightly? So plunge into it and prepare to wow your friends with this stunning setup; your little oasis will surely be the talk of the town—or at least of the corner of your living room.
9. Vertical Layering Strategies
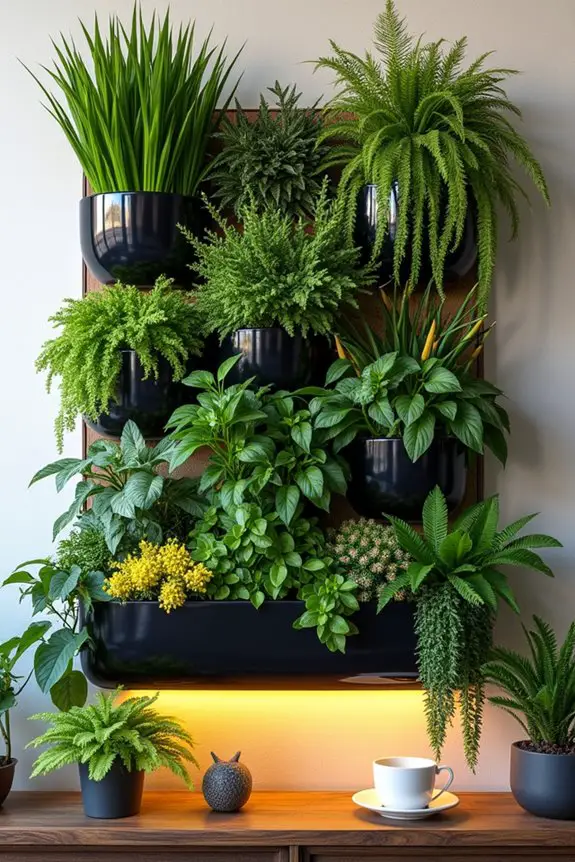
If you’re all about squeezing the most green into your small space without sacrificing style, vertical layering is your best friend. This strategy lets you stack your plants in layers, giving your wall the lushness of a mini rainforest while beautifully utilizing every inch of vertical space. It’s like taking a cozy garden nook and transforming it into a vibrant living tapestry.
Start by envisioning your wall as a canvas to paint with plants. Use sturdy wall-mounted planters or tiered planter systems. Stack them in a way that creates horizontal layers, with the taller plants at the top and gradually working down to the shorter ones. This is where your creativity shines—think of layering as building a delicious sandwich. Your favorites go on different tiers, so everything can mingle while still being distinct.
When picking plants, choose a delightful mix of heights, textures, and colors. Go for a tall, spiky plant at the top to catch the eye, maybe something feathery and light. Then let shorter, bushier plants create the middle and lower layers. This not only adds dynamics but also encourages growth patterns, like nature’s own puzzle coming together. Just imagine how thrilled your neighbors will be to see this wall evolve with every passing week; the drama unfolds as colors shift and new leaves unfurl.
Now, a little word on maintenance—like any good recipe, it’s all about finding that perfect balance. Keep an eye on moisture levels and be ready to give your plants a little extra love if they start looking droopy. It’s kind of like keeping a sourdough starter alive; one little misstep, and you might find yourself facing the dreaded wilt.
And hey, plants need trimming, too. Regularly snip away any dead leaves or stems so your garden looks chic and polished.
And don’t forget the finishing touches. Incorporating a built-in lighting feature can elevate this lush layering experience. A soft glow highlights your plants at dusk, creating a magical ambiance that draws people in like moths to a flame.
Imagine sharing a cup of tea, surrounded by your beautiful green creation, that soft light cascading down over your plants, making everything feel serene and cozy. Your vertical layering garden isn’t just a project—it’s a lifestyle upgrade, one delightful layer at a time.
10. Colorful Plant Layering Techniques
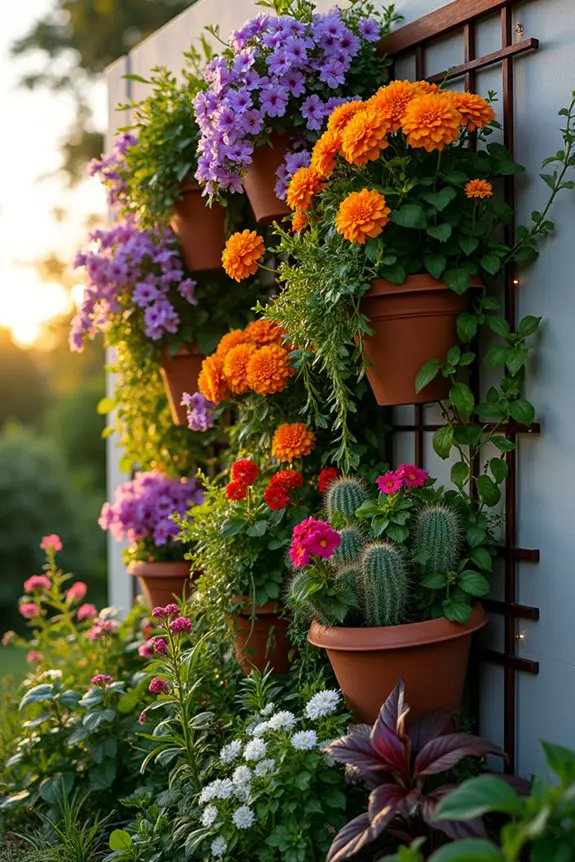
When it comes to creating your vertical garden, mixing colors is just as essential as layering your plants. Think of it as arranging a beautiful plate of food; you want those poppy reds, vibrant greens, and sunny yellows to dance together, enticing everyone who walks by. Not only do colorful plants make your garden visually striking, but they also create a warm and inviting vibe, turning your little corner into a lush retreat.
Start by selecting a variety of plants that boast different hues. For instance, imagine trailing purple petunias cascading over vivid orange marigolds. They’ll not only bring life to your garden but also have your neighbors peeking over the fence out of sheer curiosity. You can even mix in some low-maintenance greenery—the kind that makes you look like a plant whisperer while you barely lift a finger. Think light greens and deep, dark foliage to frame the colorful blooms.
But hey, don’t just throw plants up willy-nilly. Position your taller plants in the back or the top levels—so they’re seen—and let those shorter, colorful beauties shine in the front. This layout guarantees that every stunning color catches the eye. It’s kind of like assembling a team; you want your star players upfront but still need your dependable defenders in the back.
And now for the fun part—experimenting with textures. A mix of smooth leaves alongside fuzzy or waxy ones adds depth to your wall; it’s the gardening equivalent of a hearty stew. Toss in some herbs like fragrant basil with bushy flowers to elevate your palette, and don’t be afraid to play with contrasts. Who would’ve thought a fluffy fern could look fabulous next to a spiky cactus?
Keep in mind, like any good meal, color coordination matters. Too much of one color can feel overwhelming, while a dash of contrast can make your garden sing. So go ahead and switch out a few plants every now and then, like swapping recipes; discover what makes your heart flutter and your garden flourish.
Finally, let’s sprinkle in some drama—consider using built-in lighting to showcase those colors as day turns to night. Soft glows will highlight the vibrant shades, making your garden a focal point even after the sun dips.
Watering Schedule Management
Keeping your plants happy and healthy doesn’t have to be a guessing game. You can manage watering schedules like a pro with just a little planning.
First, check your garden wall ideas for the types of plants you’ve chosen. Different plants have different needs. For example, your succulent wall might only need a splash of water once a week, while ferns may crave moisture every few days.
Different plants have unique needs; know your garden wall’s favorites to keep them thriving!
Try setting reminders on your phone, or use a garden journal—don’t worry, we all forget sometimes.
And if you see droopy leaves, it’s your plant’s way of saying, “Help me!” So, adjust accordingly.
Immerse yourself in a schedule that suits both you and your plants, and watch your garden wall flourish.
Happy gardening!

