Are you tired of your garden looking a bit blah? Well, how about sprucing it up with a fabulous path? Garden paths can transform a space, guiding you through nature’s beauty while adding some flair. Think about it—wood planks, gravel, maybe some charming lighting. Sounds intriguing, right? In this chat, we’ll explore ten creative garden path designs that might just inspire you to dust off your gardening gloves and get to work on something special.
Sleek Minimalist Wood Planks
When you picture a sleek garden path, imagine those smooth wood planks neatly lined up, blending seamlessly with textured gravel borders that add a touch of rustic charm.
Why not throw in a little natural stone curvature for that effortless flow, like a river winding through a peaceful valley?
And if you want to jazz things up a bit, consider some mosaic tile accents—trust me, it’s like adding sprinkles to your favorite cupcake; it just makes everything better.
1. Textured Gravel Borders
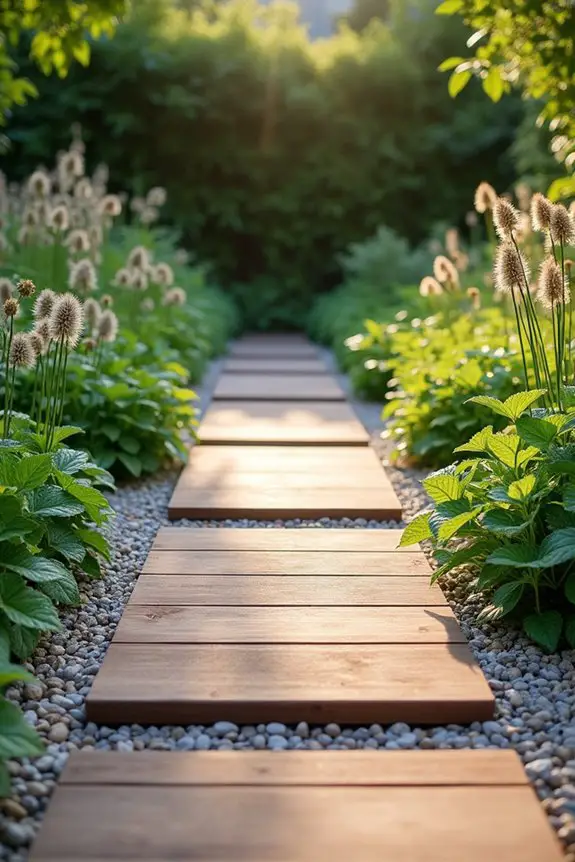
Intro: Envision this—your garden, a tranquil escape from the chaos of life, with a sleek, minimalist wooden path guiding the way. This design isn’t just about looking good; it’s practical too. It gently directs foot traffic while blending beautifully with nature, and isn’t that what we all dream of?
To start, lay down those modern linear wood planks in a clean, straight pattern. Make sure they’re sleek and sturdy. Think of them like the wardrobe staples of your path—classic, stylish, and enough to wow your guests. Space the planks evenly, which not only creates an inviting look but also keeps your feet (and your heart) grounded.
Next, let’s talk about those textured gravel borders. You want to play it cool with a sharp contrast, right? Picture the warm wood planks against a backdrop of fine gravel, softly crunching beneath every step. It’s like wearing your favorite cozy sweater with those snazzy jeans. Spread the gravel around the planks, making sure it hugs the edges nicely, and don’t forget to fluff it up a bit. It’s all about that textural vibe.
Now, for the fun part—personality. You can sprinkle in some low-growing plants in between your planks for an extra dose of charm. Think little green mint or lamb’s ears, bringing life and scent to the mix. Just envision the fresh aroma wafting through the air as you wander down your path like royalty, even if you’re still in your fuzzy slippers.
In the end, you have a stunning wood-plank path that’s not just about getting from point A to point B; it’s an experience. When you’re cultivating your plants along the way, having the right tools, like a transplanting trowel garden, will make all the difference in ensuring your greenery thrives. So, grab your tools, release creativity, and let your garden path reflect all the amazing things about you. Seriously, if I can do it, so can you.
It’ll be so worth it when your friends wander over for tea, and they ask, “Where did you buy this path?” and you just smile and say, “Oh, you know, just a little project of mine.”
2. Textured Gravel Borders
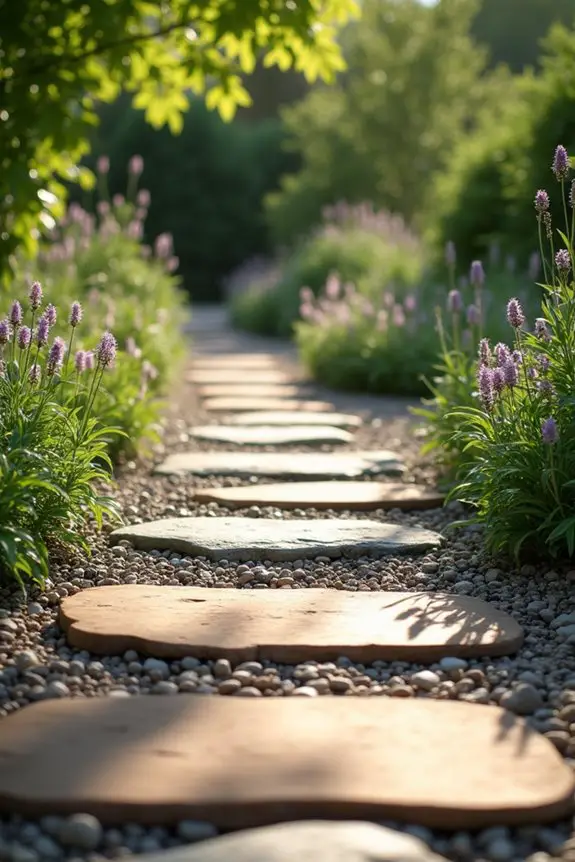
When designing your garden, why not add a touch of whimsy with a meandering natural stone path? Not only does it create a unique flow that invites exploration, but it also gives off those cozy, natural vibes we all crave in our outdoor spaces. Imagine strolling along a charming, winding path, feeling like you’ve stumbled upon a secret garden.
To bring this vision to life, first, gather your natural stones. Look for a mix of shapes and sizes for that organic look—think of it like collecting interesting rocks from the beach, but much more intentional.
Spread them out in a way that curves gently, almost like a river that guides your feet. Leave enough space between the stones for your eyes and feet to dance.
Next, consider how you want the ground to fill those spaces. Maybe some fine gravel or soft moss? Think about it like dressing up your stones; you want them to stand out but still complement each other.
Once laid out, you can fill gaps with ground cover or low-growing plants like creeping thyme, adding texture and a lovely scent to enhance that garden charm.
Now, envision walking along this beautiful path—taking each step among the stones, feeling more connected to nature, even if you’re just on a quick coffee run.
Now that sounds better than your usual trek across the garden, doesn’t it? This natural stone path is more than just a route; it’s an experience that transforms your garden into an adventure.
And trust me, once you try it, you’ll wonder why you didn’t start this project sooner. So grab those stones and get creative; your garden will thank you!
3. Natural Stone Curvature
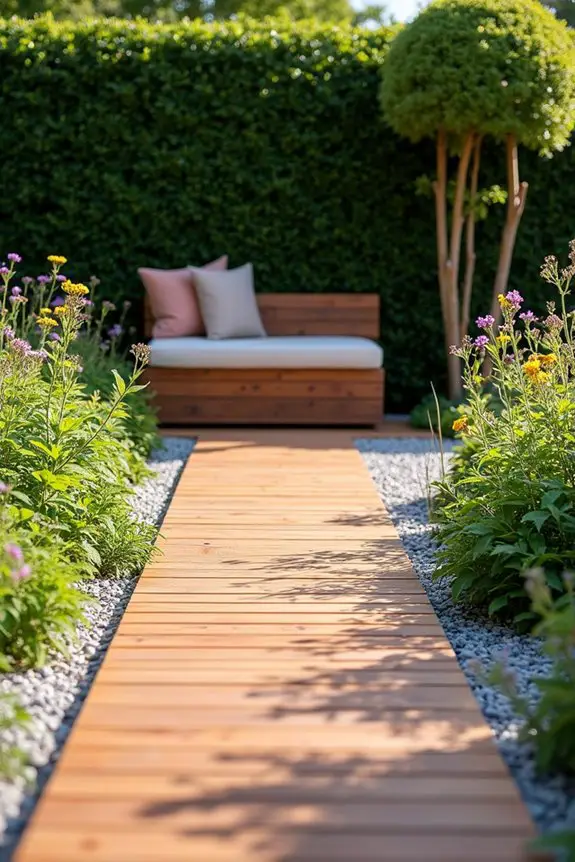
When it comes to creating a garden path that truly reflects your style, sleeking things up with modern linear wood planks is an inspiring choice. This option nails both functionality and aesthetics. Picture walking down a chic, minimalist path that harmoniously blends into your outdoor space—talk about a serene vibe. Plus, the clean lines add that oh-so-modern touch that can make even the most chaotic garden feel like a sanctuary.
First, let’s talk planning. Decide where you want your path to lead. Is it to a cozy nook or perhaps a blossoming flower bed? Mark your route with some garden string or stakes, mapping out the shape while keeping in mind that straight lines are all the rage in minimalistic designs.
Next, choose your wood—think sturdy, weather-resistant types like cedar or redwood. Trust me, you don’t want to be replacing rotting boards next summer. A hand rake can be a helpful tool for leveling the garden bed before you start laying down your planks, making sure you have a smooth surface to work on.
Now, the fun part—laying those planks down! Start with a solid base; you might want to dig a shallow trench for your path to guarantee stability.
Lay the planks in a neat, linear fashion, spaced evenly apart to let your eyes wander and your feet glide. Here’s where the secret sauce comes in: consider adding some gravel or small stones in between the planks. Not only does this elevate your look, but it also brings in a playful texture.
It’s like giving your garden a gentle tickle, while also providing drainage—works smarter, not harder, right? A garden storage bench can also complement these paths by providing functional seating and additional storage for gardening tools.
Lastly, you’ll want to finish up this beauty by sealing the wood for protection against the elements.
Consider planting low-growing greenery along the edges. Not only does this soften the hard lines, but it’ll also add a splash of color when the flowers bloom.
Trust me, you’ll be patting yourself on the back for a job well done every time you take a stroll down your stylish wooden path. Just remember, it’s okay if it doesn’t look like a Pinterest project the first time around; both you and your garden will get better with practice. Happy gardening!
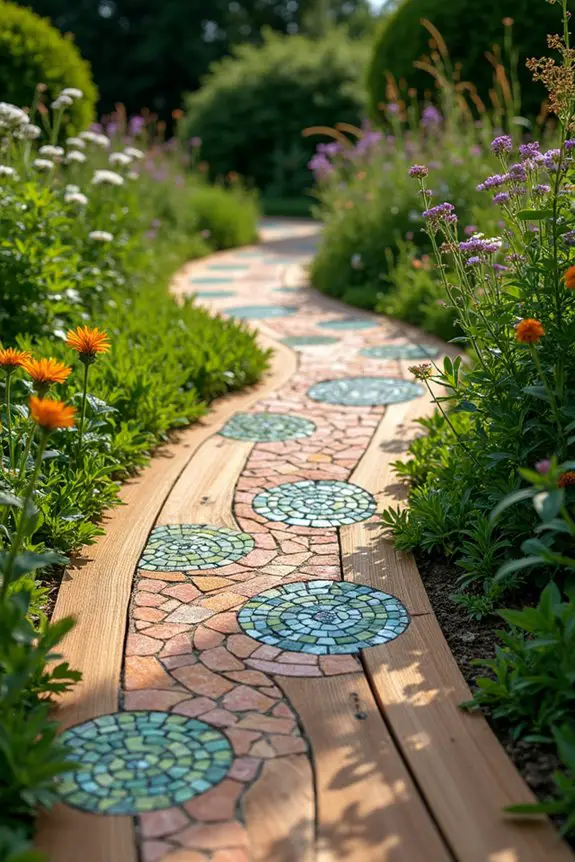
4. Mosaic Tile Accents
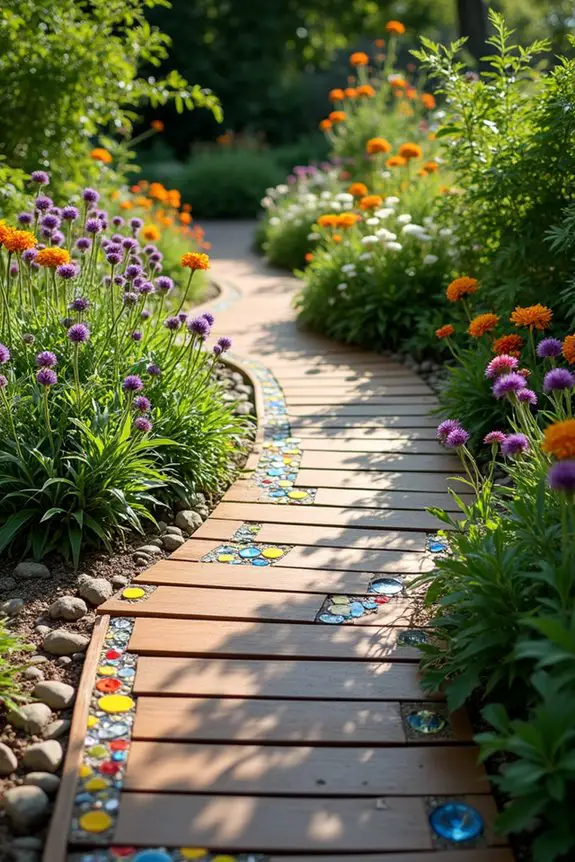
When it comes to elevating the look of sleek minimalist wood planks, adding mosaic tile accents is a game-changer. Not only do these vibrant tiles inject a playful splash of color, but they also create a unique contrast that feels both artsy and stylish. Think of it as giving your path a chic accessory—just like how a scarf can totally elevate a plain outfit.
So, how can you make this whimsical transformation? First off, consider where you want your mosaic tiles to peek through. You might choose to place them at the edges of your wooden planks, or even set them right in the middle for a little surprise as you stroll.
Don’t be afraid to let your imagination run wild—different shapes and colors can create a fun mosaic pattern, turning a simple path into a joyful treasure hunt.
Now, let’s get your hands a bit dirty! Start by carefully measuring and marking where your tiles will go. Once you have your design in mind, it’s time to grab a chisel or a fine saw to create gaps in the wood planks. If I’m being honest, I found this part to be a bit trickier than I expected—my first attempt ended with more moss than tiles.
Next, mix up some quick-setting mortar. Applying just enough to secure those little gems into place is key. Once your tiles are snug and cozy, wipe off the excess with a sponge before it sets; no need to have a messy path that looks like it’s been through a mud fight. Additionally, using a nutrient-rich blueberry fertilizer can help enrich the soil around your path, supporting the overall garden health.
Once everything dries, you’ll want to grout around the tiles. This part is like frosting a cake—smooth it out, and be as creative as you like. The end product? A stunning wooden path with personality, charm, and a touch of whimsy that’ll keep you smiling each time you step outside.
As you lace up your gardening shoes to admire your handiwork, you might just realize that this chic wandering space feels like a little slice of art right in your own garden.
5. Mosaic Tile Accents Integration

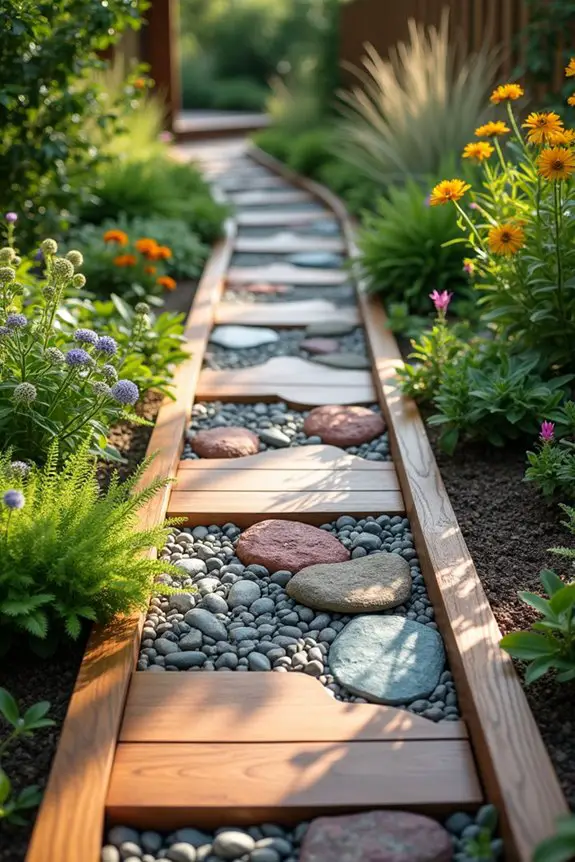
Creating a stunning sculptural pebble stone arrangement brings a delightful artistic flair to your sleek minimalist wooden planks. Not only does this design add interest and texture, but it also creates a natural flow that perfectly complements your garden path. So, why not mix it up with some pebbles that make you smile each time you pass by?
First things first, let’s talk about choosing your pebbles. Imagine this: smooth, round stones in various shades complementing the soft lines of your planks. When you select your stones, think about the colors that resonate with you—grays, whites, or even a sprinkle of earthy reds. The key is to create a cohesive look that keeps everything feeling harmonious.
Next up is the arrangement. You don’t want to just dump your stones haphazardly; that’s a pathway disaster waiting to happen. Instead, start by laying out your pebbles in a pattern that flows naturally. You could go for random clusters or a more uniform approach—just remember to blend them in between your wooden planks.
Feeling fancy? Opt for some artistic shapes or even spirals. The beauty is in the little details, so let your creativity shine.
To secure your pebbles in place, a little landscaping fabric goes a long way—kind of like a supportive friend, holding everything together. Lay it out first, then pour your pebbles on top. If you’re like me, you might struggle with keeping the stones in place without scattering them everywhere.
A trick I learned is to sprinkle a bit of sand over the pebbles and then lightly water it. This helps them settle in, preventing the dreaded “rock slide.”
Now, step back and admire your work. Can you see the way those pebbles catch the light? You’ve created a functional path that doubles as a beautiful art piece. Each step isn’t just a journey through your garden, it’s an adventure enhanced by the lovely textures and colors beneath your feet.
6. Sculptural Pebble Stone Arrangement
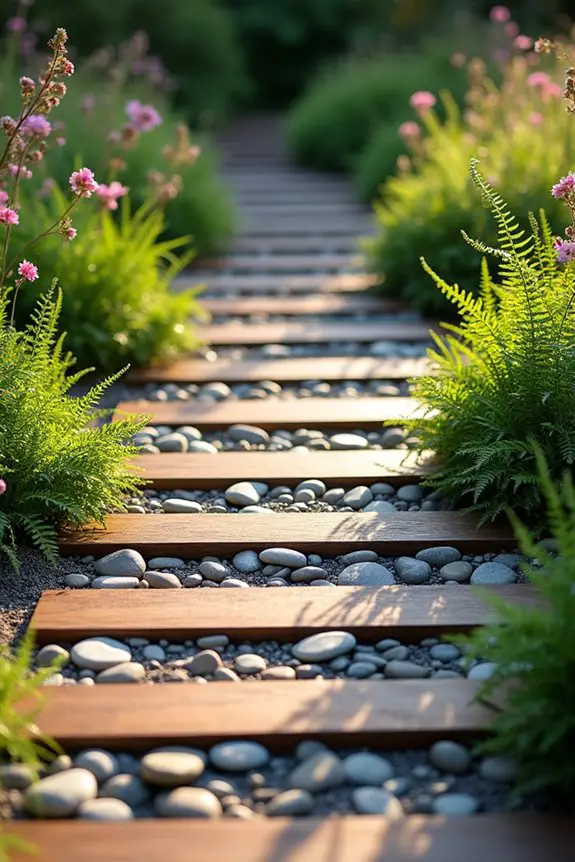
Imagine your sleek, minimalist wooden path elevating from just functional to fabulously artistic with a sprinkle of textured stone inlays. This idea isn’t just about the aesthetics—it’s about adding depth and interest. Every step you take becomes a unique experience, not just a walk, but a journey across a canvas of nature and design.
Let’s chat about the types of stones you could use. Think about pieces that vary in size and texture—smooth river stones, rough granite, or even colorful slate tiles. The mix adds a delightful contrast against the smooth lines of your wooden planks. You want to play with both the visuals and the tactile experience, and trust me, running your fingers over those stones can instantly connect you with nature’s art.
Now, how do we get these stones inlaid without it looking like a kid’s craft project gone rogue? Start by sketching a simple layout on paper—like a treasure map but for your garden path. Decide where you want the stones to go alongside your wooden planks. Once you’ve mapped it out, dig shallow spaces for your stones so they sit just below the surface of the wood, giving your path that sleek, integrated look.
When it’s time to set those stones in place, a little creative elbow grease is required. Fill the dug-out spaces with a mix of sand and polymeric jointing material. This combo helps the stones stay put while allowing for a bit of flexibility that works beautifully with changing weather. Then, gently press your stones into the mix, ensuring they’re snug but not overly tight. You want that playful texture to shine, after all.
And here’s a little tip—embrace the unevenness. The charm in these stone inlays comes from their organic look, so don’t be afraid if one stone sits a bit higher than another. It adds character, and who doesn’t want a path that tells a story?
Step back and admire the intricate details of your work, where each stone intertwines with the wooden planks, creating a harmonious blend of nature and architecture. Additionally, using a manual push reel mower to trim around your garden path creates a clean and refined edge, enhancing your overall design.
Trust me, this textural addition is going to invite you and your guests to pause, explore, and appreciate your creations. So take a deep breath, pop on your gardening gloves, and let’s get a little creative together.
Who knew your garden could be not just a patch of earth but a striking display of natural beauty? It’s more fun than watching paint dry, for sure.
7. Textured Stone Inlays
When you’re dreaming of that perfect garden path, it’s all about blending practicality with your unique style. Today, let’s explore the enchanting world of textured stone inlays within sleek, minimalist wood planks. This marriage of materials does more than just look good; it creates an inviting space that beckons you and your guests to stroll and admire.
Picture it: wooden warmth paired with the raw, earthy charm of stones. Sounds lovely, right?
Here’s the fun part—getting those textured stone inlays just right. First, pick your favorite stones. You might go for smooth river stones that glisten in the light or opt for bold, jagged pieces for a more dramatic flair. It’s like choosing the toppings for your favorite pizza; go wild!
Now, onto the layout. Grab a piece of paper or just use your imagination—think of it as sketching out a secret garden map. Mark where the stones will sit along your wooden planks. The goal is to have them nestled in just perfectly, like cozy friends enjoying a picnic on a sunny day.
Once you’ve got your plan, it’s time to dig. Get ready to channel your inner archaeologist as you scoop out small spots that are just a smidge below the surface of the wood. We want the stones to sit nicely but still peek out just enough to say, “Hey, look at me!”
For the fun part—mixing up your adhesive! Grab some sand and polymeric jointing material. It’s like making a sandy cake batter, but instead of frosting, you’re creating a stable base for your stones. Gently fill the dug-out spots, and then press your stones in snugly. But remember, a little variance is charming—almost like nature’s own art project.
And just like that, you’re crafting a path that feels alive with textures and stories. While you work, take note of the quirks of each stone—maybe one has a funky shape or a color that sings when the sun hits it. Just like us, every stone has a history to share.
8. Decorative Path Lighting Options
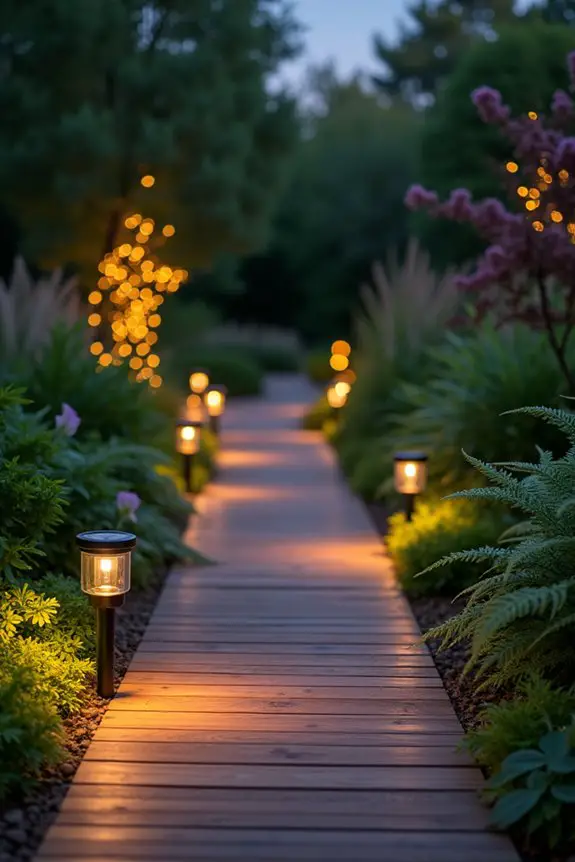
Imagine wandering down your garden path when the sun sets, soft lights twinkling like stars guiding your way. That’s the power of decorative path lighting—it’s practical and oh-so-magical. Not only does it illuminate your beautiful wood planks, but it also creates an inviting atmosphere, making every evening stroll feel special.
Now, let’s explore a few lighting options that’ll fit beautifully with those sleek minimalist wood planks. First up, consider solar-powered lights. They’re like little garden fairies, collecting sunlight during the day and glowing softly at night. Just stake them along the edges of your path, and voila! You’ve got sustainable lighting that doesn’t require a PhD in electrical work.
Next, think about in-ground lights. These sleek little wonders hide discreetly between your planks, casting light upward to create a glow that highlights the beauty of the wood. If you’re feeling fancy, choose fixtures with a warm hue to complement the natural tones of the wood. Just remember to avoid tripping over them—nobody wants a new garden path and a spectacular face plant to go with it.
If DIY is your thing, fairy lights strung along low posts or around some lovely garden plants can add a whimsical touch. Imagine twinkling lights that mimic fireflies, giving your garden that enchanting glow. Plus, if you forget to untangle them from last season, who’s gonna notice? It’s all part of the charm, right?
And let’s not forget about the benefits of functionality here. Proper path lighting can keep you from stumbling in the dark, while adding elegance to your outdoor space. So, whether you’re entertaining guests or just enjoying a quiet evening alone, those little lights can make a world of difference.
9. Artistic Mosaic Tile Integration
When it comes to adding a unique flair to sleek minimalist wood planks, artistic mosaic tile integration is an absolute game-changer. Mosaic tiles can transform a simple path into a visual feast for the eyes. Imagine stepping onto your garden path and being greeted by bursts of color and creative designs peeking out from between the wood. It not only enhances functionality—giving you a firm footing—but also elevates the overall vibe of your garden space to one that feels warm, welcoming, and downright artistic.
So, how do you go about this delightful integration? First, choose your mosaic tiles. This is where you can let your creativity soar. You can mix vibrant colors or stick to a cohesive palette to harmonize with your wood’s natural tones. Then, decide where to place the tiles along the path. A good rule of thumb is to create patterns or shapes that complement the linear design of the wooden planks. Think alternating tiles or even a spiral design that draws the eye.
Once you have a plan, it’s all about the installation. Start by digging out small spaces between the planks—just enough for your tiles to sit snugly. You can use a bit of cement to secure them in place but remember to leave some gaps. It’ll add drainage and also prevent any potential winter mishaps when Mother Nature releases her icy chill.
After the tiles are set, you might want to reflect on grouting for that clean, polished finish. Or leave the rough edges exposed if you prefer a more organic look. Just don’t worry too much about making it perfect; a few irregularities can add character. And if a tile or two ends up cracked or dislodged—hey, it adds to the charm, right?
As you enjoy your new path, notice how the sunlight dances off the tiles, bringing a smile to your face each time you pass by. After all, who wouldn’t feel a spark of joy when walking along a path that’s both functional and bursting with personality? Trust me, your garden will thank you for this artistic touch.
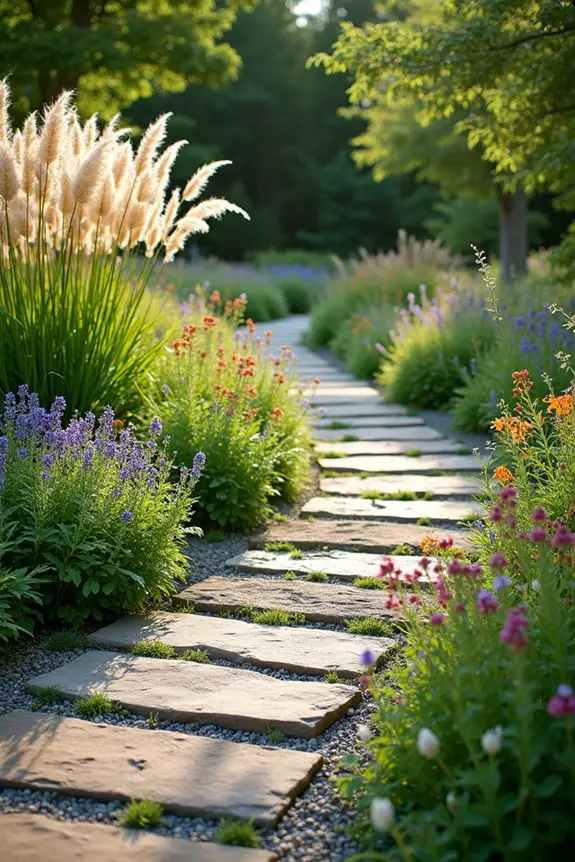
10. Natural Stone Variations
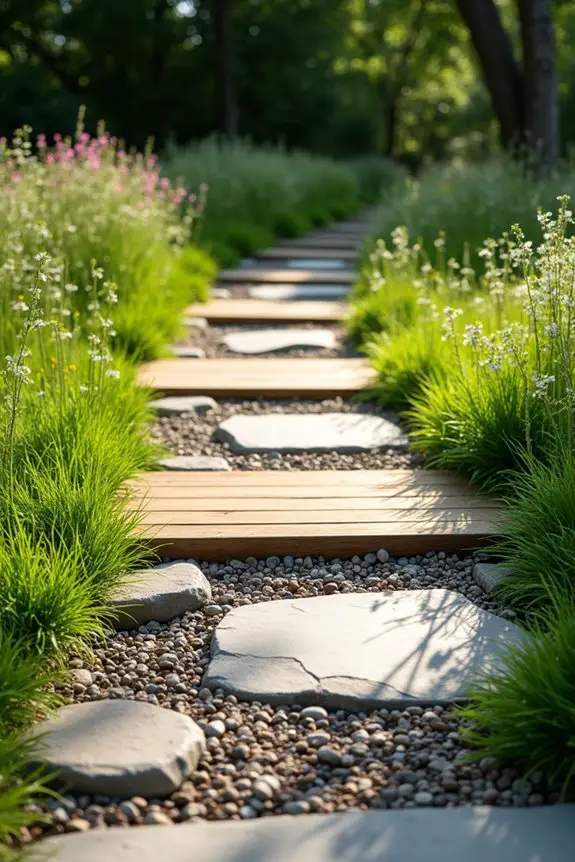
Natural stone variations alongside sleek minimalist wood planks create a beautiful harmony in your garden. Envision this: wooden planks serving as a strong foundation, while natural stones weave in and out, adding texture and a natural vibe that’s impossible to ignore. Not only does this combination offer a sturdy and practical path, but it also brings a touch of earthy elegance that makes you feel right at home in your outdoor space.
Let’s immerse ourselves in crafting this eye-catching path. Start by selecting various types of stones. Maybe you lean towards smooth river rocks for that soft and rounded look, or perhaps jagged slate pieces that scream rugged charm. Whichever you choose, aim for a mix that plays well with the warmth of your wood planks. With that palette in mind, you can create a path that intrigues the eye while maintaining that minimalist aesthetic.
Once your stones are picked out, it’s time to plot your design. A simple staggered arrangement works wonders. Alternate the natural stones with sections of wood planks, filling in the gaps with small pebbles or gravel. Not only does this provide a striking contrast, but it also keeps things visually interesting. Imagine walking down this path—your feet flowing smoothly from wood to stone, feeling the different textures beneath you. Ahh, blissful.
Now, let’s talk installation. Start by laying out the planks first, ensuring they’re evenly spaced. Don’t worry about perfection; some variations can add character and make your garden feel lived-in, like it’s had stories to tell over the years.
Afterward, place your stones in those delightful gaps. You might feel like an artist creating a masterpiece, which, I mean, in this case, you really are. Secure those stones if you like, but leave a few loose for just the right hint of natural chaos—think of it as Nature’s surprise element.
To wrap it up, consider incorporating low-growing plants like Corsican mint between the stones. Not only do they soften the edges, but they also add lovely scents to the mix. Trust me, there’s nothing quite like strolling past your newly designed path, inhaling the fragrant air while admiring your handiwork—the kind of moment where you might just think, “Wow, I nailed it.”
Pathway Layout Considerations
As you map out your garden’s pathway, you’ll want to contemplate how it can guide visitors through your little slice of paradise without feeling like they’re lost in a maze.
Think about your garden path ideas—do you prefer straight lines or gentle curves? A linear path keeps it simple, while a meandering route sparks curiosity. You might even play with materials, like combining pavers with gravel for texture.
Consider your garden path style—straight lines for simplicity or gentle curves to inspire exploration, with diverse materials adding character.
And don’t forget to take into account the surrounding plants. Low-growing ground covers peeking through pavers can soften the look and give off delightful scents.
Keep it engaging, functional, and easy to navigate. Trust me, nobody wants to find themselves wandering aimlessly—unless, of course, they’re hunting for that elusive garden gnome.

