Imagine stepping into a garden oasis where the fences have just as much personality as your favorite cozy sweater. We’ve all seen those plain, old barriers that do little more than mark boundaries. But, what if your fence could be both functional and fabulous? Explore creative ideas that can transform your outdoor space into a unique haven. Who knew a little wood or metal could bring so much joy? Let’s plunge into some fence designs that’ll make your garden the talk of the neighborhood.
Charming Rustic Wooden Designs
When you think about adding charm to your garden, rustic wooden fence designs might just be your answer.
There’s something warm and inviting about vertical pallet boards or a classic split rail that makes you feel right at home.
Want a fence that tells a story? Let’s explore how these simple yet stunning wooden touches can transform your outdoor space.
1. Vertical Pallet Board Design
When it comes to adding charm and character to your garden, a vertical pallet board fence is a fantastic option. Not only does it create a lovely rustic vibe, but it also offers privacy and defines your outdoor space perfectly. Plus, it’s like a fun DIY project that makes you feel a little like a crafty genius—who doesn’t want that?
Building a vertical pallet board fence is simpler than you might think. Start by gathering some wooden pallets; you can often find them for free behind local stores or on online marketplaces. Just make sure they’re in good shape—no one wants splinters in their hands. Additionally, consider how metal garden fence panels can offer a sleek alternative for a more modern touch.
Next, decide how tall you want your fence to be and measure the space accordingly. When you’ve got a vision, lay the pallets out vertically, side by side. Use brackets or screws to secure them to a sturdy wooden frame, making sure they’re level before fastening them in place. Trust me, no one likes a fence that leans like it had one too many at the garden party.
Here’s where things get extra fun: personalize it! You can paint the pallets in whimsical colors, or stain them to bring out that gorgeous wood grain. Maybe add some climbing plants or fairy lights for a dreamy ambiance—come on, who doesn’t love twinkly lights? Moreover, consider solar garden lights to enhance your outdoor space with added illumination at night.
A helpful tip is to sand down any rough edges to prevent any unfortunate run-ins with splinters. And if you’re feeling fancy, you might even want to add some decorative touches, like little flower boxes on the tops of the pallets or even small painted signs to give your garden a personalized feel.
In the spirit of full disclosure, I once had a pallet that looked like a modern art installation instead of a fence, but hey, every creation is a reflection of its maker, right?
Just keep your sense of humor handy and enjoy the process. It’s all about making your garden your own little paradise with a touch of rustic charm.
2. Split Rail Aesthetics
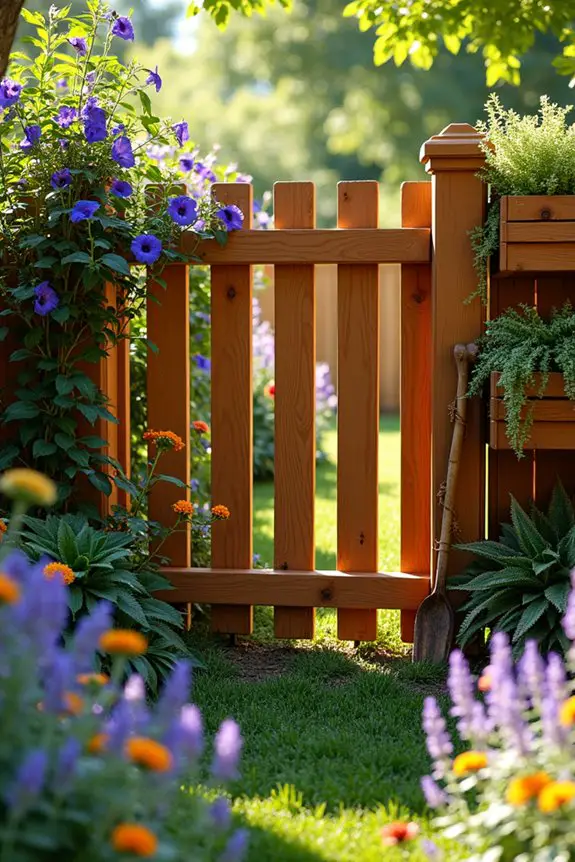
When it comes to adding that charming rustic touch to your garden, a split rail fence is a winning choice. Not only does it evoke a sense of timelessness and warmth, but it also creates an inviting boundary that defines your space without feeling too confining. Imagine pottering about your garden, surrounded by wooden rails that softly blend into the scenery—sounds lovely, right?
To start, gather some sturdy wooden posts and rails. You’ll generally want to go with cedar or pine for that classic look. Measure out your desired fence line and make sure to mark your post locations—it’s all about that precision, or you might end up with a fence that goes on an unexpected adventure (and we’re not talking about a trip to the neighbor’s yard).
Dig post holes at least two feet deep for stability, especially if you live in a windy area; we don’t want your masterpiece to become an impromptu sailboat. Additionally, you can choose to incorporate a garden pergola kit as a beautiful complement to your split rail fence.
Next, insert your posts into the holes and pack them with dirt, making sure they stand upright. Once you’ve set those posts, it’s time to attach the rails. Usually, two to three rails will do the trick, but feel free to get creative! You can space them out for a more open feel or put them closer together for a bit more privacy.
If you find yourself struggling with levelness, remember: the eye is a tricky thing. Grab a level, take a step back, and adjust accordingly. It may be frustrating, but hey, that slight adjustment is what your fence deserves.
Now comes the fun part—personalizing your split rail design. Add climbing plants—like grapevines or morning glories—along the fence to invite more life into your space. Picture it: vibrant greenery entwined with rustic wood, creating an enchanting atmosphere. Additionally, consider placing your bamboo plant shelf indoor nearby to enhance your plant display and complement the natural beauty of your garden space.
You could even string up some fairy lights, turning your garden into a nighttime wonderland. And don’t be shy about showcasing your personality. A coat of weather-resistant paint on the rails can make everything pop, or you could keep it simple and let the natural wood shine through.
But here’s a little nugget of wisdom from my own experience: don’t forget about maintenance. Regularly inspect your fence for any wood rot or insect damage; trust me, it’s no fun to wake up one day to find your fence looking like it just went through a tough breakup.
And if your rail starts to lean, a quick fix or secure reattachment can be all it needs to stand tall once more.
Let’s face it, assembling a split rail fence might test your patience—but when you finally stand back to admire your handiwork, you’ll be beaming like you just won the garden lottery. So grab your tools, channel your inner craftsman, and get ready to transform your garden into a rustic paradise.
3. Wrought Iron Elegance
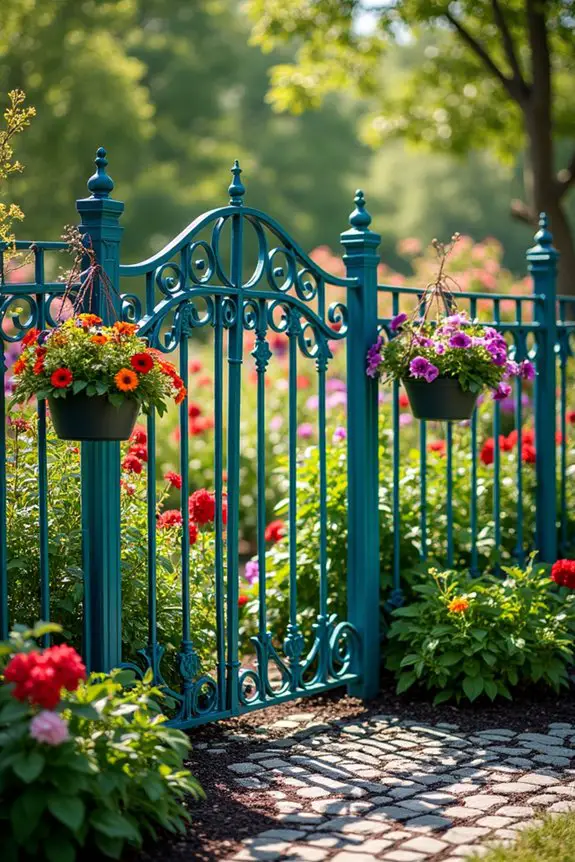
When thinking about garden fence design, wrought iron elegance brings a level of sophistication that’s hard to beat. This material not only offers an alluring style but also provides durability and strength. Imagine strolling through your garden, surrounded by artistic iron scrollwork that dances gracefully in the sunlight—doesn’t that just take your breath away?
To bring this vision to life, start by sketching out your design. Wrought iron fences can range from simple vertical pickets to ornate patterns. Measure your yard’s perimeter, and don’t forget to take note of any elevation changes or unique landscape features. Those details can greatly affect the installation process.
If you’re leaning toward a freestanding design, keeping the posts spaced evenly is essential to maintain that polished look. A good rule of thumb is to place posts every 6 to 8 feet; this gives your fence the sturdiness it needs while allowing it to flow gracefully around your garden.
Now, if you’re going for a DIY approach, make sure you have the right tools on hand. You’ll need a welder (or maybe a friend who’s a wizard with one), a level, and a post-hole digger—fighting with stubborn ground isn’t a great way to spend your weekend.
For a more streamlined experience, purchasing pre-made decorative garden fence panels can save you time and energy, so you can spend more time enjoying your space rather than building it.
Installing wrought iron can be a bit tricky because, let’s be honest, working with metal isn’t as forgiving as wood might be. When you set the posts, dig deep—about two to three feet is ideal. This really helps keep your fence steady against those crazy winds. Don’t skip the concrete for added support; nobody wants a fence that’s as wobbly as a toddler learning to walk.
Here’s where it gets fun: consider adding decorative elements. You can hang flower baskets or drape fairy lights through the intricate designs for a whimsical touch. Even a simple coat of weather-resistant paint can add a pop of color; just remember, metallic hues look super chic against greenery.
I once painted mine a vibrant teal that felt lively during the day and magical at night—like Schrodinger’s garden, always alive in two states.
And maintenance? Well, it’s not a huge hassle, but you should keep an eye out for rust—trust me, it sneaks up faster than you think. A good scrubbing with a wire brush followed by a rust-inhibiting primer can work wonders.
If something feels loose or a bit off-kilter, a quick tightening usually does the trick. And who knows, that little fix might even inspire you to whip out your inner handyman or woman.
4. Geometric Metal Patterns

When it comes to creating a garden fence that not only provides security but also adds a dash of modern flair, geometric metal patterns are a fantastic choice. They offer a sleek, contemporary vibe that seamlessly complements both lush gardens and minimalist landscapes. Plus, the combination of metal’s durability and geometric shapes creates a stunning visual effect—an eye-catching showcase that’s both functional and artistic.
To incorporate geometric metal patterns into your garden, start by choosing the right metal for the job. Options like aluminum, steel, or even rusted corten steel provide different aesthetics and levels of maintenance. For a DIY project, sketch out a few designs on graph paper. Picture a combination of triangles, squares, or hexagons—letting your imagination roam allows for endless possibilities. The key is to balance aesthetics with structure, ensuring your design not only looks good but functions well.
Once you’ve got a design in mind, it’s time to take accurate measurements. Measure your garden’s perimeter carefully; I once thought I could eyeball it and ended up with a fence that was more jagged than a toddler’s drawing. Remember, for a geometric look, you might need to pre-cut the metal shapes before installation. Having everything organized can save you time (and sanity) during construction.
Now, here’s a tip: when installing, consider using a mix of vertical and horizontal placements for your metal panels. This creates depth and interest in your design. Spacing and angles matter—make sure to maintain uniform gaps between patterns so that it feels intentional, not haphazard, unless you’re going for the “abstract art” vibe.
For the installation itself, digging post holes is essential, just like with wrought iron. Aim for two feet deep, and don’t forget to set the posts in concrete for stability—it’s like giving your fence a solid foundation, much like what a house needs.
And as you assemble the panels, keep a level handy because nothing screams “rushed project” like a crooked fence.
Once your design is up, release your creativity with added touches. String lights or climbing plants can contrast beautifully against the metal, and who doesn’t love a touch of whimsy? I once draped fairy lights along a similar fence design, and my backyard transformed into a little fairy kingdom at night—just watch out for the neighborhood squirrels; they think they’ve a divine claim to anything sparkly.
Lastly, one more thought on maintenance: be sure to give your panels a good wash every now and then. Dirt and grime can dull that beautiful shine. A simple soapy water scrub with a soft brush should do the trick.
I learned the hard way—after neglecting mine for a season, all my sparkle turned into a sad, dusty mess. Fun fact: cleaning metal can sometimes feel like an underwater workout; don’t be surprised if you’re gasping like you just sprinted a marathon.
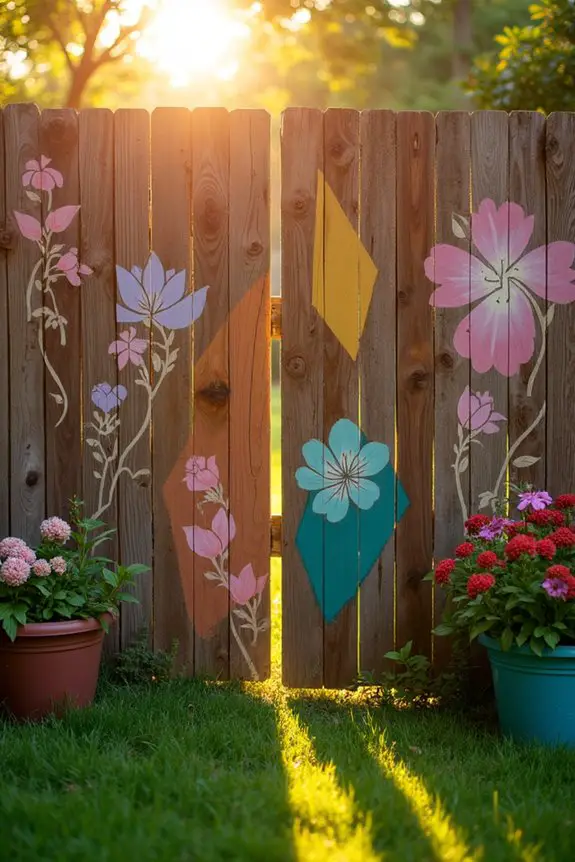
5. Colorful Painted Panels
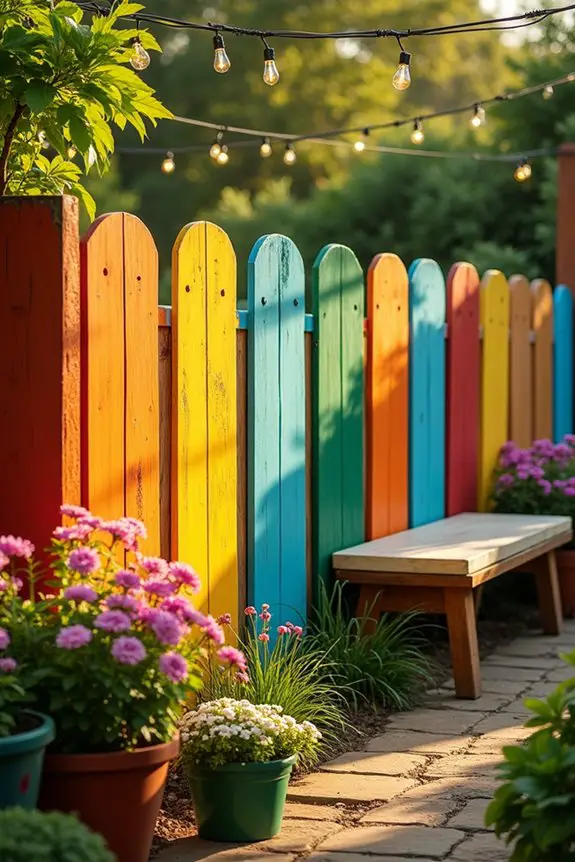
When it comes to transforming your garden space into a cozy retreat, colorful painted panels are a stellar choice. Not only do they bring a splash of vibrancy to your outdoor area, but they also add a charming rustic vibe that feels welcoming. There’s something about a beautifully colored fence that can turn a regular yard into a picturesque escape. Plus, if you’re looking for a simple DIY project that allows for a ton of personal expression, this is it.
To get started on your colorful painted panels, first, choose the right type of wood. Cedar or pine are popular choices given their durability and availability. Once you’ve got your wood planks, it’s time to release your inner artist. Decide on a color palette that complements your garden—think warm yellows, soothing blues, or even bold oranges to make a statement.
Painting can be therapeutic; just be careful not to spill paint on your favorite gardening shoes—trust me, those suckers don’t come clean.
Before you paint, it’s vital to prep your wood. Give each panel a light sand to create a smooth surface for the paint to adhere to. I learned this the hard way when my first attempt looked more like a messy mural than a work of art, with all the paint bubbling off. Then, apply a good primer—this step is key. It helps the paint stick better and makes the colors pop.
If you want a fun pattern—like stripes or chevrons—mark it lightly with pencil before you start. Remember, measuring twice means fewer trips back to the hardware store.
Now, let’s talk about the painting process. Use a good quality outdoor paint, and if you’re feeling adventurous, consider using different brushes for different textures. Big brushes can give you wide swaths of color, while small brushes can allow for details and touch-ups—perfect for when you attempt to create that artistic flair (or, let’s face it, clean up any oops moments).
Once you’ve painted your panels, let them dry completely before installation—this will prevent any sticky mishaps that could leave those vibrant colors on your hands instead of the panels where they belong.
When it comes to installation, use sturdy brackets to attach your painted panels to the fence posts. Make sure these are firmly in place; no one wants a panel that flops over like a sleepy puppy. You can also add some outdoor sealant to protect your masterpiece from the elements, so it stays looking fresh and colorful season after season.
Now, for the grand finale—don’t forget to accessorize! Hang some potted flowers or string lights across the top to enhance that rustic charm.
Remember the time I hung my fairy lights and found that my dog had decided to chew through one? Lesson learned: sometimes, decorations are too tempting, even for pets.
As you sip your lemonade and enjoy your colorful creation, you’ll realize that these painted panels not only brighten your garden but also reflect your unique style, turning your outdoor space into a true extension of your home.
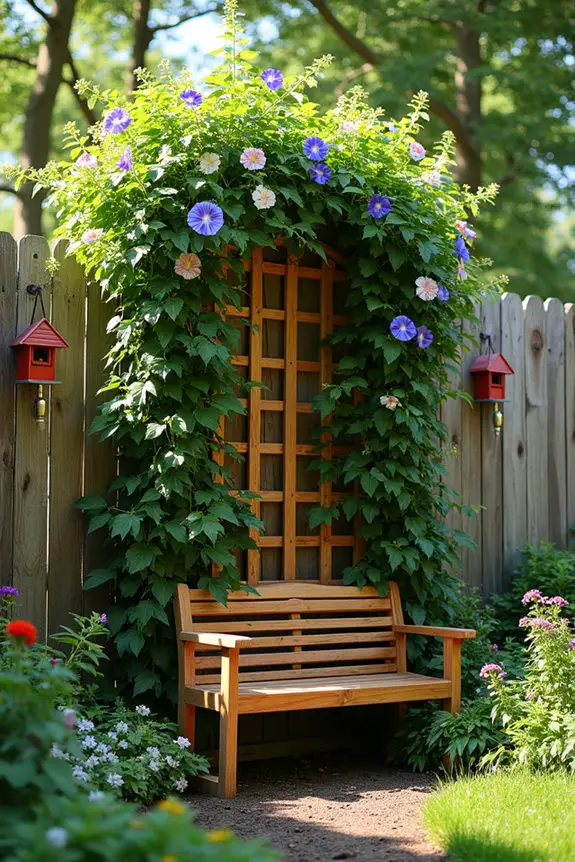
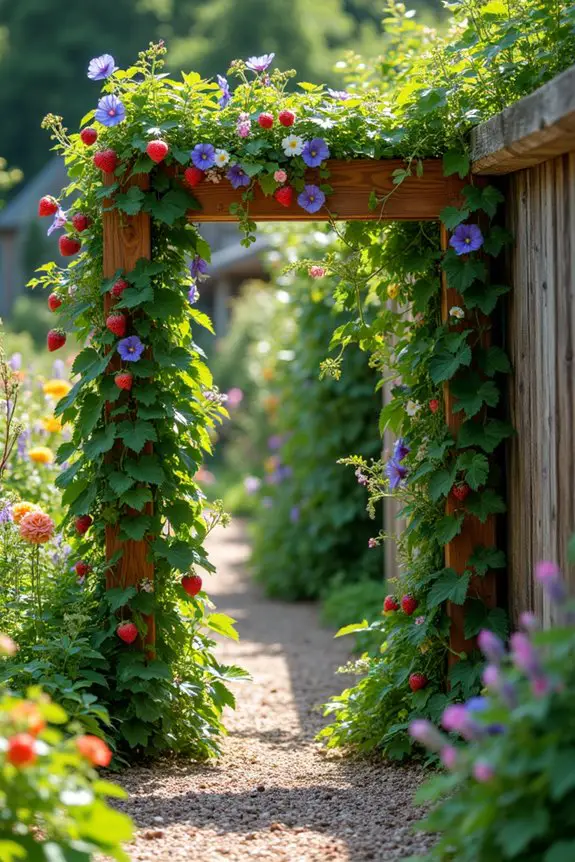
6. Vertical Trellis for Climbing Plants
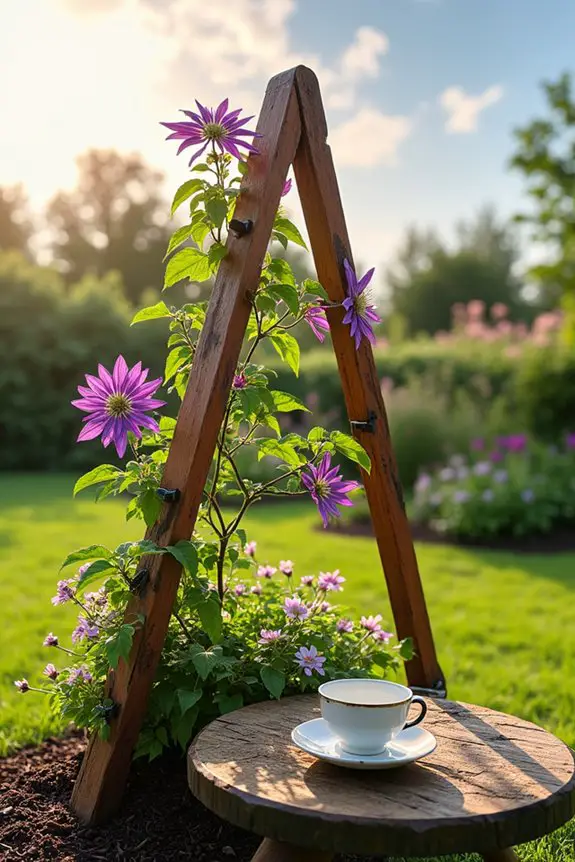
Vertical trellises are a fantastic addition to any garden, combining beauty and functionality in one charming package. Not only do they provide a perfect support system for climbing plants, but they also create a visually appealing vertical element that draws the eye upward.
Picture lush greenery and vibrant flowers climbing your rustic wooden trellis, transforming a simple fence or wall into a garden oasis—it’s a definite win-win.
To get started with your vertical trellis, you’ll want to first select the right type of wood. Cedar or treated pine works wonderfully because they hold up well against the weather, but don’t let that intimidate you. If you can handle a saw and nails, you’re halfway there.
Once you have your materials, decide on a design that suits your space. A simple A-frame can add a wonderful structure without being overpowering, while a more intricate design can really make a statement. Sketch your ideas on a napkin or an old receipt—trust me, inspiration can strike at the most unexpected times.
Next, measure out your wood carefully. Nothing’s worse than cutting a piece too short and realizing you’re left with an awkward stump—been there, done that. Cut your wood according to your design, and if you need help, don’t hesitate to grab a friend or watch a quick tutorial online.
Once cut, sand down the edges to make everything nice and smooth; you don’t want splinters ruining your gardening vibe.
Now comes the fun part: assembly. Lay out your pieces first, so you can see how it all comes together—like a puzzle. Use outdoor wood screws, which are designed to withstand the elements, to secure everything tightly.
If you feel fancy, add cross supports for added sturdiness; I once skipped this step and watched my trellis slowly tilt like a sad Leaning Tower of Pisa as the vines grew.
After assembly, you may want to give your trellis a protective stain or sealant. It not only enhances the wood’s color but keeps the harsh weather at bay. Plus, it gives a polished look that elevates the whole design.
While that’s drying, get your climbing plants ready. Think about options like clematis, sweet peas, or even morning glories. Just imagine those colors bursting forth in the sunlight—dreamy, right?
Now, come planting time. Space your plants well at the base of your trellis, so they’ve room to stretch out and grow. It may take a little time, but eventually, you’ll have a delightful green scene climbing up your vertical structure.
You can use twine or plant clips to help guide those ambitious vines as they make their ascent. Just be patient; it’s a garden, not a race.
Before you know it, you’ll be sipping tea and admiring your handiwork as the garden comes alive with color—what could be better?
7. Decorative Mosaic Tile Patterns
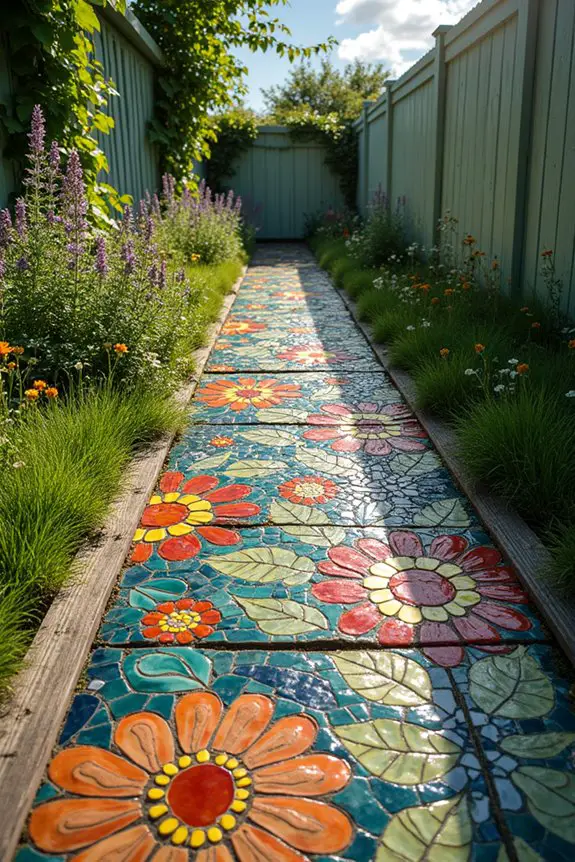
There’s something undeniably enchanting about decorative mosaic tile patterns, especially when paired with rustic wooden designs. These beautiful tiles don’t just add a splash of color; they’re also functional, making your garden space feel vibrant and inviting. Imagine stepping into your backyard and being greeted by a mosaic creation that captures the sunlight, radiating warmth and creativity. It’s like an art gallery, but instead of paintings, you get a colorful, tactile landscape that’s as practical as it’s pretty.
First things first, pick the right place for your mosaic masterpiece. A small patio, a garden path, or even a quaint corner by your fence can showcase your design perfectly. Once you have a spot in mind, gather your materials. You’ll need some mosaic tiles (ceramic or glass works wonders), outdoor adhesive, and a wooden frame if you want a bordered design. If you’re feeling bold and crafty, consider using broken tiles for an upcycled look. I once dumped all my random, chipped dishes in a bucket, and let me tell you, it turned into quite the conversation piece at my last garden party—who knew broken porcelain could be so chic?
Now, let’s plunge into creating your mosaic. Start by sketching out your design on paper. This step helps visualize what you’re aiming for, plus it saves you from the heartache of having to rework everything later. When you’re ready, lay out your tiles on the ground without glue first, arranging them into the design you’ve dreamed up. It can take some trial and error, so don’t rush it.
I once got so excited that I glued tiles down on the first go, only to realize I’d turned my flower into an accidental abstract shape that looked more like a cactus than a daisy. Not my finest moment.
Once your layout is just right, grab your outdoor adhesive and start applying it to your base. Using a spatula or your fingers (if you’re feeling daring), spread a thin layer of glue where you’d like to place each tile. Press them down firmly, making sure to leave small gaps between each piece—this is vital for that classic mosaic look. What’s getting tricky, you ask? Making sure your tiles are level. Trust me, uneven tiles can turn your beautiful design into a landscape of sheer frustration.
After your tiles are in place, let the glue dry according to the instructions, which often takes a good few hours. During this time, you can pat yourself on the back for your excellent judgment and artistry. Once it’s set, mix your grout according to package directions—think thick pancake batter. Spread it over your tiles to fill in the gaps, then wipe off any excess with a damp sponge before it dries.
I once accidentally left grout smudges all over my hands, looking more like I’d a paintball fight than a productive gardening day.
Finally, make your mosaic shine by sealing it with a weatherproof sealant—this will help protect your work from the elements and keep it looking fresh for years. And remember, everyone will admire your handiwork but will have no idea how much time you spent getting those tiles just right.
With your beautiful mosaic in place, step back and enjoy your work. It’s more than just a decorative element; it’s a piece of art that brings your garden to life, creating a charming scene that you can be proud of. So gather those supplies, let your creativity flow, and soon you’ll have a rustic, colorful addition to your outdoor oasis.
Just try not to trip while admiring your work—those mosaic tiles can be charming, but the last thing you want is to make them the star of your clumsy antics.
8. Ivy-Covered Lattice Panels
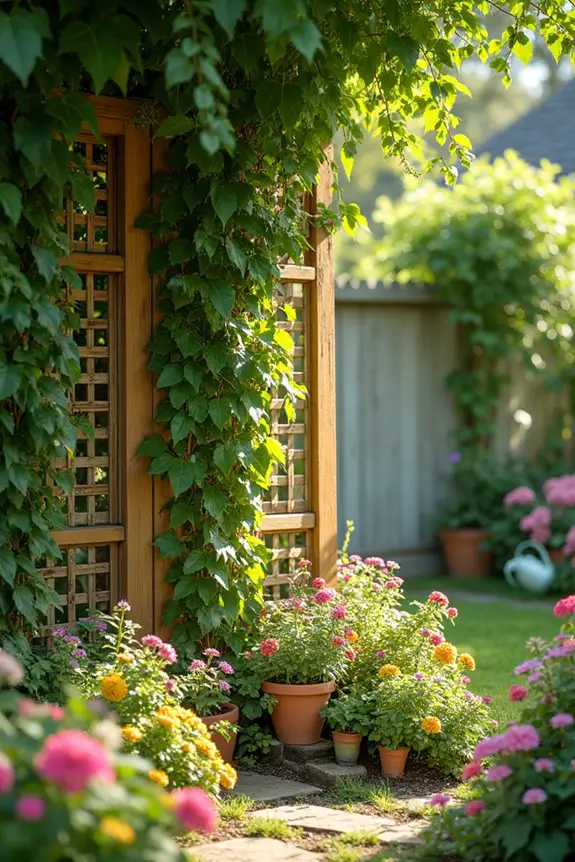
When it comes to adding a touch of rustic charm to your garden, ivy-covered lattice panels are like the cherry on top of a sundae. Not only do they provide privacy and define your space, but they also give that picturesque, cottage-garden vibe we all dream of. Imagine walking into your backyard, greeted by lush green leaves cascading down wooden panels, creating a natural tapestry that feels both magical and inviting. Plus, who wouldn’t want something that makes their backyard look like it’s been plucked straight from a storybook?
To create your own ivy-covered lattice delight, start by selecting sturdy wooden lattice panels, which are widely available at most home improvement stores. It’s crucial to choose a type that withstands the elements; after all, we’re not trying to create a sad, wilting wall of wood. Once you’ve got your panels, decide on where they’ll go—these can be placed against a fence for extra coverage or positioned to separate different areas of your garden. Trust me, before I learned this, I used a flimsy curtain to separate my garden from my neighbor’s, and let’s just say it didn’t have the same effect, nor did it last long.
Now comes the fun part: planting ivy. English ivy is a popular choice, thriving on sunlight and climbing like it has ambition. You can either plant small ivy saplings at the base of your lattice or if you’re feeling lazy (which, let’s be honest, happens to the best of us), you can buy pre-grown ivy that’s ready to cover.
When planting, make sure to space them evenly and guarantee they’re well-watered. Here’s a tip—when you water them, consider using a playful watering can rather than a boring hose. A little whimsy can make gardening chores less, well, chore-ish.
Once the ivy is planted, it’s time to let nature do its thing. Ivy grows relatively quickly, so keep an eye on it as it climbs up the lattice. You may need to gently guide the vines as they grow, weaving them in and out of the lattice to encourage full coverage.
Just remember to check back often, especially because, inevitably, something in the garden will distract you—like that sneaky gopher who seems to think he owns the place. If you notice any stray vines that seem to have ventured off course, don’t be afraid to trim them or coax them back to where they should be.
Watching your ivy flourish can be incredibly rewarding, but here’s an insider tip: regularly check for pests. Some unwanted visitors like aphids might try to crash your green party. A light solution of soap and water can usually do the trick, but don’t let it get out of hand. After all, you want your ivy-covered lattice panel to be charming, not a scene from a horror movie.
In the end, this ivy-covered lattice design adds both beauty and substantial functionality to your garden. It’s like creating a gorgeous green wall that defines your space while also inviting a touch of nature’s elegance into your outdoor life.
9. Artistic Stenciled Fence Designs
When it comes to spicing up your garden fence, artistic stenciled designs might just be what you need. Not only do these charming rustic wooden textures bring an aesthetic flair, but they also serve a practical purpose by adding personality to your outdoor space.
Picture your fence adorned with lovely patterns, capturing your unique style while also giving your garden a cozy, inviting atmosphere—almost like a welcoming hug from the garden itself.
To get started with this creative project, you’ll need some basic supplies: a wooden fence (obviously), weather-resistant paint, stencils (which you can either buy or make), and a few brushes or sponges. First, decide what designs resonate with you. Are you into floral patterns, geometric shapes, or perhaps whimsical animals?
Once you settle on a theme, it’s time to prep your fence. Clean the area well; trust me, a dusty fence won’t showcase your hard work and creativity. A good scrub—or maybe even a pressure wash if you’re feeling adventurous—will do the trick.
Now, onto the fun part: applying the stencils. If you’ve chosen store-bought ones, lay them flat against the fence where you want the design to pop. If you’re feeling super crafty, you can create your own stencil using cardboard; it’s like being back in art class, except this time you won’t have to hide the paint stains from your mom.
Make sure to secure your stencil with painter’s tape to prevent it from slipping around—nothing screams “What was I thinking?” quite like a paint smudge in the wrong place.
When it comes to painting, a little goes a long way. Dip your brush or sponge into your paint and dab it onto the stencil without overloading it, allowing for clean lines that will make you shout “Bingo!” (silently, of course, because we don’t want neighbors wondering about us).
Once you’ve covered the stencil with paint, gently lift it off to reveal your masterpiece. Take a moment to admire your handiwork—maybe even take a selfie with your newly adorned fence. Just remember, everything looks better with a good angle and plenty of natural light.
After the first layer dries (grab a snack or read a book while you wait), don’t hesitate to add more layers if you want deeper colors. However, it’ll be essential to let those layers set fully before applying any further decorations or stencils.
A wise gardener once told me patience is key, and I believe they were onto something (even though I often struggle with flexibility when it comes to my whims).
Lastly, don’t forget to seal your designs. A clear weatherproof sealant will help protect your stunning stencils from the elements while ensuring that vibrant pop of color keeps on shining.
After all, a little rain doesn’t mean your fence’s splendor should fade away. And there you have it—a delightful stenciled fence that isn’t only functional but also sparks joy every time you step into your garden sanctuary.
Think of it as an art gallery, but one that you don’t have to keep kids and pets away from. Sounds relaxing, right?
10. Cascading Vertical Garden Trellis
When it comes to enhancing your garden’s charm, a cascading vertical garden trellis is like planting a little slice of magic right in your backyard. Not only does it help you save space and add a delightful vertical element, but it also cultivates a vibrant and lush atmosphere that effortlessly draws the eye. Imagine your once-plain fence transformed into a stunning backdrop, teeming with life and color. Sounds dreamy, right? Let’s take the plunge.
To get started, you’ll want to choose your trellis style. A rustic wooden design pairs beautifully with any garden aesthetic, radiating warmth and coziness. You can either purchase one from your local garden shop or make your own if you’re feeling crafty (and maybe channeling your inner lumberjack). If you take the DIY route, I recommend using untreated cedar wood—it’s durable and will weather beautifully over time.
Don’t forget the tools: a saw, measuring tape, hammer, nails or screws, and a drill should do the trick.
Next, you’re going to want to decide where your trellis will live. Check for a spot that gets a good amount of sunlight and is close to a water source. Once you’ve found your prime location, it’s time to get that base in place. If building from scratch, keep your trellis at least six feet tall so your plants can cascade in glorious drapes. Remember to anchor it well; nobody likes a wobbly trellis that leans to one side like an old uncle at a wedding.
Now comes the fun part—deciding what to plant! Climbing plants like morning glories, sweet peas, or even strawberries (yes, strawberries can be so fancy) work wonders. They’ll embrace your trellis as they climb, creating a lovely green curtain against your wooden backdrop.
If you’re feeling adventurous, mix in some trailing plants like ivy or even flowering vines. Just picture it: a tapestry of green and blooms, flowing like a fairy tale right before your eyes.
Pro tip: As your plants grow, be sure to train them onto the trellis by gently guiding their tendrils. It’s like being a plant cheerleader, cheering them on as they grow skyward, but without the pom-poms.
And don’t forget to water regularly and check for pests like aphids; otherwise, you might just find those little guys throwing a wild party on your beloved blooms.
Before long, that plain fence won’t just be a fence anymore; it will be a living, breathing piece of art, full of character and life. Plus, your friends will start referring to your garden as the chosen one—who doesn’t want that accolade?
Essential Gardening Supplies Checklist
Starting your gardening journey can feel a bit overwhelming, can’t it? You’ve got garden fence ideas dancing in your head, and suddenly you’re thinking, “What do I even need?”
Starting your gardening journey can be daunting, but with a little preparation, you’ll soon be cultivating your own paradise.
Fear not. First, grab some sturdy gloves—dirt under your nails is one thing, but deep cuts? No thanks. You’ll need a trowel for digging, plus a spade for the heavy lifting.
Don’t forget to snag some quality potting soil and fertilizer; they’re your garden’s best friends. Oh, and seeds—couldn’t hurt to grab a few of those. Watering can? Yes, please.
Finally, a good pair of pruning shears rounds out your essentials. With this checklist, you’re ready to dig in and create your oasis. Let’s grow!

