Thinking about sprucing up your small space? You’re in for a treat. Mini gardens are like little treasure chests of creativity. Ever thought of hanging planters or a whimsical fairy garden? Imagine transforming that bare wall into a lush vertical masterpiece—without the need for a green thumb. Sure, I’ve killed a cactus or two, but that only makes me appreciate the vibrant life these gardens can bring. Ready to explore some sprinkle-of-magic ideas? Let’s plunge into it.
Unique Vertical Garden Layouts
When you think about vertical gardens, what pops into your mind?
Picture a wall alive with hanging plants, or a quirky succulent arrangement that’s just begging to be admired.
You can even incorporate colorful containers or tiny pathways made of stone to create a mini sanctuary that’s all your own.
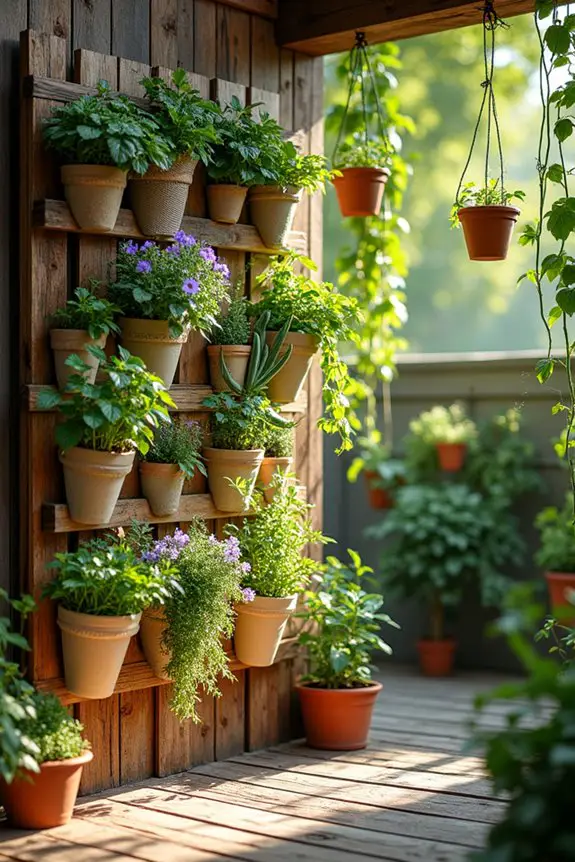
1. Hanging Planter Wall Installation
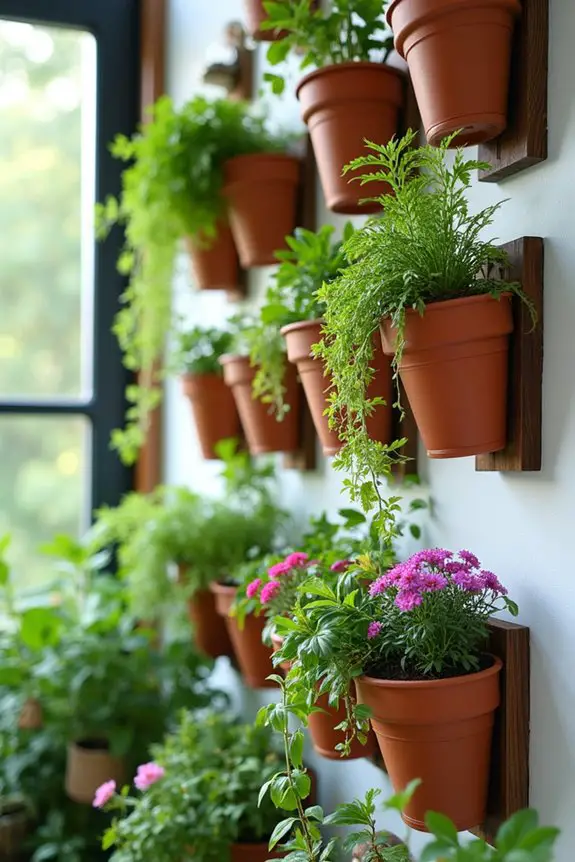
Creating a hanging planter wall isn’t just a trendy way to display your plants; it’s the perfect blend of functionality and style! Imagine transforming any blank wall into a lively tapestry of greens and colors. It not only saves space but also adds a touch of whimsy and charm to your surroundings. Talk about a win-win! Ceramic herb pots set can be a delightful addition to your vertical garden.
First up, let’s talk about the materials. You’ll want sturdy wall brackets or shelves, and hanging planters made from durable material. You could even upcycle old containers or use terracotta pots—your call, really!
Make certain to lay everything out before you begin—you know, like testing your favorite recipe before serving it at a dinner party. Trust me, you don’t want surprise ingredients around your prized begonias.
Next, decide the configuration. Do you want the planters to hang in a neat row, or would a staggered look be more your vibe? I personally love the zigzag style—it’s a bit like my hair on a messy hair day, full of character and chaos, but it totally works. It gives off that relaxed feel while also showing off your plants’ personalities.
Once you’ve decided on your layout, mark the spots where you’ll install the brackets. Use a level to verify everything’s straight—nobody wants wonky plants, right? Then, drill your holes and secure the brackets to the wall.
I once tried to skip this step and just use adhesive hooks, but let’s just say my fern and I’d an awkward moment when it took a tumble.
Now, fill those planters with soil and a mix of your chosen plants. Think about color and texture. Pair leafy greens with vibrant flowers or even succulents for a layered look. You want it to feel like you’ve created a mini jungle that beckons anyone to come and explore!
Just remember to give them a good water after planting—because nothing says ‘I forgot to care’ more than wilted leaves.
After that, hang your planters on the brackets. Step back and admire your handiwork! It’s important to take a moment here. Don’t you feel proud? You’ve basically created a work of art that doubles as a cozy corner of nature.
Lastly, don’t forget to maintain your green wall. Regular watering, light exposure checks, and maybe even some plant food now and then will keep your little garden thriving. Plus, a little pruning goes a long way. Just like a haircut, sometimes a trim is all your plants need to look their best! Plus, for the best results, consider investing in a quality vertical garden wall planter that enhances your creative mini garden designs.
2. Succulent Arrangement Techniques
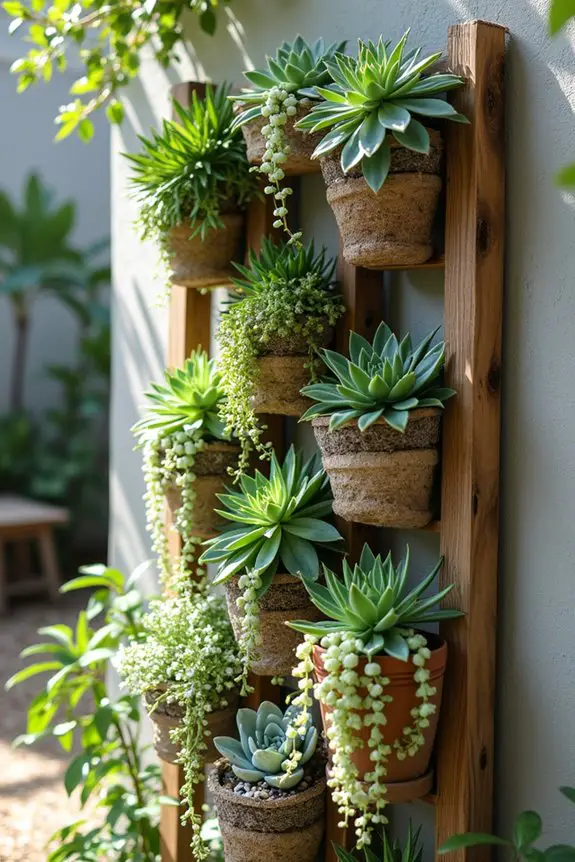
When it comes to succulent arrangements, there’s something simply magical about creating unique vertical garden layouts. Not only do these little plants add a splash of life to any space, but their trendy, chic vibe can elevate your home decor to new heights—literally. Envision turning an ordinary wall into an eye-catching masterpiece that’s as functional as it’s stunning.
So, how do you achieve this floral fantasy? Start by selecting a sturdy vertical frame or trellis. Consider it as the backbone of your succulent story. You can repurpose an old ladder, a wooden pallet, or even a vibrant mesh grid—anything that allows your plants to hang and shine. I once used a collapsing tent frame, and while it seemed genius at the time, let’s just say my succulents took a dramatic tumble. Lesson learned: stability is key. Foam kneeling pads can be a helpful addition for comfort while working on your garden projects.
Next, reflect on your plant selection. Succulents come in all shapes, sizes, and, yes, colors. Combine rosettes, trailing varieties, and plump, quirky options for texture and interest. Envision this: bold greens paired with soft pastels and deep hues, creating a visual feast.
I personally adore adding a succulent with quirky leaves, like the string of pearls, because let’s be honest, it’s like the plant equivalent of a fun hairstyle.
Then, it’s time to plant. Use lightweight potting soil—yep, we want that drainage game strong. When you’re placing your succulents, consider how they’ll grow. You don’t want them crowding each other, like a packed subway at rush hour.
Give them room to breathe and flourish, and don’t forget to think about the light exposure—some are sun-worshippers, while others prefer the shade. Interestingly, using a mini pop-up greenhouse can enhance your growing environment by providing optimal conditions for your succulents.
Now, once you’ve got your arrangement just how you like it, secure everything to your vertical frame. Use sturdy clips, twine, or even fishing line to hold your succulents in place. You want them to stay put while still looking fabulously wild.
Trust me, I once tried to achieve a loose look with some fancy ribbons. Spoiler: they weren’t very effective.
Finally, give your succulent arrangement a loving home. Hang it on a wall that gets the right amount of sunlight, but not too much. I once thought my south-facing window would be perfect—only to watch my poor cacti look more like shriveled raisins than the vibrant plants I dreamed of.
Make sure to water them sparingly; succulents are like that friend who loves you but doesn’t need to hear from you every day. They thrive on a bit of independence.
3. Colorful Container Combinations
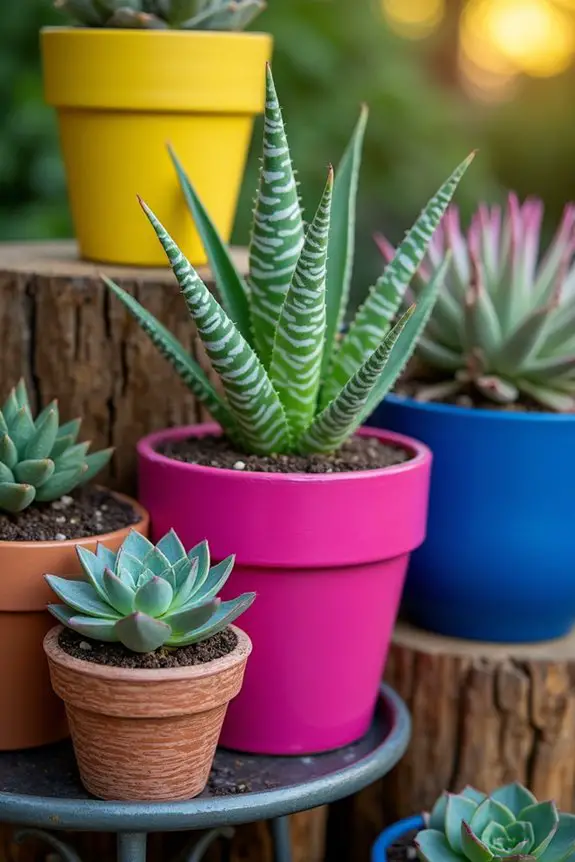
When it comes to creating a vivid vertical garden, choosing colorful containers can truly transform your space. Not only do vibrant pots catch the eye and enhance your plants’ beauty, but they also add a distinct flavor to your overall garden aesthetic. Think of it as seasoning your favorite dish—a little extra color makes all the difference.
Start by picking containers in various shapes and colors. Don’t shy away from the bold blues, cheerful yellows, or even deep purples. You know what they say—variety is the spice of life, right?
I remember when I found a terracotta pot that was just way too dull for my taste. So, I painted it a bright pink, and let me tell you, it instantly became the star of the show—it’s like a plant party in there.
Next, mix and match your plant selections. Pair tall, striking succulents with low, trailing varieties just spilling over the pot’s edge. Visualize this scene: a tall, proud agave standing tall next to a whimsical string of hearts, both of them together dancing with color.
It’s a little like inviting friends with different personalities to the same potluck—they all bring something unique to the table.
When planting, layer your soil. Start with a good base of stone or gravel for drainage, then add your potting soil, like lovingly crafting a lasagna. Be sure to give each succulent enough room to grow without feeling crowded—I once crammed in too many plants, and it looked like a succulents’ jam session gone wrong.
After arranging your plants, place your colorful containers at varying heights. Use small stands or even stackable plant tables to create depth and interest. A seed starter greenhouse can also enhance your gardening experience by providing a nurturing environment for young plants.
Just imagine your garden as a stage, with each pot getting a spot in the spotlight. Don’t forget, some light will make those colors pop, but be careful about too much sun. A wilted plant isn’t cute at all—trust me, I’ve made that mistake before.
And finally, admire your creation often. Maybe even snap a pic or two for Instagram. This colorful collaboration of pots and plants isn’t just a garden; it’s a vibrant reflection of your personality.
4. Natural Stone Pathways
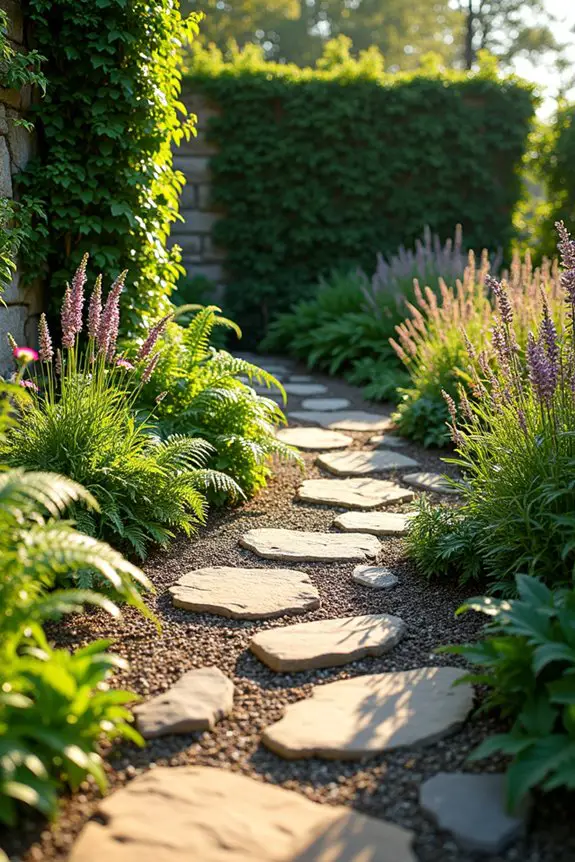
Creating natural stone pathways in your vertical garden is like adding a well-seasoned drizzle to a gourmet dish—it elevates everything around it. Not only do these pathways guide your guests through the greenery, but they also create a rustic, charming vibe that makes your garden feel both inviting and enchanting.
Picture strolling through a serene, hidden garden, where every step leads to a new discovery. That’s the kind of atmosphere you’ll be crafting.
To begin, gather your stones. Look for a mix of sizes and shapes—this variety adds character. I once went to a local quarry and ended up with half my car filled with stones that looked like they just rolled off a mountain. Beautiful, yes, but heavy—like lugging around a stubborn bag of flour.
Next, decide on the pathway layout. You can go for straight lines for a more formal look or gentle curves for a relaxed feel. Remember, you’re not just laying stones; you’re designing a journey. I recommend sketching it out beforehand, or you might end up with a path that resembles a snake—trust me, my first attempt was far too twisty, and even confused me.
Once you’ve got your design down, clear the area where your stones will go. It’s like prepping the perfect pan for cooking; you don’t want anything getting in the way of your masterpiece. Get rid of weeds and debris, and make sure the ground is level. If you’ve ever tried to bake with a wobbly cake plate, you’ll understand the importance of a solid foundation.
Now, it’s time to lay those stones! Start at one end and work your way to the other. Place them a few inches apart, allowing space for plants or ground cover to spill over if you want that dreamy garden feel. You might find yourself getting a bit crick in your neck or a sore back—yep, you’re not alone; I’ve done the same while trying to position the stones just right. They’re surprisingly heavy.
Once your stones are laid out, it’s a good idea to fill in the gaps with gravel or sand. This not only keeps them in place, but it’s like giving your pathway a lovely border. After you fill in the gaps, give it a little water to help everything settle.
Then just stand back and admire your handiwork.
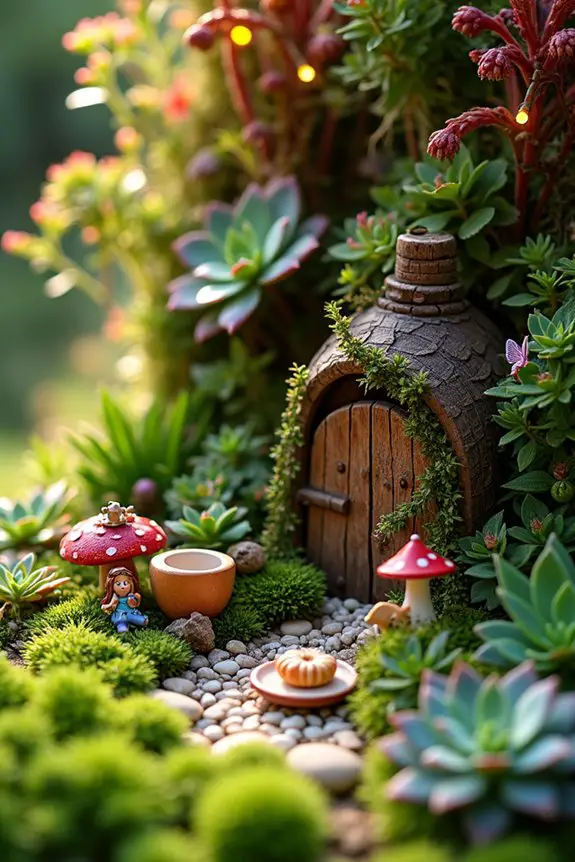
5. Artistic Miniature Landscape Ideas
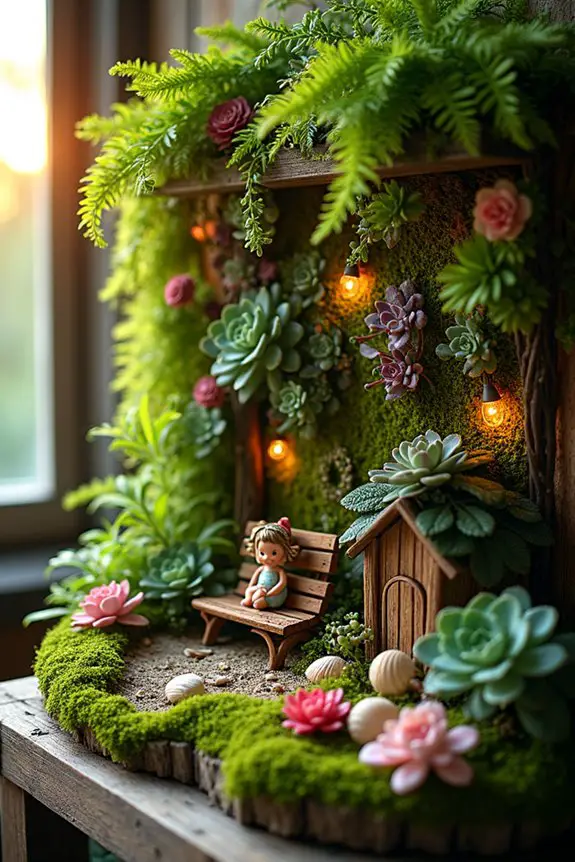
When thinking about artistic miniature landscapes, your vertical garden can be transformed into a whimsical wonderland. Imagine stepping into a miniature world where every plant tells a story and every design element invites discovery. This kind of layout not only adds charm but also creates a unique experience that draws your eye and sparks joy.
First things first, choose a theme. Whether it’s a fairy-tale garden, a lush rainforest, or a tranquil desert, your theme sets the tone. For instance, I once tried a seaside theme, complete with tiny seashells and sand, which worked great until I realized my plants looked a little too parched—not so beachy after all. So pick something that resonates with you!
Next, let’s talk about your plant selection. Look for a variety of sizes, colors, and textures. Succulents can be an absolute gem for this; they’re low-maintenance, like that friend who always shows up on time with snacks. You might want to mix in some tiny flowering plants or even moss to add pops of color.
Keep in mind that you’re creating layers—think about how different plant heights can create depth, like staging a play where the tallest actors are in the back.
Now, for the layout. I suggest using small containers or even repurposing items you have lying around, like mini teacups or old jars. Line them up like a quirky little street or scatter them across a shelf for that surprising feel. Just remember, balance is key, much like trying to juggle spaghetti and meatballs without dropping any on the floor.
Adding some decorative elements will tie it all together. You can include tiny figurines, like fairies or animals, to spark the imagination. Maybe even position a miniature bench or doorstep of a tiny house amidst your plants. However, don’t go overboard—it’s easy to turn into a cluttered mess, kind of like my kitchen during dinner prep.
Finally, the magical touch—lighting. Small fairy lights or lanterns can create a cozy vibe that makes your miniature world glow in the evening. You’ll be amazed at how these little additions make your garden feel alive, just like my busy kitchen at dinner time.
6. Zen Garden Aesthetic Principles
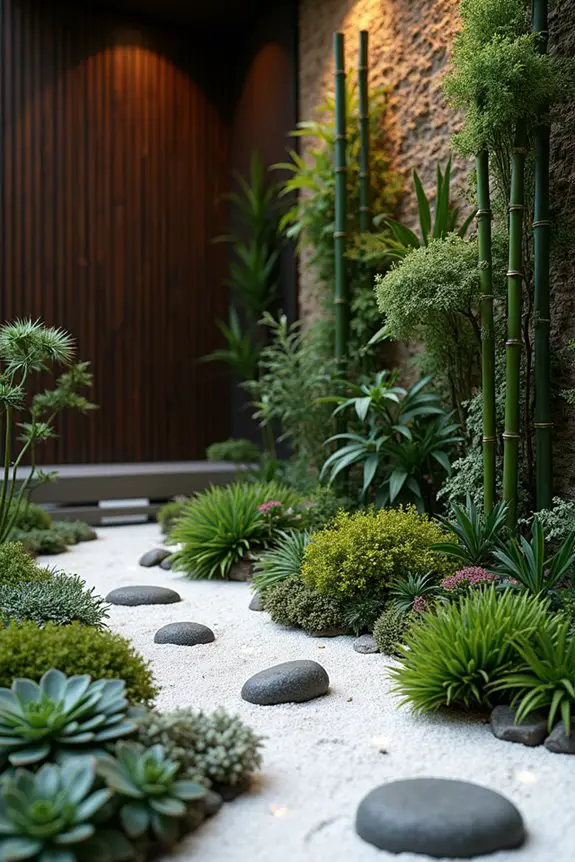
Creating a Zen Garden isn’t just about planting; it’s about crafting an oasis of calm right in your home. The beauty of a Zen garden lies in its simplicity and balance, which transports you to a space that feels serene and inviting. It’s like escaping to a peaceful retreat whenever you glance at your mini masterpiece.
To start, pick a sturdy base for your vertical garden; it could be as simple as a wooden board or a wall-mounted planter. The goal here is to establish a solid foundation that helps keep everything in place, especially when those little gravel grains threaten to escape. You’ll want to verify it’s good and secure, just like your favorite comfy chair that holds you right where you need to be.
Next, think about your plant choices. Opt for plants that embody the essence of Zen. Succulents, air plants, and even small bamboo can create a soothing effect. The key is choosing greenery that promotes tranquility. I once planted a particularly rebellious cactus, which ended up being my version of an unruly houseguest—let’s just say, it was more prickly than peaceful.
Now, layout is essential. Your plants should mimic the natural flow of water or the gentle curves of a river.
Arrange your plants and decorative stones in patterns that encourage the eye to travel across the garden. It’s a bit like making a salad—too many toppings can turn it into a messy bowl. So, focus on balance. A couple of larger plants paired with smaller ones can create visual interest without overwhelming the space.
Don’t forget the finishing touches. Raked sand or gravel can be the perfect accent to your green treasure, mimicking the tranquil patterns seen in traditional Zen gardens. I’ll admit, raking isn’t my forte—more like my version of sculpting spaghetti, but it’s all about the intention. Create simple lines or spirals that bring peace to your mini scene.
Finally, lighting can set the mood for tranquility. Soft, warm lights will enhance the zen feel and allow your garden to glow softly at night. It’s like giving your plants a gentle hug of light. You want your space to feel inviting, not like the spotlight is on your plants for a talent show they didn’t sign up for.
With each step, you’re not just designing a garden; you’re crafting a peaceful retreat that invites you to pause, breathe, and find your center.
And who wouldn’t want a little slice of tranquility in a quirky container that reflects their own personality?
7. Patterned Garden Bed Designs
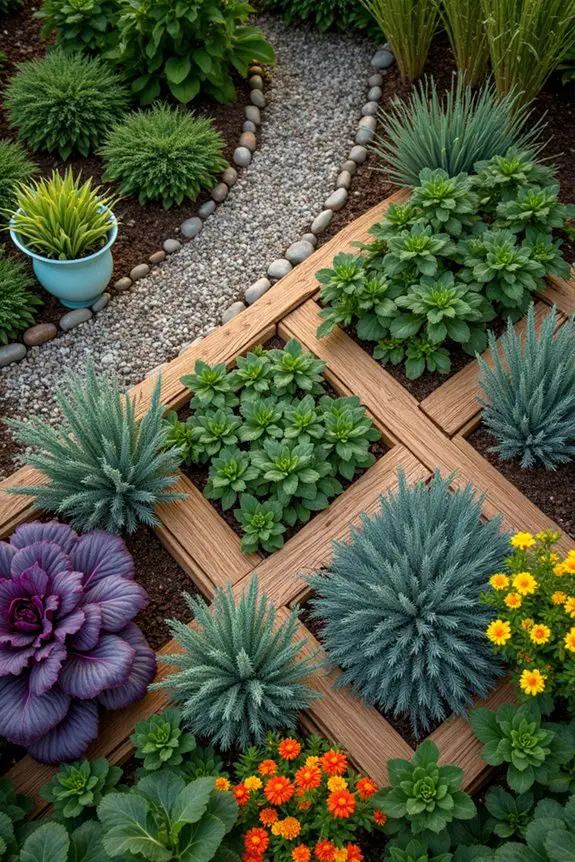
When it comes to mini gardens, patterned garden beds can really take your creativity to the next level. Imagine your plants arranged in enchanting geometric shapes or spirals, almost like a garden version of a cozy quilt. Not only does this design make your garden visually striking, but it also helps you maximize space while adding an artistic flair. It’s like upgrading your favorite sandwich from plain bread to a fancy ciabatta—suddenly, everything feels special.
Start by deciding on a pattern. Do you want sleek lines, or perhaps curvy waves? Whichever you choose, sketching it out can help you visualize the layout. Picture it like following a recipe: the clearer your plan, the easier the execution.
Using a wooden frame or even stones can help define different sections of your garden, creating a border that keeps things organized—just like those colorful muffin tins that hold everything in place during baking.
Next, select your plants. Mixing tall, striking plants with delicate ones can create a visual feast. Think of it like building a sandwich with layers—if everything is the same height, it’s just a flat piece of bread. Use plants with different textures and colors that complement each other.
And remember, no one wants soggy bread, so make sure your plants get the right amount of sunlight and water based on their needs.
As you plant, consider the distances between each one. It’s kind of like spacing out toppings on a pizza; you want each plant to have enough room to thrive while still keeping that lovely pattern intact. I’ve learned this the hard way. My first attempt at a chevron pattern ended up looking more like a tragic nacho platter—too many toppings too close together.
Lastly, don’t shy away from incorporating decorative elements. A small birdbath, stones, or even fairy lights can complement your design, adding charm and character. It’s sort of like sprinkling sesame seeds on your freshly baked bread. A little something extra can elevate the whole experience.
With these tips, your patterned garden bed could become a delightful centerpiece in your space, making you the proud parent of a lush green creation. Who wouldn’t want that kind of artistry in their home?
8. Customizable Garden Feature Ideas
Creating a vertical garden layout is one of the most delightful ways to bring a splash of greenery into your home or tiny outdoor space. Not only does it save precious floor space, but it also adds a stunning visual element that draws the eye upwards, creating a sense of depth. Envision it like hanging your artwork on the walls—suddenly, your space feels more vibrant and full of life.
One unique idea for a vertical garden layout is using pocket planters. They resemble little pockets of joy, just waiting to be filled with your favorite herbs or flowers. You can easily find them made of fabric or plastic, and they’re perfect for hanging against a sunny wall. Imagine cascading vines or golden herbs spilling out of these little pouches, like a fresh salad ready to be tossed together. It’s functional and downright charming, isn’t it?
Another fun option is the vertical pallet garden. Grab an old wooden pallet, give it a good wash, and then lean it against a wall or fence. Fill the slats with soil and plant your favorite blooms. Visualize this: a rustic masterpiece that looks like it came straight out of a hip café. Plus, it’s a great conversation starter. Just make sure to secure it well, or you might end up with a surprise gardening incident that leaves your plants face down.
And let’s not forget about trellises. These vertical structures are perfect for climbing plants like peas or cucumbers. You could say they’re like a stairway to vegetable heaven. With a little creativity, you can even create beautiful shapes or patterns as they climb up. The beauty of trellises isn’t just in their functionality but in how they can be arranged. It’s kind of like building a Lego masterpiece—but with plants instead.
Finally, if you’re feeling really adventurous, consider creating a hanging garden with pots suspended from the ceiling or a sturdy frame. This approach not only saves space, but it can also turn your area into a jungle retreat. Just be mindful of drainage—no one wants a soggy floor, or worse, an indoor water feature that wasn’t planned. Trust me, I once attempted this, and my living room ended up resembling a slip-and-slide.
With these customizable vertical garden ideas, you can transform your space while being creative. Just remember, gardening is a journey, not a race. So, enjoy each moment as you watch your plants grow, flourish, and tell a story of their own.
9. Whimsical Fairy Garden Elements
Creating a whimsical fairy garden can turn your vertical garden layout into a magical retreat. Picture tiny fairies dancing among your plants, their laughter mingling with the rustling leaves. This enchanting addition not only beautifies your space but also sparks joy and imagination, making your vertical garden feel like a cozy nook in a fairy tale.
To start, gather some miniature fairy figurines, tiny furniture, and quirky decorations like mini mushroom houses or fairy lights. You can find these charming little items in craft stores or online. Place them strategically among your plants, allowing them to peek out from behind leaves or sit atop a petal. It’s fun to create little scenes—like a fairy tea party or a whimsical mushroom village—each telling a story that brings life to your garden.
Don’t forget about pathways. You can create a charming path using small stones or colored gravel. This not only leads you through your miniature world but adds depth to the garden. As you design, think about the textures and colors of your plants; contrast a soft fern with a sturdy succulent to create a dynamic look that keeps the eyes roaming.
Now, for that touch of sparkle, fairy lights work wonders. String them through your plants or drape them around your decorations. When the sun sets, your garden will glow with a gentle twinkle, transforming it into a dreamy oasis. Remember, though, to choose lights that are suitable for outdoor use if your garden’s outside. I once picked some that were meant for indoor use, and let’s just say, they didn’t appreciate the rain as much as I hoped.
As you build your whimsical fairy garden, enjoy the process. Feel free to rearrange items or swap out decorations with the changing seasons. Your fairy land will evolve, much like the memories formed over time.
Who knows, you might even catch a glimpse of a fairy or two…or maybe that’s just your imagination running wild, like mine often does. Just remember to relax, soak in the creativity around you, and let your inner child flourish among the greenery.
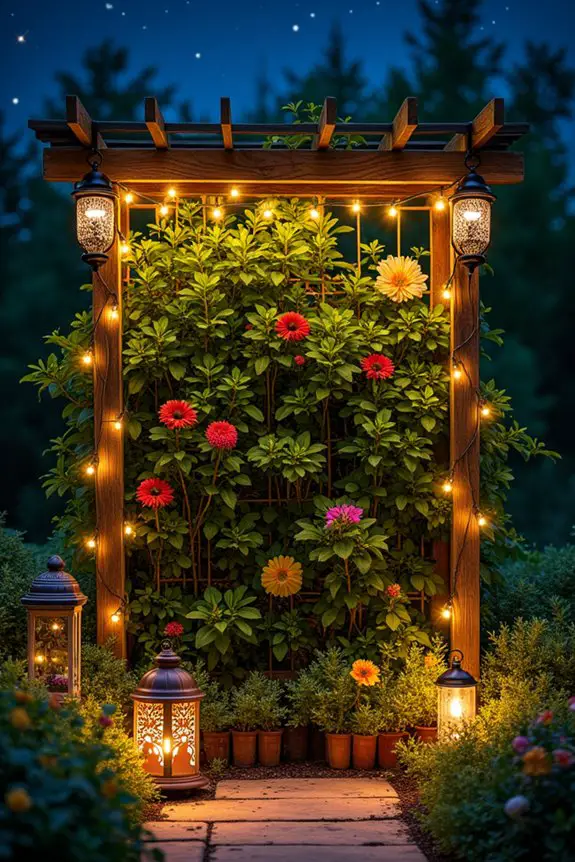
10. Creative Lighting Design Ideas
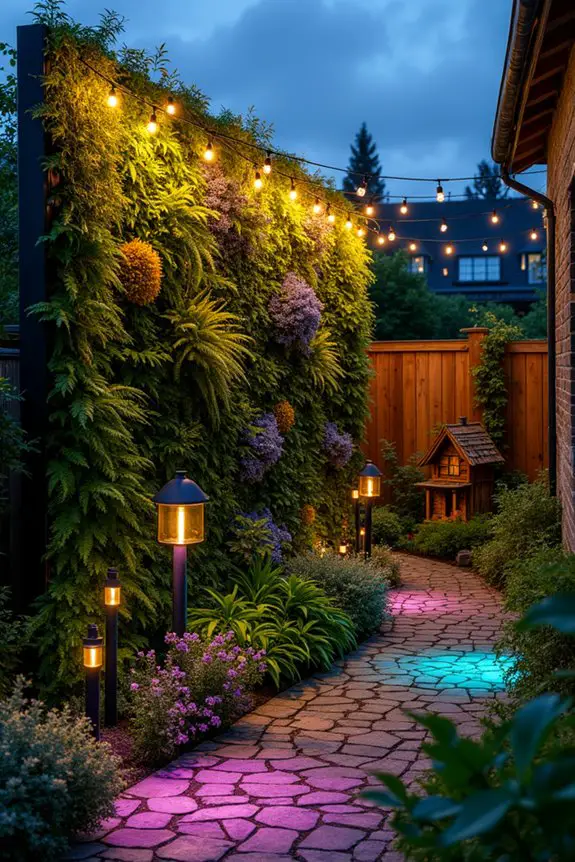
When it comes to adding some sparkle to your vertical garden, creative lighting can transform your space in the most enchanting way. Imagine your garden aglow with soft, warm lights, casting beautiful shadows and creating a serene vibe that makes you want to relax right there. Not only does it serve a practical purpose by illuminating your plants, but it also sets the mood for evenings spent outdoors.
First off, think about string lights. They’re like the fairy dust of outdoor lighting. You can drape them along the edges or weave them through your plants. If you’re feeling fancy, try LED fairy lights in cute shapes like starbursts or even little leaves. There’s something so cozy about them that just makes you want to curl up with a cup of tea and enjoy the view.
Next up are solar-powered lamps. They’re great because, well, no extension cords! And they charge up during the day to light your garden at night. Place them strategically along pathways or near your favorite plants. They’ll guide you through your little green haven and maybe even make you feel like you’re strolling through a magical forest, minus the trolls, of course.
Let’s not forget about colorful spotlights! These little gems can really pack a punch. Aim them at specific plants or features you want to highlight, like a blooming flower or an adorable fairy house. It adds drama and makes your garden feel alive, like a scene from an animated movie, where everything’s a bit brighter and more vibrant.
Now, if you’re like me and somewhat of a lighting klutz, begin by sketching out where you want your lights to go. Trust me, it’ll save you from getting tangled in a web of wires later. After all, nobody wants to do the dance of frustration trying to fix a lighting mishap when you could be enjoying a peaceful evening.
In the end, take time to play around with different combinations and placements. Light should feel effortless and fun, allowing your creativity to shine. So go on, make that vertical garden glow and watch as it turns into a nighttime wonderland. Just be careful not to trip over your own designs—you never know what hidden fairy might pop out to say hello.
Effective Space-Saving Techniques
Even if you think your outdoor space resembles a small postage stamp, there’s plenty of room for a mini garden that’ll make your neighbors green with envy.
Try vertical gardening—attach planters to walls or use ladder shelves.
Have you heard of container gardening? Pick various pot sizes and stack them for a fun look. Those hanging planters? Perfect for herbs or flowers hung from your porch—it’s like giving your space a whimsical touch.
And don’t forget about using corners; corner shelves can add depth.
Finally, consider having a themed garden. Combine mini garden ideas for small spaces, like succulents mixed with fairy lights, to create a stunning focal point.
You’ll impress everyone, even if your space is tiny.

