Creating a garden path is practically an art form—it’s like laying down a secret treasure map to your outdoor sanctuary. You might wonder how something as simple as a pathway can transform your space, right? Well, let me tell you, the right design can make your garden feel like a whimsical wonderland, inviting you and your visitors to explore. Ready to discover some ideas that might just make you the envy of your neighborhood?
The Curvy Pathways
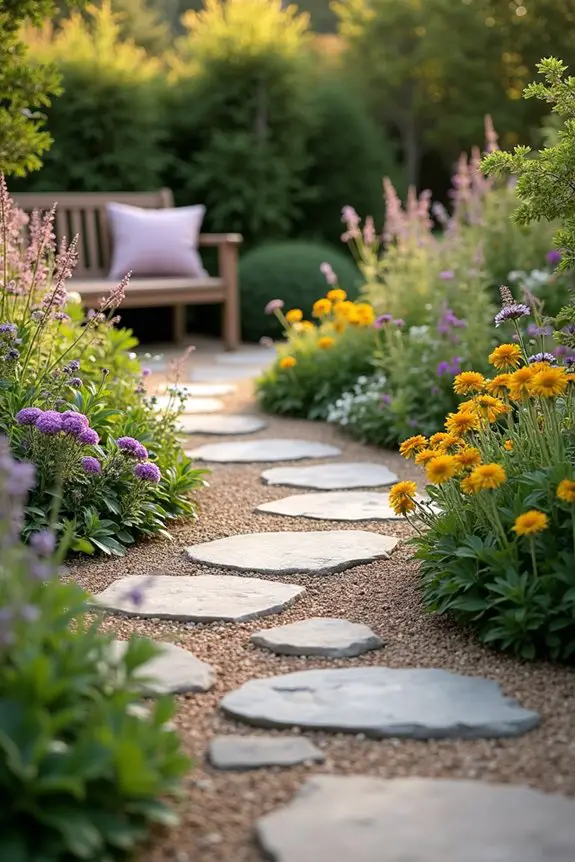
Curvy pathways can seriously transform your garden’s vibe, don’t you think?
Imagine stepping onto a smooth stone pathway or a rustic wooden plank design that leads you through a whimsical flowerbed, making every stroll feel like a mini-adventure.
Whether you go for a serene Zen garden path or a lively paved mosaic pattern, each twist and turn offers new surprises that keep the garden fresh and inviting.
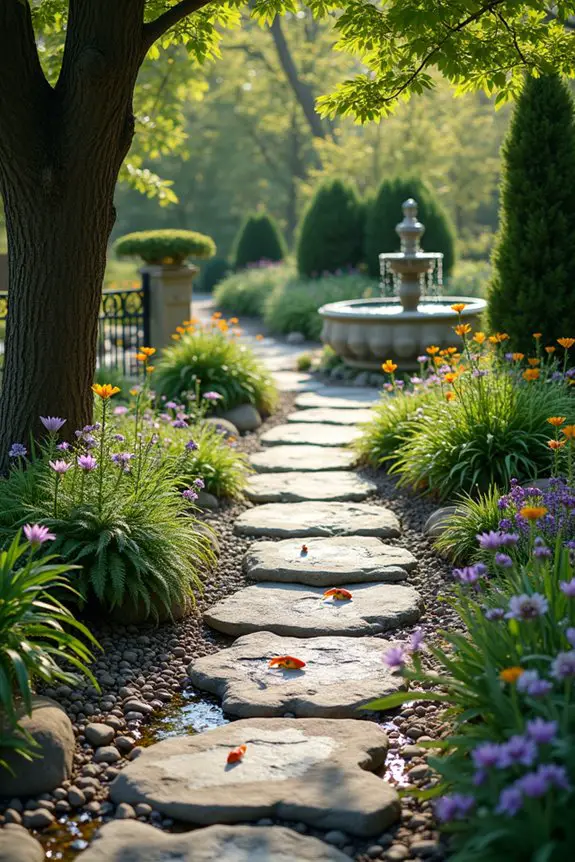
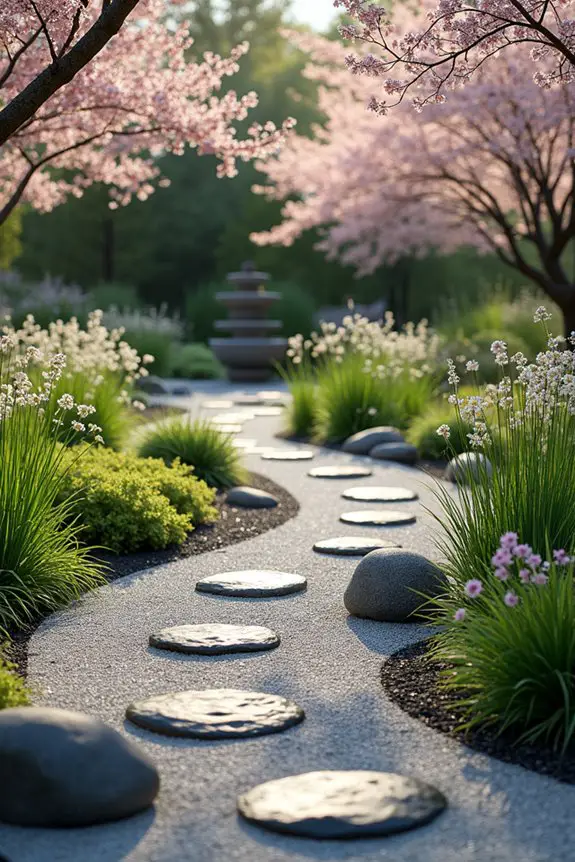
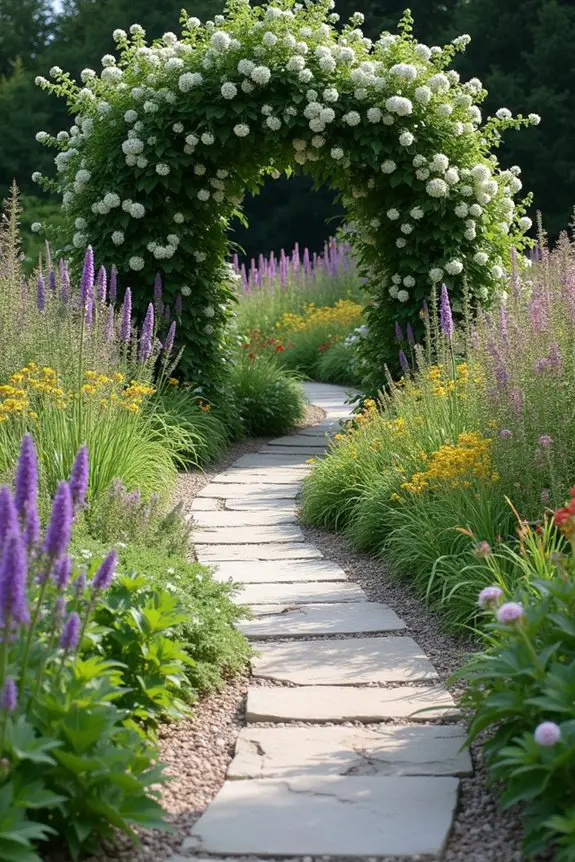
1. Stone Pathway Layout
When it comes to creating an inviting outdoor space, a stone pathway can do wonders, especially when you opt for curvy pathways. These meandering paths not only guide your guests through your garden but also add a touch of whimsy and charm. Imagine this: soft curves leading you to hidden pockets of blooms or a cozy seating area, creating a sense of adventure every time you take a stroll. It’s like a little treasure hunt right in your backyard.
So, how do you whip up a perfect curvy stone pathway? First, grab a garden hose. You heard me right, a simple hose. Lay it out in the shape you desire—curving here and there, like a snake sunbathing on a rock. Trust me, this will help you visualize the path without the commitment of digging up soil or hauling stones just yet.
Next, once you’re pleased with your design (feel free to adjust until you’re happy, no one’s judging), mark the pathway with some landscape paint or garden stakes. This step is essential, or else you might accidentally create an accidental abstract art installation instead of a lovely walkway.
Now comes the fun part: choosing your stones. You can mix and match smooth river stones with rugged flagstones for a vibe that’s both rustic and sophisticated. Don’t worry if you feel overwhelmed; I spent an entire afternoon picking out rocks, like I was auditioning for a gardening competition that doesn’t exist. Choosing stones can be quite the adventure, and hey, you might even uncover your new favorite one—perfect for skipping across puddles.
Once you’ve got your stones, start laying them out along your marked path. Think of this as creating a giant puzzle, but don’t aim for perfection. A bit of random spacing adds character and charm—besides, who among us hasn’t been a little irregular in our designs, right?
Finally, sprinkle some gravel or fine sand around the stones to secure them in place. This helps keep the stones grounded and provides a neat finish. And there you have it! Your very own curvy stone pathway radiating personality, steering your footsteps in style while welcoming everyone to enjoy the beauty of your garden. Additionally, enhancing your garden with stylish plant labels can help showcase the beauty of your flowers and plants.
2. Rustic Wooden Plank Design
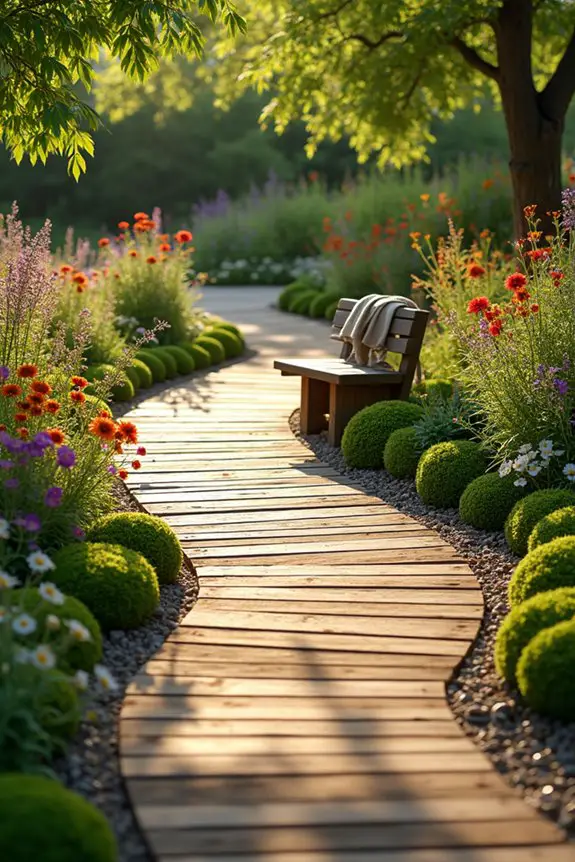
When you think about enhancing the beauty of your garden, rustic wooden plank designs can really take a curvy pathway to the next level. Imagine this: sturdy wooden planks, gently fading into a lovely weathered hue, guiding you along a charming path through your garden. They bring a blend of natural warmth and character, creating a relaxed vibe that perfectly complements lush greenery and colorful blooms. Plus, they can join forces with those curvy pathways to create a seamless experience while walking through your serene outdoor space.
First things first, gather your wooden planks. You can use recycled lumber for a sustainably chic touch or opt for brand new materials if you’re feeling fancy. If you’re like me and love a good bargain, local hardware stores often have great deals on treated wood that can stand up to the elements. Aim for planks that are at least an inch thick to guarantee stability. Don’t shy away from exploring different sizes as well. Variety adds charm, right? Additionally, don’t forget that essential garden tools such as garden scissors are useful for trimming any overgrown plant edges that may intrude upon your pathway.
Now, it’s time to map out that curvy path. Grab your garden hose again and lay it down just like in our stone pathway adventure. Next, trace out a sweeping design that feels natural and inviting. You want it to flow smoothly, weaving in and out of your garden beds. Once you’ve got that lovely shape, mark the edges with those trusty garden stakes or landscape paint again.
Then comes the installation part, and trust me, this is where the magic happens. Dig out a narrow trench along your marked path. It doesn’t have to be a massive hole—think of it as creating a cozy bed for your wooden planks. Now, place your planks into the trench, with the rounded edges of the pathway cradling them like a gentle hug. If you struggle with alignment (hey, don’t we all?), just make sure they’re relatively even and spaced out nicely; remember, perfection isn’t the goal here.
After your planks are snug in place, you can sprinkle in some gravel or soil around the edges to help hold them secure. This little touch not only reinforces the path but adds a neat finish. Honestly, I found that a few days later, I felt so accomplished seeing my rustic wooden pathway come to life.
It’s not just a place to walk; it invites you to linger, to take a breath, and enjoy your garden from new angles. For those finishing touches, consider using a hand rake small garden to smooth out the edges and help with any loose soil around your path. So, do you think your garden is ready for a charming wooden plank addition?
3. Whimsical Flowerbed Borders
Creating whimsical flowerbed borders to accompany your curvy pathways can transform your garden into a delightful wonderland. They not only create a natural flow and guide the eye along the path, but they also add a playful and enchanting touch that can spark joy every time you step outside. Imagine vibrant colors blooming in unexpected places, drawing you in with whims and whimsy.
Start by envisioning the kinds of flowers and plants that resonate with your garden’s personality. Do you want bright daisies to dance in the breeze, or perhaps some lush lavender to infuse the air with a sweet scent? Choosing a mix of annuals and perennials can guarantee that your borders are lively throughout the seasons. Just remember to think about height—dwarf varieties at the front and taller plants at the back create a delightful cascade of colors and textures.
To layout your whimsical border, grab a roll of garden twine and lay it along the curve of your pathway. This will give you a visual guide for planting. Now, it’s time to dig in the dirt. Well, technically, you’re digging up little holes for your plants, but who’s counting? Remember to loosen the soil because happy roots mean happy plants.
Keep a slight gap between each plant; they need their personal space to flourish, after all. As you go, try not to overthink it—nature is beautifully chaotic, so don’t hesitate to plant them in a slightly haphazard arrangement.
Once the flowers are nestled in their new homes, you might love the idea of adding some decorative stones or mulch around the base. It’s kind of like giving your flowerbeds a stylish outfit. Plus, it helps with drainage and makes weeding a breeze. Honestly, I still chuckle thinking about the time I planted everything in neat rows only to realize that flowers are more about their personalities than following rules. So go ahead, let them have a little fun.
Finally, take a step back and admire your handiwork. Picture yourself meandering along the curvy path, surrounded by blooms that seem to dance just for you. You might spot butterflies flitting about, considering a flower stop, and you’ll feel that your garden has become a magical escape.
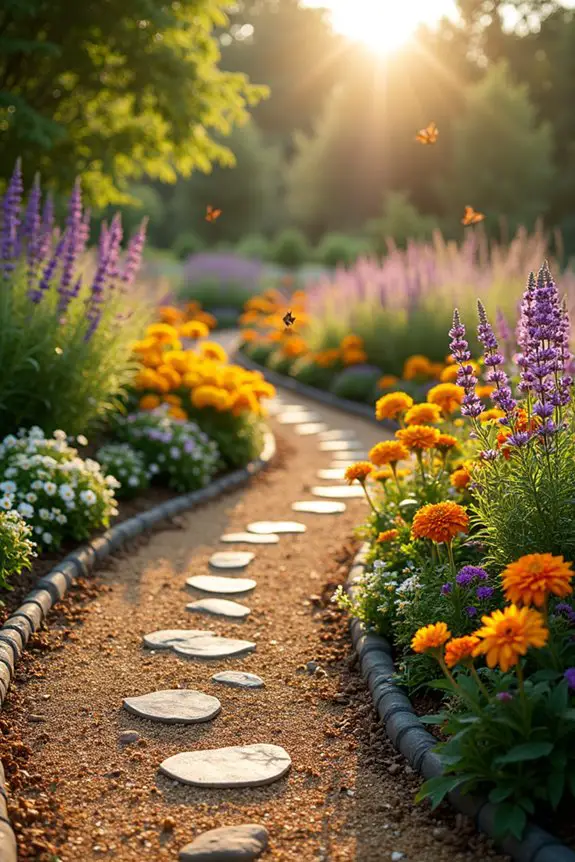
4. Zen Garden Path Design
There’s something incredibly calming about a winding garden path, don’t you think? Curvy pathways invite you to slow down, take a breath, and appreciate the little details around you. They not only guide your journey through the garden but also enhance the overall vibe, bringing a sense of peace and serenity, like a quiet walk through nature. You can practically hear the relaxing whispers of the breeze as you meander along.
To create your Zen garden path, start with a vision. Grab a sketchbook (or a napkin if that’s all you have handy) and jot down a rough outline of where you want the path to wind. Ideally, it should flow gently, allowing for smooth curves rather than sharp turns. Remember, we’re going for tranquility here, not a roller coaster ride. You’ll want the path to draw you in and entice you to explore every nook and cranny.
Next, select your materials. Keep it simple. Gravel or pebbles can be an excellent choice because they make a pleasing crunch underfoot, bringing that satisfying *step, step, step* rhythm to your stroll. If you’re feeling adventurous, larger stones or pavers can create a more defined look while still allowing for those gentle curves. You can sprinkle in a bit of sand, too, as it gives the path a lovely relaxed feel. Just make sure to avoid anything too rigid; we’re aiming for peace, not a military march. Additionally, consider adding an element of sustainability by incorporating a bokashi composting kit to recycle kitchen scraps, enhancing the health of your soil.
Once you’ve decided on materials, it’s time to lay out the path. Use a garden hose or string to mark the curves before you begin digging—this way, you avoid the dreaded “what was I thinking?” moment when you realize the path looks more like a roller coaster than a serene stroll.
Dig a shallow trench, about three to four inches deep, then fill that baby up with your chosen materials. If you’re using gravel, a neat layer about two inches deep will do the trick. You can level it out with a rake, channeling your inner Zen master as you smooth it over.
Here’s a personal tip: when I first attempted this, I got a little too excited and ended up with a path that looked more like a snail’s trail. Cue the laughter from my neighbors. So, don’t rush—let the path wind naturally, embracing those gentle curves, and enjoy the process.
Connect your path with various elements, like some strategically placed plants or ornamental rocks along the sides. Try to use different textures and heights to add depth and intrigue. Imagine how lovely it would be to watch the sunlight dance on the leaves as you wander down your curvy path. Ah, bliss.
Finally, step back and marvel at your creation. Picture yourself strolling down this peaceful pathway, inhaling the fresh scent of blooming flowers, feeling a light breeze brush against your skin. It’s amazing how a simple curvy path can transform your garden into a tranquil retreat, right?
Also, be sure to incorporate manual core aerators into your garden maintenance routine, as they can greatly enhance soil health and promote healthier plant growth, ensuring your path remains surrounded by lush greenery.
5. Paved Mosaic Patterns
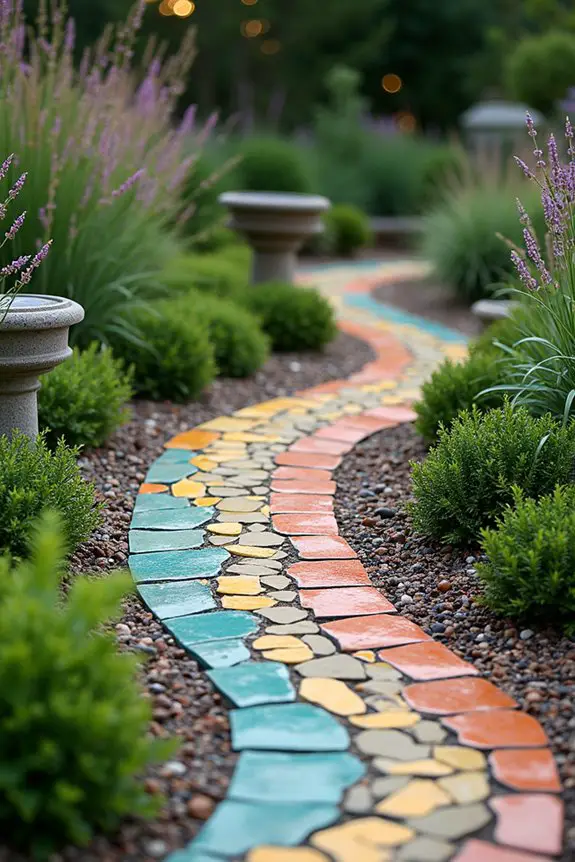
When it comes to garden paths, paved mosaic patterns bring a playful twist to the traditional design, and they work wonders for both functionality and style. Envision this: stepping onto a beautifully crafted path full of colorful tiles that mimic the gentle ebb and flow of nature around you. It adds character, breaks up the monotony of greens and browns, and creates a delightful, welcoming experience for anyone who wanders through your garden.
To get started with your mosaic design, sketch out your vision, just like with the Zen path. Think about the colors and shapes you want to use; perhaps vibrant blues and reds, or earthy tones complementing your plants. Embrace your inner artist because this is where you can really let your creativity flourish. The best part? These patterns don’t need to be uniform. Go ahead, embrace those delightful imperfections, and let your path reflect the beauty of organic shapes—after all, life isn’t perfectly square.
Once you have your design in mind, choose the materials. You could go with concrete pavers, colorful ceramic tiles, or even recycled glass pieces for an eco-friendly twist. Seriously, the choices are endless! Just refrain from anything too slippery; we’re making a path, not a slip-and-slide.
Take your time laying out the pattern on the ground before cementing anything in place. A quick trip to your local gardening store can also inspire you with unique mosaic tile options.
Here’s a little tip from my first foray into mosaic designing—I got so carried away with creativity that I forgot to check if my tiles would match my garden’s feel. Spoiler alert: they didn’t, and I ended up having to buy more. So, keep an eye on cohesion!
Once you’ve set your tiles in place, fill the gaps with sand or grout, making sure they fit snugly together. This step will help keep things tidy and prevent any wandering weeds.
As you create your curvy mosaic path, don’t hesitate to add little touches along the way. Consider incorporating some low-growing plants around the edges or maybe a few whimsical garden ornaments.
Oh, and don’t forget about lighting. Some solar-powered lights nestled among your tiles will add a magical glow at dusk. Imagine strolling down your artistic path as the sun sets, the colors reflecting light, creating a serene ambiance—not a bad way to unwind after a long day.
In no time, you’ll be the proud owner of a mosaic pathway that not only serves its purpose but also sparks joy and conversation. So go ahead, unleash your artistic side, and remember: even if it doesn’t turn out like the Pinterest inspiration board (don’t worry, mine didn’t either), it’ll still be uniquely yours, and that’s what counts.
6. Tile and Gravel Combinations
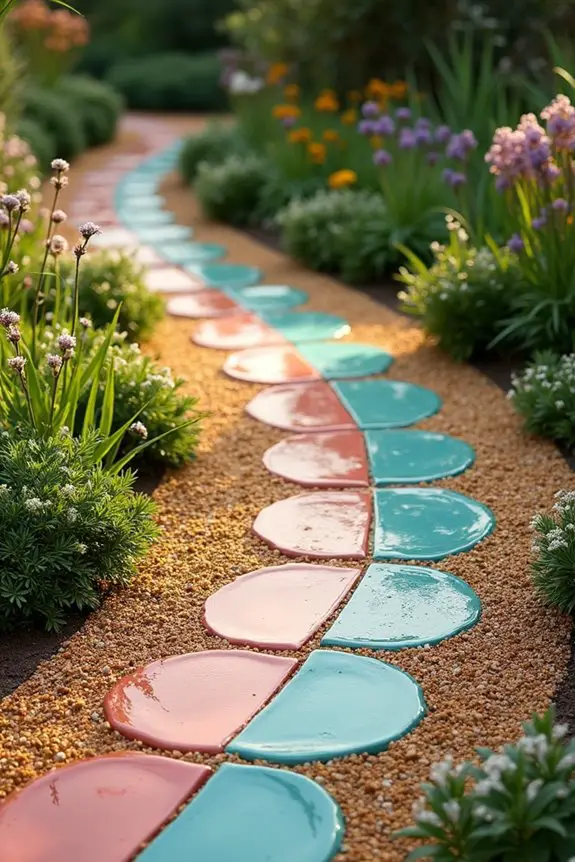
When it comes to creating curvy pathways in your garden, combining tile and gravel is a match made in design heaven. This duo not only allows for a visually stunning effect, but it also provides excellent drainage and a natural feel. Picture a winding path that invites you to explore, with the colors of the tile popping against the earthy tones of the gravel. Talk about a great way to set the mood.
To pull off this look, start by determining your path’s shape. It’s all about the curves—so ditch the straight lines. Trace a whimsical path with soft, flowing curves that mimic the contours of the land. Use a garden hose or a string line to visualize your masterpiece before you start laying anything down. Trust me, the less you rely on your imagination at this stage, the better. I once thought I’d drawn the perfect curve, only to find out it looked more like a wobbly snake.
Next comes the fun part—choosing your tile and gravel. You can go for vibrant ceramic tiles for a bold statement or opt for natural stone tiles that blend beautifully with the environment. Just make sure the tiles you choose are durable and won’t crack under the changing weather.
As for the gravel, look for something that complements your tiles. River rock or decomposed granite can create a cozy atmosphere while still being practical.
Now, it’s time to get your hands dirty. Start by preparing the base of your path. Mark out your design, and then dig out a shallow trench. Aim for about four to six inches deep; this will help keep everything level and in place.
Lay down a weed barrier fabric to prevent those pesky plants from poking up through your idyllic gravel. After that, pour a layer of gravel about two inches deep, packing it down firmly.
For the fun part—laying tile. Arrange your tiles along the curves, pressing them snugly into the gravel. Make sure they sit firm and even, so you won’t trip when you take a late-night stroll.
Once satisfied with the layout, fill in the spaces with more gravel. Just take care not to completely bury your beautiful tiles; they should still be visible, adding that touch of flair. Finish up with a light sprinkle of water to settle everything in place and help lock the tiles within the gravel.
Lastly, let your path mature into a beautiful masterpiece by adding a touch of greenery. Line the edges with small flowering plants or even low-growing ground cover. This softens the look and blends those shifts beautifully.
And just like that, you’ve created a vibrant
7. Customizable Lighting Features
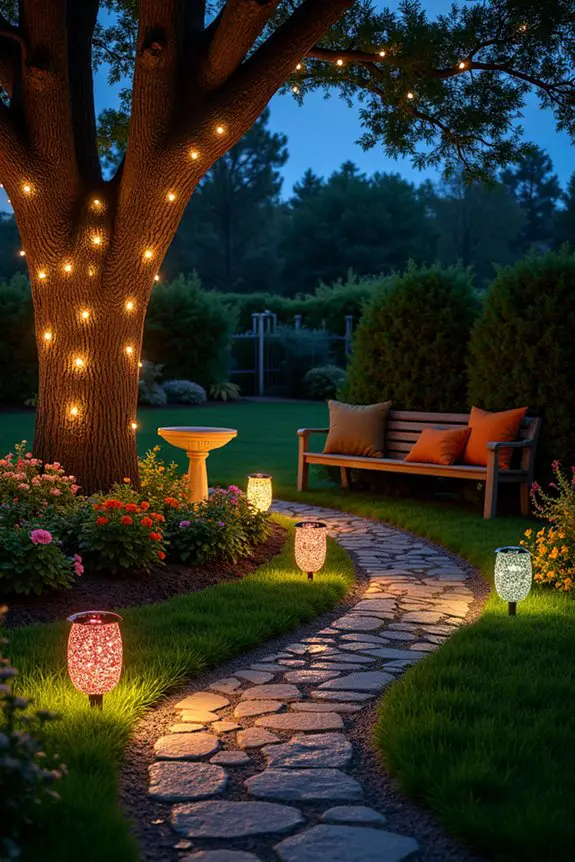
Adding customizable lighting to your garden pathway isn’t just about illumination; it’s about creating an enchanting atmosphere that guides you through those lovely curves. Imagine soft lights twinkling like fireflies, casting gentle shadows while leading you to cozy corners of your garden.
It’s functional and magical at the same time.
So, how do you get started? First, think about the vibe you want. Do you envision a romantic setting with soft, warm lights that make you want to linger? Or perhaps something a bit more whimsical, with colorful lanterns dotting the path?
Once you’ve settled on a theme, the real fun begins—choosing your lighting styles. If you want something permanent, built-in lights along the edges of the path can provide a seamless look. If you prefer flexibility, think solar-powered stake lights that you can move around as seasons change.
Placement is key here. Strategically position lights to highlight certain features—like that cute birdbath or a standout bush. Try to space them evenly for a balanced glow, or cluster them for a cozier feel.
A couple of years back, I got ambitious and strung lights all over the place, but it ended up looking like a disco party gone wrong. Live and learn, right?
Next, consider using smart lighting options. With the right app, you can control when the lights come on, change colors, or even set the mood with dimming options. Nothing says “I’ve got my life together” like lighting that you can control right from your phone while you sip your evening tea.
Finally, don’t forget to factor in safety. Make sure the lights are installed securely and that pathways are well-lit to avoid any trips or tumbles. Trust me, after bumping into one too many garden gnomes, I learned that tripping isn’t part of the serene garden stroll I envisioned.
With the right lighting, your curvy pathway won’t just be a path; it’ll be an experience, inviting friends, family, and even you to linger a little longer in your beautiful garden.
8. Planting Guide Integration
When you think about curvy pathways in your garden, it’s easy to get lost—in a good way, of course. These winding trails not only get you from point A to point B but also create a delightful and inviting atmosphere. The way they twist and turn invites exploration, making every corner feel like a little adventure waiting to happen.
So, how do you integrate your plants along those curvy pathways? Start by selecting a mix of heights and textures. Tall plants on one side can guide the eye as they reach for the sky, while low ground covers on the other can soften the curves. This creates a beautiful contrast that draws you in, making you want to take a stroll.
My own attempt at this resulted in a slight jungle right next to the path. I may have misjudged my plant heights, but hey, you learn as you grow, right?
Next, think about color. Pick plants that bloom at different times so your pathway bursts with color throughout the seasons. Imagine walking past vibrant daisies in spring, lush greens in summer, and stunning golds and oranges in fall.
It’s like nature’s changing canvas, which is a feast for your eyes every time you pass by. And let’s be honest—who doesn’t want their garden to look like an Instagram-worthy postcard?
Don’t forget about the spacing between the plants, either. If they’re too crowded, it can feel chaotic, and trust me, you don’t want your garden to look like it’s auditioning for a wild jungle movie.
Give them enough room to breathe and grow. I once planted some perennials a bit too closely, creating a mini plant riot. Lesson learned—less is often more.
Finally, consider how these plants interact with your pathway. Do they drape over the edges, creating a lush, inviting feel? Or do they stand proudly, framing the path like little guardians?
It’s all about creating that perfect vibe, one that encourages both you and your guests to wander and linger, perhaps stopping to sniff a flower or two along the way.
9. Colorful Plant Arrangement Ideas

When it comes to colorful plant arrangements along those curvy pathways, consider it as painting an image with nature’s palette. These little splashes of color not only serve to guide you but also create a cheerful vibe that feels almost magical. You’re not just planting flowers; you’re crafting an experience, drawing people in like moths to a flame—or should I say, bees to a bloom.
Start with the foundation: the backbone of your arrangement. Choose some vibrant perennial plants that can hold their own throughout the seasons. Think about sturdy beauties like coneflowers or daylilies for height and robustness. These bold flowers create that initial splash of color you’re after.
As I learned the hard way, don’t be tempted to go all-out with every color under the sun in one spot—less is often more, but a few well-placed pops of color can really create that idyllic scene. Trust me, last season’s rainbow explosion looked more like a toddler’s art project than a garden.
Now, mix it up with annuals that bloom throughout the warmer months. Snapdragons or geraniums can be perfect companions. They’ll support your perennials and add layers of color—think bright pinks, luscious purples, and sunny yellows.
Envision this: as you wander, these colors are dancing around you, inviting you to meander a little longer. You might even find yourself somewhere you didn’t expect, but in the best possible way.
Consider the arrangement, too. It’s like a performance, where each plant gets their moment in the spotlight. Place taller plants toward the back, gradually reducing the height as you approach the path’s edge. This allows all the colors to shine and keeps the view unobstructed.
I’ve learned that clustering different colors together rather than spacing them out can make a more dynamic look. Try a little trio here and a duo there, creating a rhythm that’s delightful to the eye.
Lastly, don’t forget about the seasons. Make sure to include some evergreens or plants that offer texture even in the off-season. Trust me, nobody wants their garden looking like a tired old couch in winter.
I made that mistake once, and let’s just say my winter garden looked more like a grocery list than a serene wonderland.
10. Water Feature Pathways
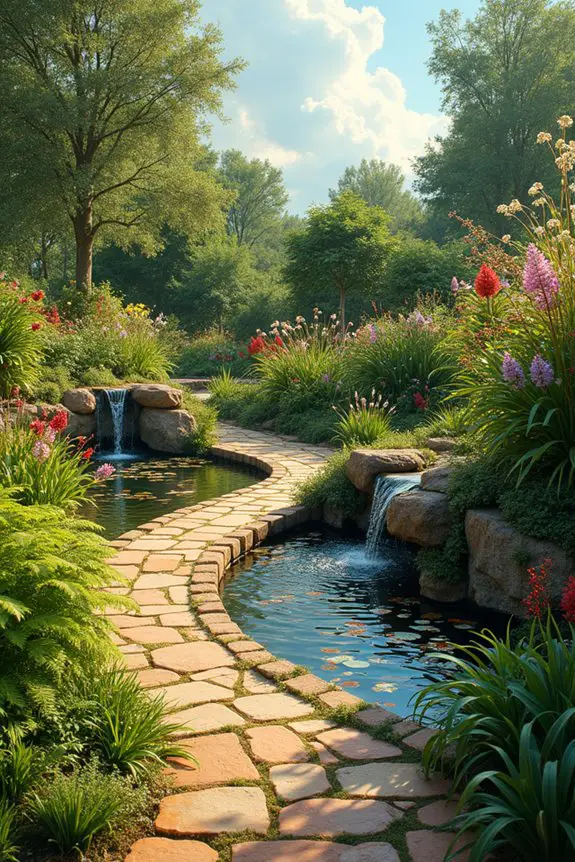
When you think of pathways, don’t just settle for plain old dirt or stone. Why not add a water feature that twists and turns alongside those curvy trails? A bubbling brook or a soothing pond can make every step feel like a scene from a storybook, where fairies flit and splash around. Seriously, nothing transforms an ordinary garden into a magical haven quite like the gentle gurgle of water, beckoning you to wander a little longer.
Begin by mapping out where you want the water feature to flow. Imagine your garden as a giant canvas, and the water as a paintbrush, guiding visitors along the path. It’s about creating motion—when water dances and sparkles, it captures attention and invites exploration. You could place a small pond at a bend in the pathway or throw in a meandering stream that leads visitors down a dreamy detour. I once opted for a pond right near a seating area, and let’s just say it turned every cup of coffee into an enchanting experience.
Next, think about the type of water feature that works for you. If you’re aiming for that serene vibe, a still pond with koi fish and water lilies might be your jam. If bubbly sounds are more your style, a fountain or waterfall could add that perfect touch. I hastily installed a mini waterfall once, and instead of calming serenity, I got a splashing fiasco that soaked my gardening gloves. Lesson learned—sometimes, smiles and splashes aren’t quite the same.
Also, don’t forget to frame your water feature with plants and flowers. Think about adding some moisture-loving plants like ferns or astilbes around the edges for a lush, breezy feel. Imagine stepping around the corner, only to be enveloped by stunning colors and the gentle sound of trickling water. I mean, who wouldn’t want to feel like they just walked into their own Secret Garden?
Lastly, make sure your water feature complements the path. The key is to balance it all out. A small stream should curve gently, matching the twists of your path, creating a flow that feels intentional. I tried placing the path too close to my waterfall once, leading to an accidental splash zone—let’s just say I resembled a wet dog by the end of the day.
Budget-Friendly Material Suggestions
You mightn’t think that designing a garden path can be a wallet-friendly adventure, but you’d be surprised at the affordable material options out there.
For example, gravel’s not only budget-friendly but also easy to work with. Imagine this: using different colors or sizes, you can create unique patterns. It’s like crafting your own artsy pizza—playful and deliciously personal.
Or consider reclaimed bricks for a rustic vibe; they’ve got stories behind them! If you’re in a hurry, stepping stones laid in grass can offer a simple yet stylish look.
These garden path ideas don’t just save cash; they also add charm. So, don’t let a tight budget stop you—get creative and make your garden path truly yours!

