Are you tired of your garden looking just…well, blah? You’re not alone. We’ve all been there, staring at a patch of dirt that feels more like a chore than a charm. But transforming your outdoor space doesn’t have to be intimidating. Imagine cozy seating areas and vibrant flowers, all woven together with natural paths. Curious about how you can spice things up? Let’s explore some DIY garden design ideas that won’t break the bank but will elevate your outdoor happiness.
Creative Outdoor Layouts
When it comes to creating your outdoor space, you’ve got a canvas just waiting for your touch. Imagine a symmetrical flower bed that draws the eye, or colorful vertical gardens that make you feel like you’ve stepped into a secret paradise.
Whether you want a natural stone pathway that invites leisurely strolls or a Zen-inspired succulent arrangement that whispers calm, the possibilities are endless and totally up to you.
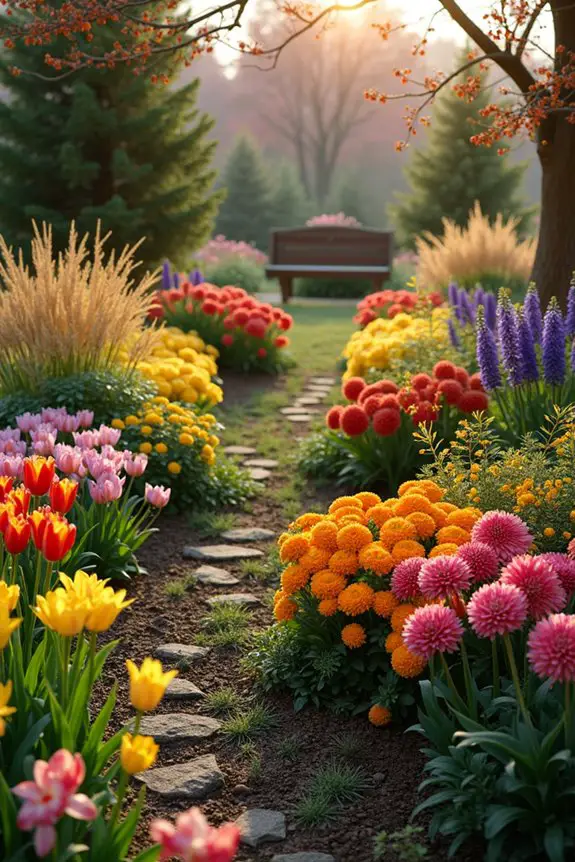
1. Symmetrical Flower Bed Arrangement
When it comes to garden design, nothing quite compares to the timeless elegance of a symmetrical flower bed arrangement. This approach not only looks stunning but also makes your outdoor space feel more balanced and inviting. Can you picture it? Flanking blooms that mirror each other, like nature’s very own version of a perfectly styled outfit. It’s both functional—allowing easy maintenance—and attractive, giving your garden that polished vibe.
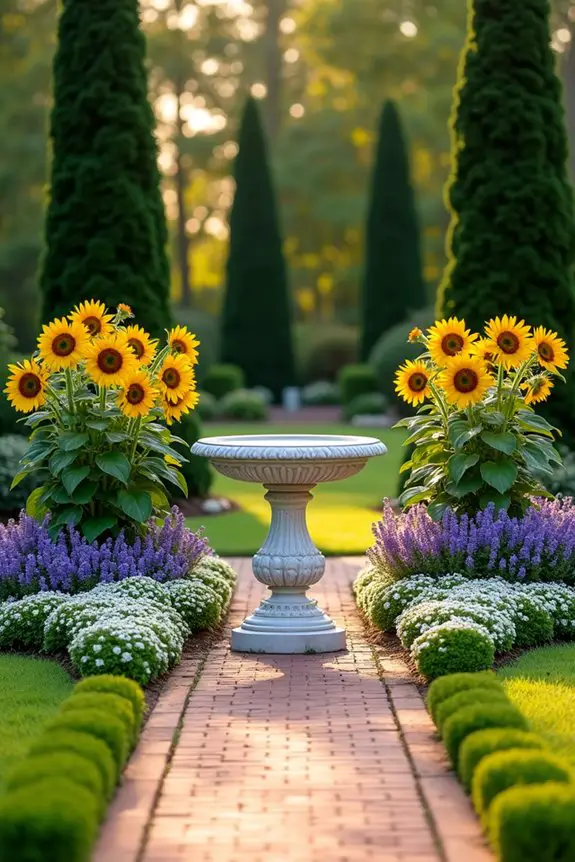
So how do you create this harmonious look? First, pick a focal point for your garden, like a charming birdbath or a decorative bench. From there, choose your plants—think dual rows of colorful blossoms or lush greens. Using odd numbers of plants can feel a tad wild, so stick to even numbers for that structured feel. But don’t sweat it; if you accidentally stray into odd territory, just make sure both sides of the bed still look balanced.
Next, lay out your plants in a mirror image. For example, if you plant tall sunflowers on the left side, do the same on the right. You can mix heights and colors, but try to keep a consistent theme—maybe a palette of yellows and purples or a mix of textures.
And here’s a little nugget of wisdom: even if you have two types of flowers, aim for planting the same quantity on each side.
Now, don’t forget about pathways. Create a symmetrical path leading right up to your flower bed. This adds to the overall design and makes those garden selfies pop. Plus, you won’t end up tripping over potted plants as you rush to grab your pruners—trust me, I speak from experience.
Finally, keep maintenance in mind. Trim and deadhead your flowers regularly to maintain that perfect symmetry. A little love goes a long way, and before you know it, you’ll have a picturesque garden all your friends will admire.
2. Colorful Vertical Garden Structures
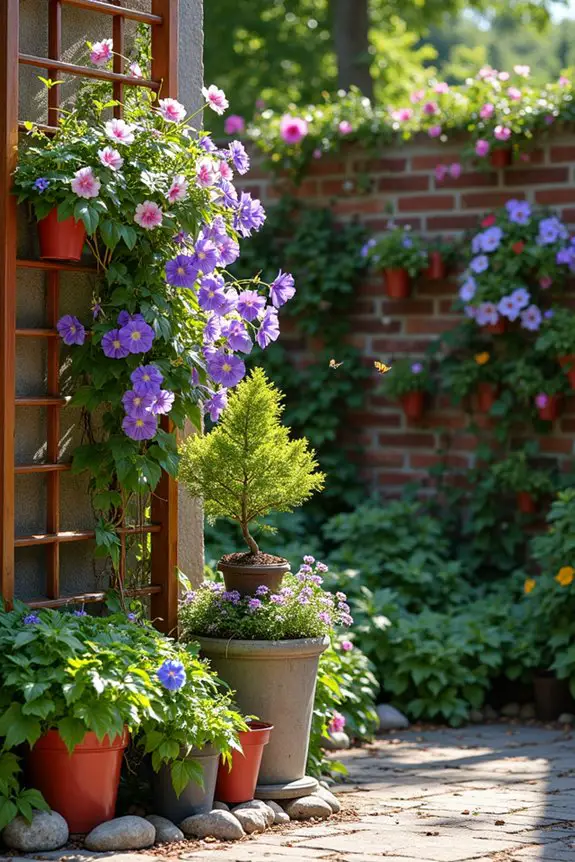
In the world of gardening, colorful vertical garden structures are a game-changer. Not only do they save space, but they also create a vibrant and dynamic look that can transform any outdoor area. Imagine lush greens and dazzling blooms climbing up a trellis or hanging from wall-mounted planters. It’s like bringing a little bit of the rainforest into your backyard, minus the humidity. Plus, incorporating a vertical garden tower into your design allows for additional plant varieties and organization, optimizing both aesthetics and utility.
Plus, they offer the added benefit of attracting butterflies and bees, turning your garden into a buzz-worthy hotspot.
So, how do you jump into this delightful endeavor? First, you’ll want to choose your frame. This could be anything from a classic wooden trellis to a stylish metal frame or even repurposed pallets—make it personal. A good structure shouldn’t just be sturdy but also fit the aesthetic of your garden. Is it rustic chic? Modern minimalism? Let your personal style shine.
Once that’s settled, it’s time to pick your plants. Climbing plants like clematis, morning glories, or even edible options like peas are fabulous choices—think about mixing herbs or trailing flowers for a pop of color.
Now, here comes the fun part: arranging those plants. Start with your tallest climbers at the base, giving them something to cling to as they reach for the sky. This way, you’ll create layers of beauty. And, if your vertical garden is against a wall, consider adding some trailing vines at the top, so they cascade down like a wild waterfall. Isn’t that imagery just dreamy?
A little tip: make sure you group plants with similar sun and water needs together. Nothing like the sheer panic of realizing your poor succulents are sharing a pot with a thirstier fern. Trust me, I learned this the hard way—and let’s just say one plant emerged victorious.
Maintenance is key here, too. Regularly check your plants for any signs of illness or overcrowding. And don’t forget to give them a little trim when they start to get wild. A few snips here and there will keep your garden looking sharp—literally.
And, if you ever feel overwhelmed, don’t sweat it. A vertical garden can look charmingly chaotic if done right; nature doesn’t do uniformity, after all. Additionally, incorporating a stylish display stand can elevate the beauty of your vertical garden by showcasing your bonsai and other unique arrangements.
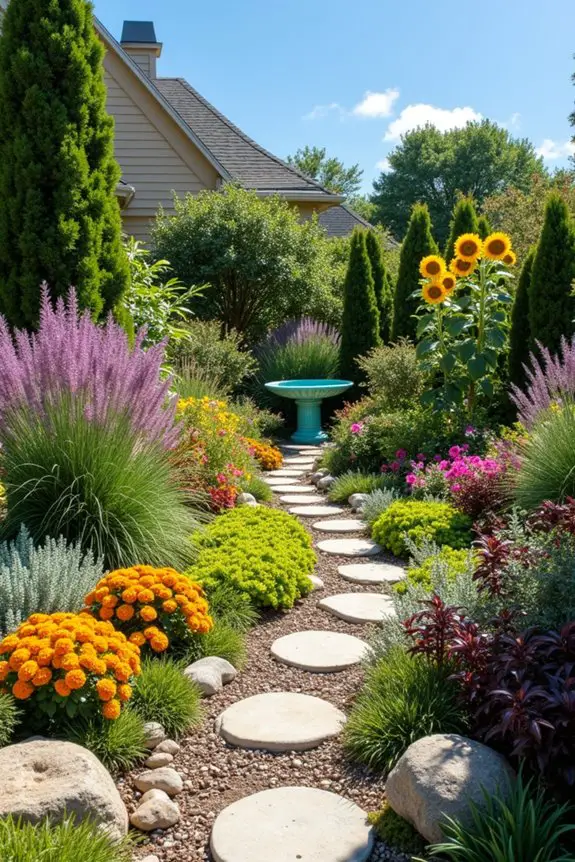
3. Natural Stone Pathway Layout
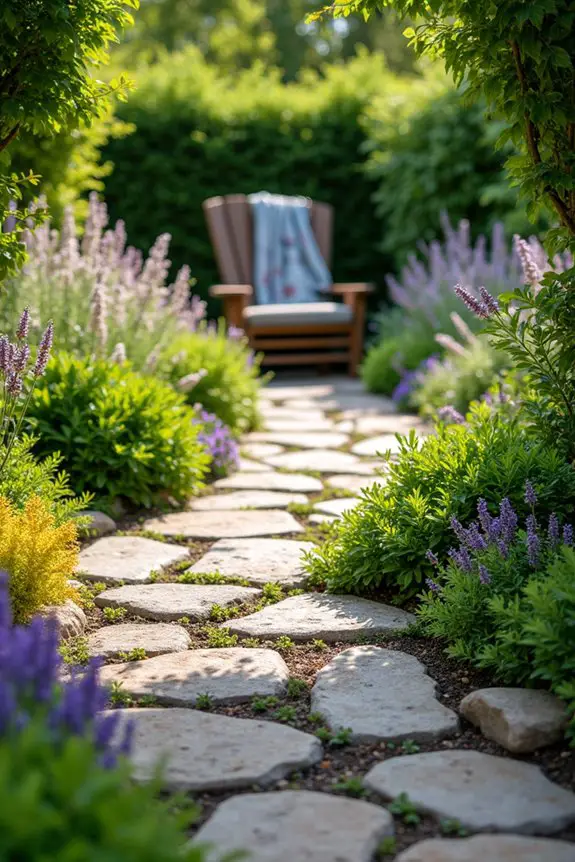
When it comes to creating a spectacular outdoor space, a natural stone pathway is the unsung hero of garden design. Not only does it guide visitors through your beautiful backyard, but it also adds that earthy touch that makes your garden feel more organic and inviting. Picture stepping stones that blend seamlessly with the surrounding greenery, guiding your feet along a rustic trail of adventure. Plus, no one can resist the charm of a well-laid stone path.
To get started on your pathway, first, you’ll want to plan its layout. Think about where you want to lead your guests. Is it to that cozy nook you’ve set up with a chair and a cozy blanket? Or maybe to your secret herb garden? Once you’ve got your destination set, outline the path with some garden hose or string so you can visualize where the stones will go. It’s like doodling with your feet—fun, right?
Next, it’s time to pick your stones. Natural stones can be found at your local nursery or landscaping store, and they come in all sorts of shapes and sizes. Don’t feel pressured to select perfectly uniform stones; allow for a bit of variation. The beauty of a stone pathway lies in its natural imperfections, just like our gardening skills (which let’s face it, don’t always shine). A mix of flat and rounded stones can create great visual interest. Plus, you won’t have to stress if you can’t find three of the same rock.
Once you have your stones in hand, lay them out along your pre-marked path. Keep a decent space between each stone—about two to three inches. This little gap can be filled with gravel, moss, or even creeping thyme. Trust me, there’s something absolutely delightful about having your feet in a cool stone, while your eyes delight in the greenery peeking through the gaps. It’s like nature is giving you a high-five every time you take a step.
As you’re laying out the stones, don’t forget to adjust for any uneven ground. If a stone wobbles when you step on it, give it a little shimmy. You can pack some soil or use stones to create a sturdy base. No one wants a pathway that feels like a bumpy rollercoaster ride on a sunny day. That’s a surefire way to trip up even the most graceful gardener (not that I’d know from experience or anything).
Finally, once you’ve got your stones down, take a moment to add some finishing touches. Surround the path with flowers or plants that are low-maintenance and complement the stones. Think cheerful ground cover like creeping juniper or low-growing sedums. Imagine a wildflower garden bursting with color! Your pathway won’t only guide the feet but also draw the eyes, making every walk feel like a stroll through an enchanted meadow.
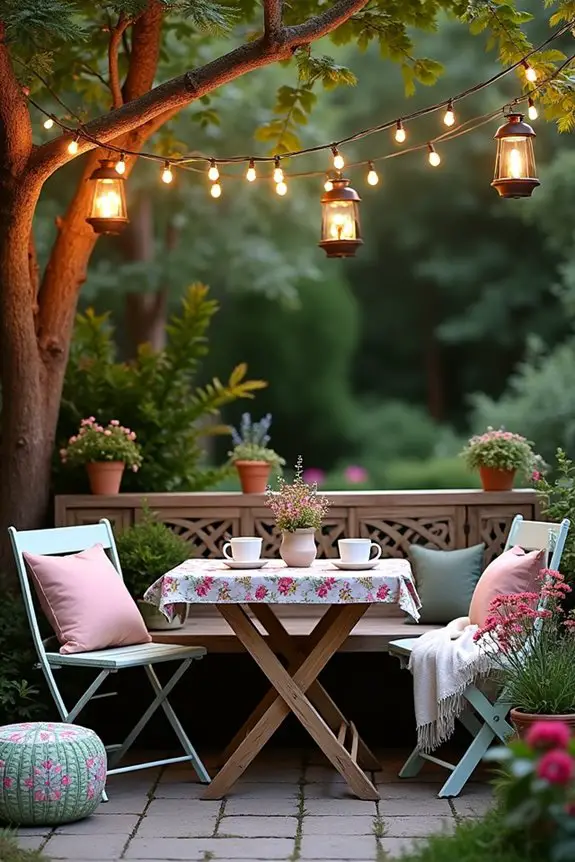
4. Eco-friendly Garden Furniture Layout
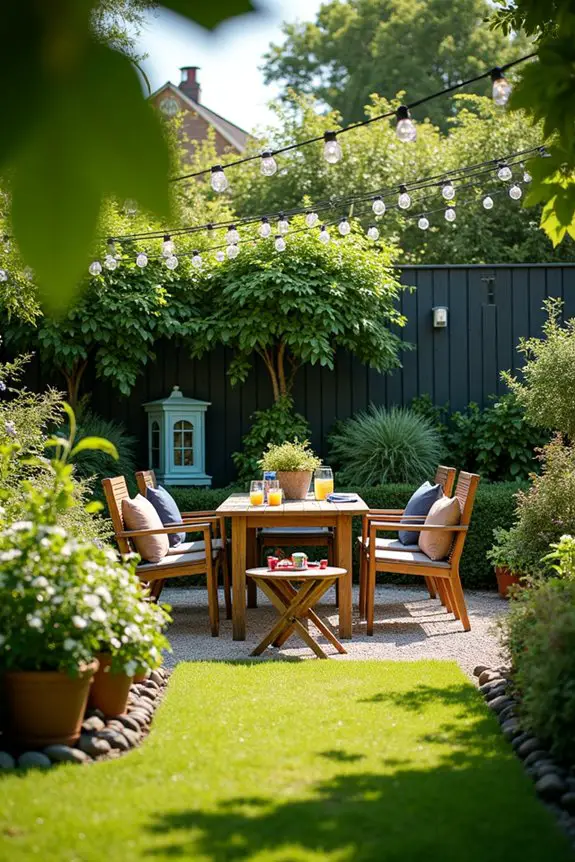
When you think about creating a cozy outdoor space, eco-friendly garden furniture is the way to go. Not only does it add stylish charm to your garden, but it also shows your love for the planet. Envision sinking into a beautifully crafted chair made from reclaimed wood or sipping your morning coffee at a table made from recycled materials. It’s like hugging Mother Nature while enjoying the great outdoors.
To start your eco-friendly furniture layout, consider the function of your space. Are you going for a relaxed lounging area, a dine-and-dash corner, or perhaps a reading nook nestled among your blooms? Once you’ve narrowed that down, sketch a rough layout. Use stakes and string (or even garden hose again, if you got extra from your pathway project) to visualize the arrangement. This way, you won’t end up with your chairs scattered like wildflower seeds amongst the weeds.
Next up, let’s talk furniture choices. Look for options made from sustainable materials, like bamboo, reclaimed wood, or even recycled plastic. You’d be amazed at how much personality and comfort these materials can offer without adding to landfills.
If you’re feeling creative—and a little adventurous—think about upcycling old furniture. A thrifted chair can receive a fresh coat of eco-friendly paint and be transformed into a garden statement piece. Just make sure it’s sturdy enough to handle the outdoor elements. We wouldn’t want your new favorite chair to collapse like a cheap party tent during a light breeze.
Now, let’s focus on placement. Arrange your furniture in clusters; it creates a more inviting atmosphere. Envision cozy conversation spots, maybe with a low table in between for snacks (or that obligatory glass of wine, if that’s your vibe). Don’t forget to leave some space for foot traffic. You don’t want your guests to feel like they’re maneuvering a tightrope just to refill their drinks.
Last but not least, accessorize! Add some cushions in outdoor-friendly fabrics to bring in color and comfort, and don’t skimp on greenery. Planters with your favorite flowers or herbs can bring life and fragrance to your furniture space. It’s amazing how a little foliage can create an entirely different mood.
Just imagine: surrounded by lush plants, sipping lemonade, and feeling like you’ve stepped into your own peaceful paradise. Just watch out for pesky bugs; sometimes I swear they think my lemonade is a buffet just for them.
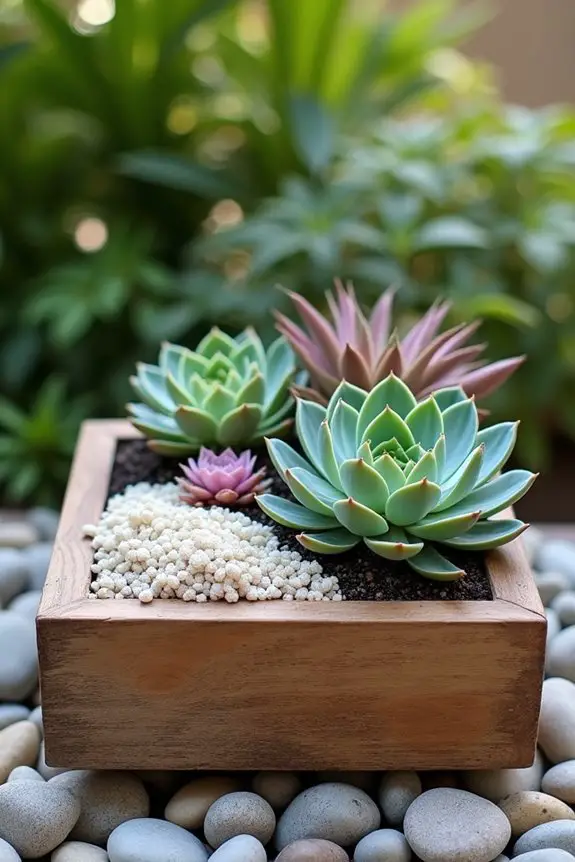
5. Zen-Inspired Succulent Arrangement
Let’s explore some Zen-inspired succulent arrangements that can elevate your outdoor space and create a soothing atmosphere.
Creating a Zen-inspired succulent arrangement not only brings a sense of tranquility to your garden but also requires very little upkeep, making it both beautiful and functional. Imagine this: a serene cluster of vibrant succulents nestled in a pebble-filled dish or a rustic wooden planter. The soothing greens and earthy tones draw you in like a warm hug from Mother Nature, inviting you to slow down and breathe. It’s like having a miniature sanctuary right outside your door.
To get started with your Zen-inspired succulent arrangement, gather a few necessities. You’ll need a variety of succulents, such as the popular Echeveria, the whimsical agave, or even a string of pearls for a playful touch. Choose a planter that speaks to you—a low, wide dish or a textured pot works wonders.
Next, make sure you have some well-draining soil. Trust me, your succulents will thank you for not turning their roots into a soggy mess.
Now, for the fun part! Begin by adding a layer of small pebbles at the bottom of your pot for drainage. This is your succulent safety net, so they don’t end up swimming in water. Then fill your pot with the soil, leaving some space at the top to accommodate your plants. Space them out creatively; you can place taller varieties towards the back and shorter ones up front for a lovely layered look.
Think of it like putting together an outdoor salad—each piece has its place and showcases its unique flair.
While arranging the succulents, don’t forget to have fun with it! Experiment with colors, shapes, and heights. It’s a bit like decorating your home, only much easier (and more forgiving). If one succulent looks like it’s throwing a temper tantrum, just reposition it. Remember, there are no strict rules when it comes to your little green oasis—if it makes you smile, that’s all that matters.
Once everything’s in place, you can finish your arrangement with decorative stones or sand for that extra Zen touch. Imagine this: a calming oasis where you can sit with your favorite book, letting the softly swaying leaves bring you peace.
Just be sure to give your succulents a drink every now and then. I accidentally left mine high and dry once; it was like watching a tiny desert unfold. Oops.
6. Herb Spiral Garden Design
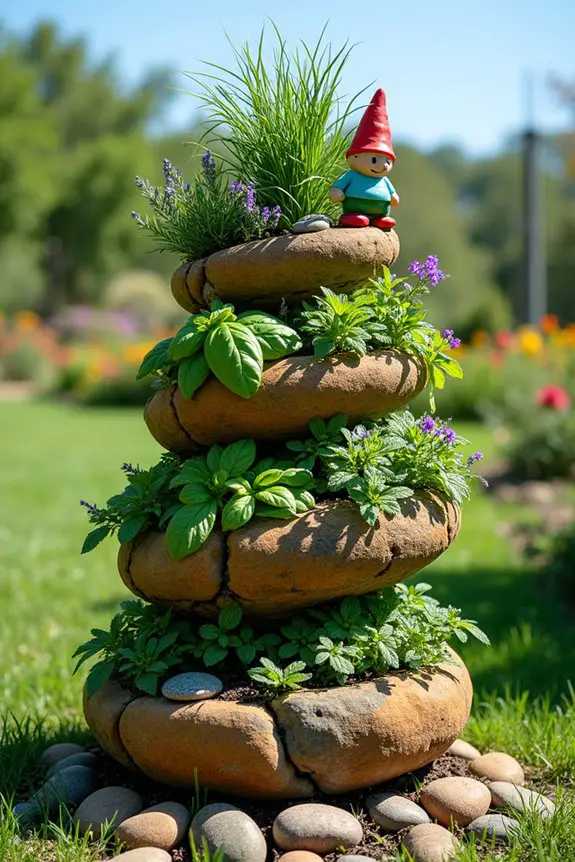
An herb spiral garden design isn’t only a clever way to maximize space, but it also adds a beautiful, spiraling focal point to your outdoor space. Imagine a vertical garden that combines whimsy with functionality, where you can easily access your favorite herbs as you cook or garnish your dishes. Additionally, using indoor potting soil perlite in your planting mix enhances drainage and aeration, which promotes healthy root development.
Plus, this design captures rainwater and creates microclimates for your plants—what’s not to love about multitasking?
To get started on your very own herb spiral, you’ll need a few materials: stones or bricks for the structure, good quality soil, and a selection of herbs that spark joy (and flavor) in your cooking.
Begin by choosing a sunny spot in your yard; the herbs will appreciate the warmth and light. Then, start building your spiral. Picture a soft serve ice cream cone, but instead of ice cream, you’ll be stacking stones. Make a circular base with stones or bricks, curling the stones upwards as you go to create a spiral shape. It should rise about a foot and a half high when you’re done.
Once your spiral is complete, fill it with soil—I suggest using a mix that’s light and well-draining, potentially enhanced with perlite soil additive for improved aeration. As you’re filling, remember to create different levels; the top will be the driest and hottest area, perfect for herbs like rosemary and thyme, while the lower sections can be filled with moisture-loving herbs like mint and basil.
Space your herbs out so they’ve room to grow, and don’t hesitate to mix colors and textures. It’s sort of like layering your favorite pasta dish, each herb adding its own unique flavor; you wouldn’t want them fighting for space, would you?
Here’s a tip: when choosing herbs, opt for culinary favorites, like chives, oregano, and cilantro. These fresh flavors will have you running to your garden with excitement when it’s time to cook.
Plus, the beauty of an herb spiral is that it can be (surprise, surprise) beautiful. Add some decorative rocks, or even place a little garden gnome at the top—who can resist a quirky touch when it comes to garden décor?
Just a word of caution: keep an eye on your herbs. Some can be relentless, like mint, which will spread if you give it half a chance. If you let it run rampant, it could turn your charming spiral into a wild jungle.
So, gather your scissors for regular trims; they’ll help keep your spiral looking fabulous and in check.
In the end, standing in your herb spiral garden is like having a personal farmers market right in your backyard. The fragrance of fresh herbs wafting through the air is just icing on the cake—or herbs on the pasta, as it were.
Now, how easy was that? Go ahead and get spiraling; your taste buds will thank you!
7. Asymmetrical Planting Techniques
If you’ve ever gazed at a perfectly arranged flowerbed and thought, “Wow, I can’t ever do that,” then let me bring you some good news: asymmetrical planting is here to save the day.
This technique lets you embrace your garden’s wild side, mixing plants and shapes in a way that feels both natural and whimsical. It’s like having a friend who’s a little quirky but always makes you smile—your garden will shout personality rather than order.
So how can you sprinkle this excitement into your own space? Start by choosing a variety of plants that have different heights, colors, and textures. Think about it like picking toppings for a pizza—do you go for colorful peppers, spicy sausage, and creamy mozzarella, or just plain cheese? Let your imagination run wild.
Lay them out on the ground first, experimenting until it looks just right to you. And remember, asymmetry is all about balance without symmetry; it’s okay to have a tall plant here and a short one over there, as long as they complement each other in some way.
When you’re planting, try clustering smaller plants together in groups of three or five—this creates a more natural look while adding a sense of flow to the arrangement. Be bold with your colors; a splash of bright orange here or a hint of deep purple there can elevate the entire vibe.
It’s like putting on your favorite funky socks with sandals—stylish, yet comfortable.
One pro tip—leave some breathing room between your plants. The idea is to avoid overcrowding, which can lead to those sad, wilting plants that just want some space to breathe. You can always adjust their positions as they grow and see how the shapes and colors evolve.
As you design your asymmetrical garden, feel free to add in features like stepping stones, pathways, or decorative rocks for a touch of fun. It’s these little details that give your garden soul.
And if you’re feeling adventurous, why not throw in an occasional quirky garden ornament? Envision this: a vibrant birdbath surrounded by lush greens, drawing in feathered friends for a visit. It sounds enchanting, right?
Just a friendly reminder—don’t overthink it! Gardening isn’t a strict science; it’s more of an art form that you can play with. If one plant looks like it has taken a wild vacation on a hot summer day, relocate it.
Gardening is about experimenting and finding what resonates with you. And who knows, maybe your asymmetrical masterpiece will end up being the talk of the neighborhood, all while you sip your lemonade and dub yourself the “gardening wizard.”
8. Wildflower Meadow Planting Design
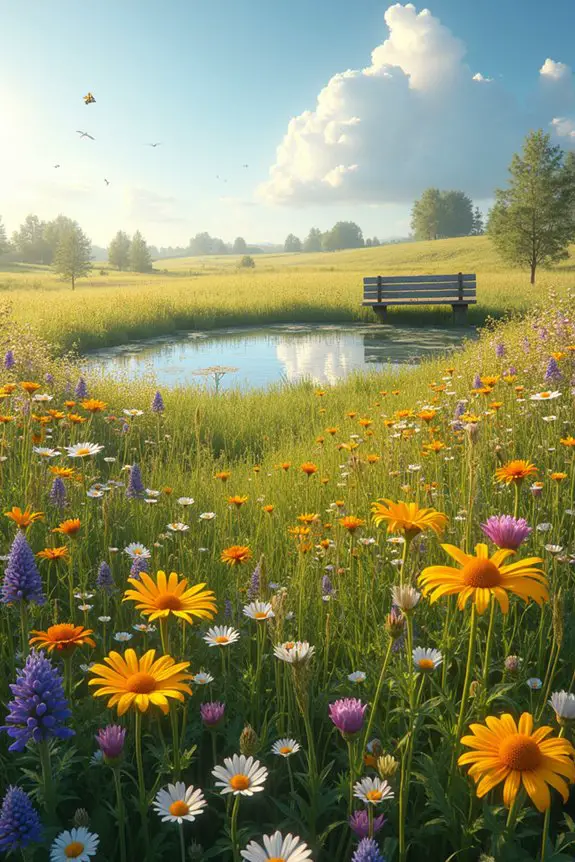
Have you ever dreamt of stepping into a sun-drenched meadow, alive with the colors and scents of wildflowers? Well, why not bring that charming vibe right into your backyard? Creating a wildflower meadow isn’t just beautiful; it’s a welcoming habitat for pollinators, adds interest to your landscape, and gives you that laid-back, earthy feel. Plus, they often require less maintenance than a traditional lawn, which means more time enjoying those sunny days.
To embark on your own wildflower meadow adventure, start by selecting the right spot in your garden. Aim for a sunny, open area where the flowers will get at least six hours of sunlight a day. If you’re like me and sometimes forget to check the weather forecast before stepping out, just make sure you’re not leaning towards the shaded side of the house or beneath your towering oak tree. Believe me, those flowers need their sun just as much as you do during your blissful beach days.
Next, choose a mix of native wildflower seeds—think daisies, black-eyed Susans, and maybe a few clovers for good measure. Native plants are like that reliable friend who always shows up with snacks; they’re adapted to your local climate, require fewer resources, and attract the right crowd of pollinators. Additionally, using a plant humidity tray can help maintain moisture levels for optimal germination. When purchasing seeds, look for local nursery options or online seed banks specializing in native plants. Trust me, you’ll feel like a botanical wizard, casting spells with colorful blooms later on.
Now, here’s where the fun begins. You’ll want to prepare your soil by clearing away any weeds and debris, then loosen it up a bit. This is like giving your garden a good stretch before a workout—super important! Depending on your soil quality, you might want to mix in some compost for that extra nutrient boost. I like to think of myself as a gardening chef, adding a sprinkle of this and a dash of that, all while hoping I don’t make too big a mess—spoiler alert: I always do.
Once the soil is ready, it’s time to toss your seeds. Scatter them lightly, bearing in mind that wildflowers like a bit of room to dance. A tip for you here—don’t overpack it like you’re stuffing your suitcase for a long trip; you want each flower to have space to shine. If you’re feeling creative, you can even create mini flower “islands” by grouping certain colors together. It’s like arranging your sock drawer, but way more rewarding.
Water the area lightly to help your seeds settle; think of it as tucking them in for a cozy night’s sleep. You may need to keep it consistently moist until the flowers get established—just don’t drown them. We’ve all had those moments where we get a little too excited with the garden hose, right? It can turn your lovely meadow into a mini pond.
Over time, as your wildflowers bloom, sit back and enjoy the show. You might find yourself grabbing a book and plopping down on a blanket right in the middle of your own flower patch. It’s peaceful, it’s serene, and you’ll feel a kind of pride that only comes from nurturing something beautiful. Best of all, it can attract butterflies and bees—nature’s very own decoration team working on your outdoor haven.
9. Rain Garden Design Principles
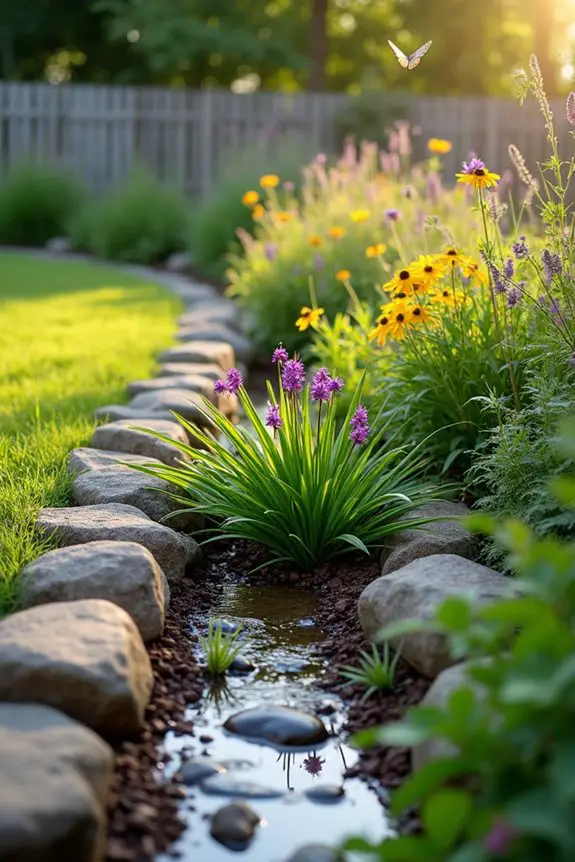
Imagine a garden that not only adds beauty to your landscape but also manages stormwater runoff, attracting birds and butterflies while reducing pollution. That’s the magic of a rain garden! It’s a creative and eco-friendly approach to gardening that combines functionality with visual appeal. Plus, who doesn’t love the sound of trickling water humming through their outdoor space?
To start, pick a low-lying area in your yard, ideally where rainwater naturally collects. It’s like finding the perfect spot for your new garden buddy—just guarantee it gets enough sun while dodging the shade of looming trees. Aim for a space near downspouts or driveways, so you can catch that pesky runoff. Trust me, you won’t need to go digging around for sources; just think about where the puddles pop up after a rain shower.
Next, you’ll want to dig out a shallow depression, about 6 to 12 inches deep. It’s like making a giant bowl for your plants to enjoy… just without the soup. As you dig, you can line the edges with rocks or bricks to create a stylish frame. Keep a wheelbarrow on hand because, let’s be honest, mud can get messy, and you’ll want to transport the excess soil like a pro.
Once your basin is ready, it’s time to throw in your plants. Choose native plants that thrive in wet conditions—think sedges, rushes, and colorful coneflowers for a delightful splash. They’re like the superheroes of the plant world, leading the way in absorbing water and supporting local wildlife.
When planting, arrange them in clusters rather than in rows to mimic nature; nobody wants a garden that looks too orderly—unless you’re aiming for a botanical prison, of course.
Now comes the watering part. It might feel tempting to flood your newfound garden like a neighbor’s sprinkler gone rogue, but a gentle soak is all that’s needed to get those roots cozy in their new home. After all, this isn’t a swim party; it’s nurturing time. Once established, these plants will soak up rainwater like they’re on a spa day, creating a lush retreat for all critters great and small.
Lastly, consider adding mulch around the plants. It keeps weeds out, retains moisture, and looks super pretty. Mulching is like putting on your garden’s favorite outfit—who wouldn’t want to strut their stuff looking fabulous?
Just be cautious not to pile it too high around the plant bases, or you might create a plant volcano… and we certainly don’t want to release the lava!
With a little effort, you’ll not only have a striking rain garden that keeps your yard looking sharp but also contribute to a greener planet. So get your hands a bit muddy, soak in the process, and watch as nature transforms your outdoor space in ways that will just warm your heart.
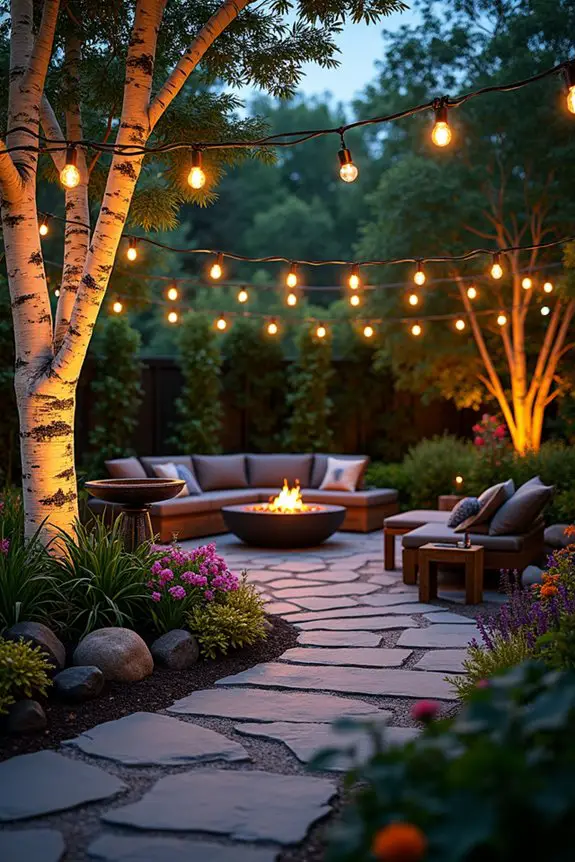
10. Modern Landscape Lighting Design
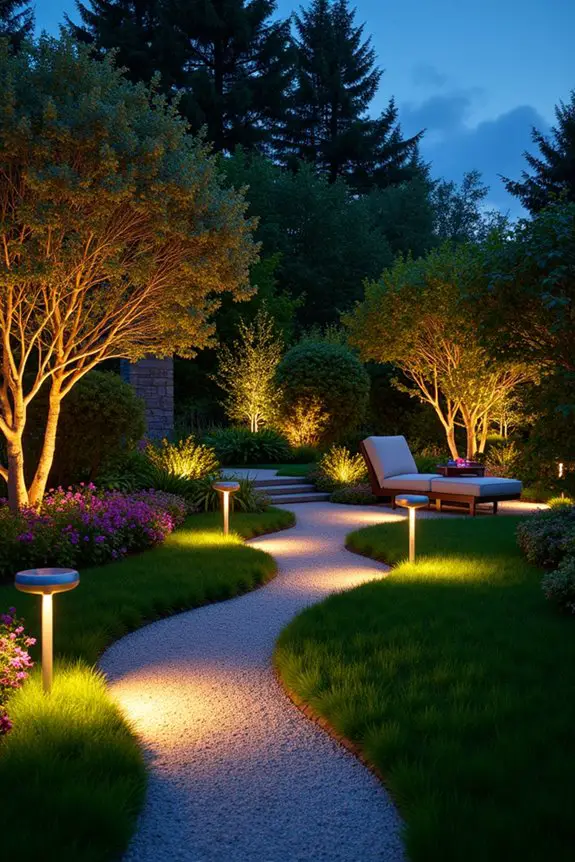
Lighting can transform an ordinary garden into an enchanting evening oasis, creating the perfect atmosphere for relaxation or entertaining friends. Imagine stepping outside at night, greeted by a warm glow that dances off your plants and illuminates your walking path—it’s magical, right? Not only does it improve safety by lighting up those sneaky garden paths, but it also sets the mood with a hint of romance or a touch of whimsy.
To plunge into modern landscape lighting, start with defining the zones in your yard that need special attention. Think about spots where you like to hang out, like near your patio or beside that gorgeous tree you always walk past during the day. Don’t forget about those charming little features too; you know, the birdbath that your neighbor so jealously admires. Create a plan that encompasses a mix of functional and accent lighting to showcase your yard’s best qualities.
Next, consider different types of lights available. For paths, solar-powered LED lights are a fantastic option—just stick them in the ground and let the sun do the rest. No fancy wiring or electrician fees here, just pure bliss. If you’re feeling a bit more adventurous, think about installing uplights that shine upward on trees or shrubs. They add depth and drama to your landscape, transforming your garden into a mysterious, storybook scene.
And if heights don’t scare you, string lights threaded through branches can look stunning and add a twinkling touch, as if fireflies decided to throw a party.
When placing your lights, aim for variety in height and intensity. Group lights together in uneven numbers (three’s a favorite for good reason) to keep things from feeling stale; after all, who wants a garden looking too polished like a magazine cover? Mix different brightness levels to create layers. It’s all about balance—think of it as a delicious layered cake—you want each flavor to stand out while still contributing to a scrumptious experience.
And here’s a quick tip that may seem simple but can save you a ton of headaches: get a light timer or smart plugs. It’s like having your own personal garden assistant who flips the switches without you lifting a finger. Imagine how impressive it’ll be to turn on your lights with a few taps on your phone. No more trudging through the dark because you forgot to check if the lights were on. Plus, it helps save energy when you don’t need them burning all night long.
Lastly, don’t shy away from experimenting with colored bulbs or fun fixtures. A pop of color can bring your space to life and match the moods of various gatherings. Picture hosting a summer cookout with soft, warm hues and then switching to a festive rainbow glow for a birthday bash.
Lighting is the perfect way to show your personality and make your garden uniquely yours.
Essential Gardening Tools Checklist
Getting your hands dirty in the garden can be one of life’s simple joys, but it’s tough to dig in without the right tools.
So, do you really want to tackle those ambitious DIY garden ideas without a solid checklist? Grab a sturdy spade for digging, and don’t forget a trowel for those pesky little planting tasks. A pair of good gloves? Absolute must. Trust me, your hands will thank you.
A watering can—yeah, you’ll need that, too. And if you want to keep those weeds at bay, consider a hoe or a weeder.
Oh, and please, don’t skip the pruning shears for snipping back overzealous plants. With these essentials, you’ll turn that garden vision into reality, dirt under your nails and all.