Got a tiny garden and feel like you’re out of luck? Not anymore. You can create a stunning space with just a bit of creativity. Think about vertical gardens, colorful containers, or hanging planters that can take your greenery to new heights—literally. And let’s not forget some quirky garden art to show off your personality. How about transforming that patch of soil into a cozy retreat? Stick around, and let’s explore some designs that’ll make your garden shine.
The Vertical Garden Layouts
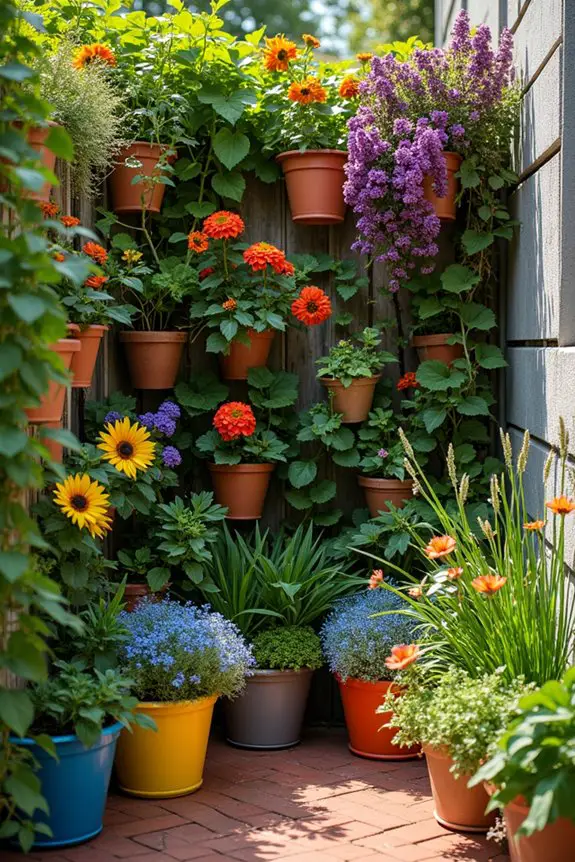
When you think about vertical garden layouts, it’s like transforming your small space into an art gallery on your walls.
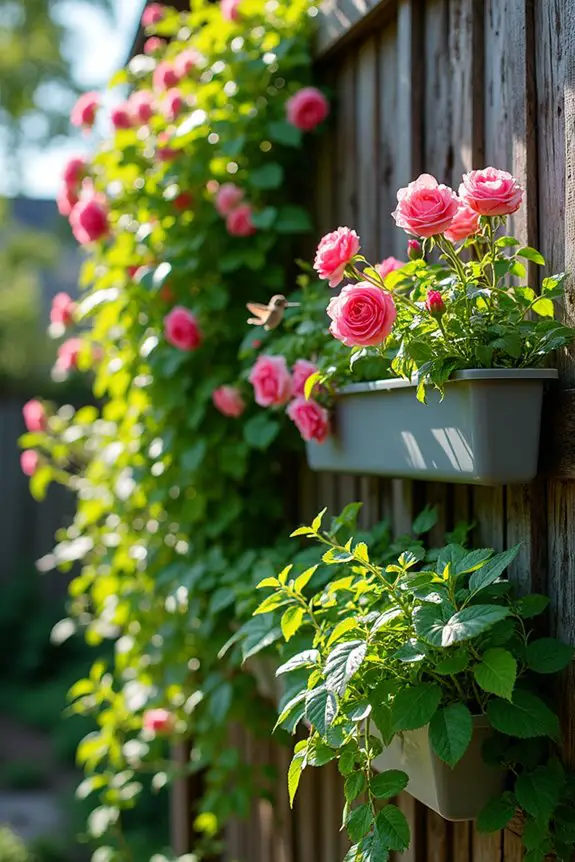
Ever considered hanging planters that cascade down like a floral waterfall? With a splash of color from different containers and some clever plant grouping tossed in, it can feel like you’re walking through a whimsical jungle—just without the mosquitoes buzzing around your head.
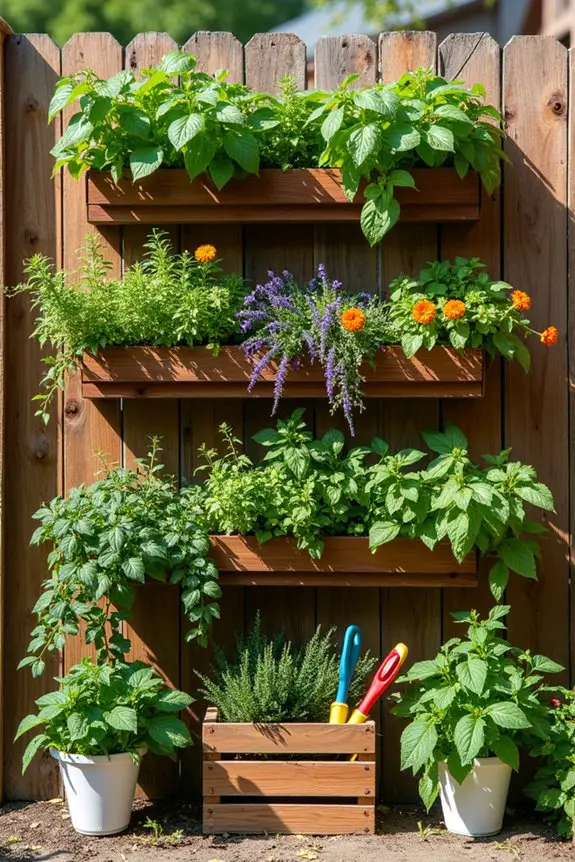
1. Hanging Planter Arrangements

Creating a stunning hanging planter arrangement is like painting a masterpiece in your own tiny garden. Not only do these vertical garden layouts save space, but they also add incredible style and charm. Who wouldn’t want their plants to become the focal point of their cozy outdoor retreat?
First things first, let’s talk about the materials. You can use a variety of containers: think classic terracotta pots, funky metal buckets, or even repurposed crates. Trust me, the neighbors will start asking you for your gardening secrets! Choose plants that thrive in your area’s light conditions—herbs, succulents, or vibrant annuals work beautifully.
Mix and match sizes and colors for a playful vibe, or go for a monochromatic look if you’re aiming for sophistication. So many options, right?
Next, hang those planters. You can use hooks on a fence, wall brackets, or even a string of macramé. Just remember, don’t go overboard—too much can look cluttered, and we don’t want your garden to resemble a plant explosion. Instead, focus on creating levels. It’s all about arranging them in a way that draws the eye up and keeps your garden feeling open.
Now, here’s a little secret. Once you’ve hung your gems, don’t forget to water them. I learned this the hard way when my flowers looked more like sad, droopy potato chips. Watering can be tricky on a vertical layout, so consider using a drip irrigation system or befriend a watering can and a good schedule. Using a hanging planter with a reservoir system can greatly simplify your watering routine and keep your plants hydrated.
Don’t forget to spice things up with trailing plants. Let those vines gracefully cascade down your wall or fencing. It’s like nature’s way of adding drama, and believe me, it will totally elevate your garden’s mood.
Lastly, stand back and admire your work. Does it feel like a mini jungle? Are you pleased with your handiwork? If so, you’ve nailed it. Happy planting, and may your tiny garden thrive beautifully—just like you!
2. Asymmetrical Plant Grouping
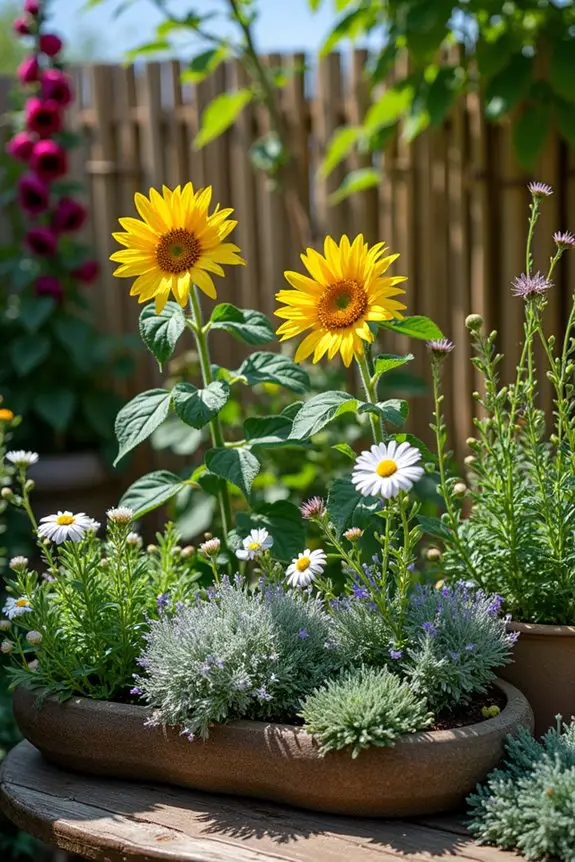
Asymmetrical plant grouping is like arranging furniture in a cozy living room—it adds depth and interest to your tiny garden without making it feel cramped. By embracing an asymmetrical approach, you encourage the eye to wander over your garden’s landscape, creating an inviting and dynamic vibe. Plus, it’s a fantastic way to showcase your favorite plants, letting each one shine in its own unique way. Consider incorporating elegant garden trug wicker to enhance your gardening experience.
To get started with asymmetrical plant grouping, first, consider the height and spread of the plants you want to use. Think about mixing tall stalks like sunflowers or hollyhocks with low, trailing plants like creeping thyme or sedum.
Beyond just height, consider how plants will grow over time. That small sprout might become a bushy plant next summer, so give it space. Don’t forget about foliage texture and color, too; a leafy plant can bring a lush feel that contrasts beautifully with a bold bloom.
Next, arrange your plants in odd-numbered groupings. A collection of three or five plants can create a more natural, organic look than even-numbered layouts, which sometimes feel rigid.
And when you place those plants, keep in mind the rule of thirds—try positioning them at various depths within your tiny garden to maintain visual intrigue.
Remember to leave some breathing room between plants. And trust me, this is a lesson I’ve learned the hard way—like trying to cram five pair of shoes into a tiny suitcase—when you’ve got crowded plantings, they compete for attention and resources, leading to sad, droopy leaves.
Additionally, keep your plants’ sunlight and water needs in mind. Some might prefer basking in the sun while others are content with a bit of shade. Finding the right balance is key, and using self-watering pots indoor can help support your plants’ hydration needs for optimal growth.
As you step back to admire your creation, ask yourself: Does it feel vibrant? Do the colors and forms harmonize? If you find yourself smiling, then congratulations, you’ve created a beautiful asymmetrical plant grouping that transforms your garden into a lush retreat.
Happy arranging, and may your garden be forever lovely!
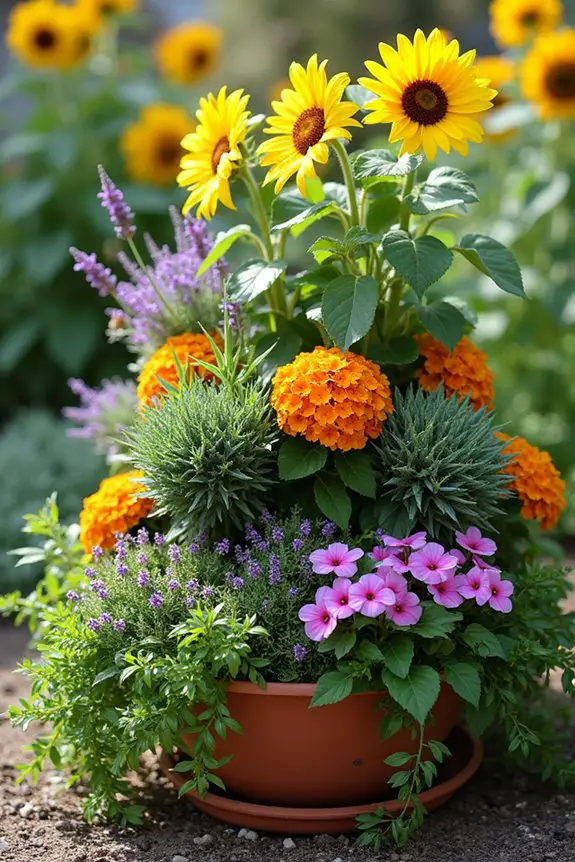
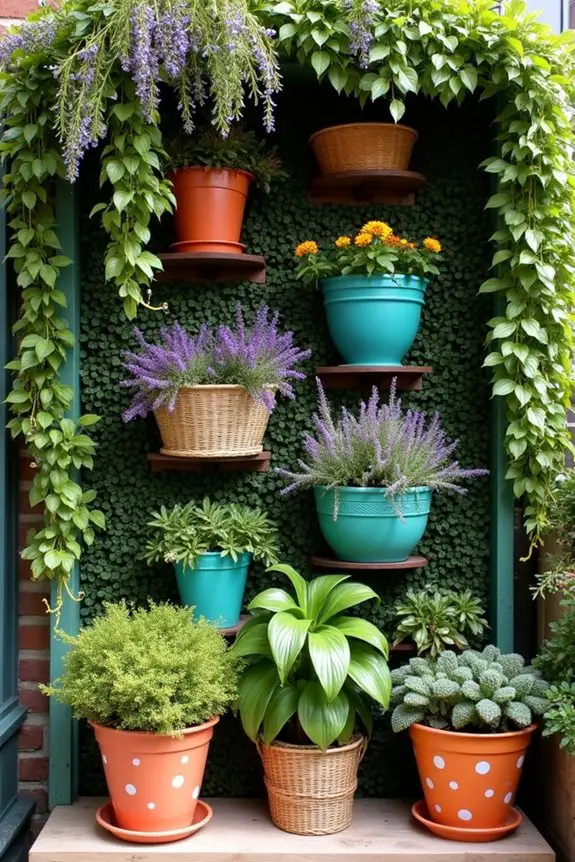
3. Colorful Container Combinations
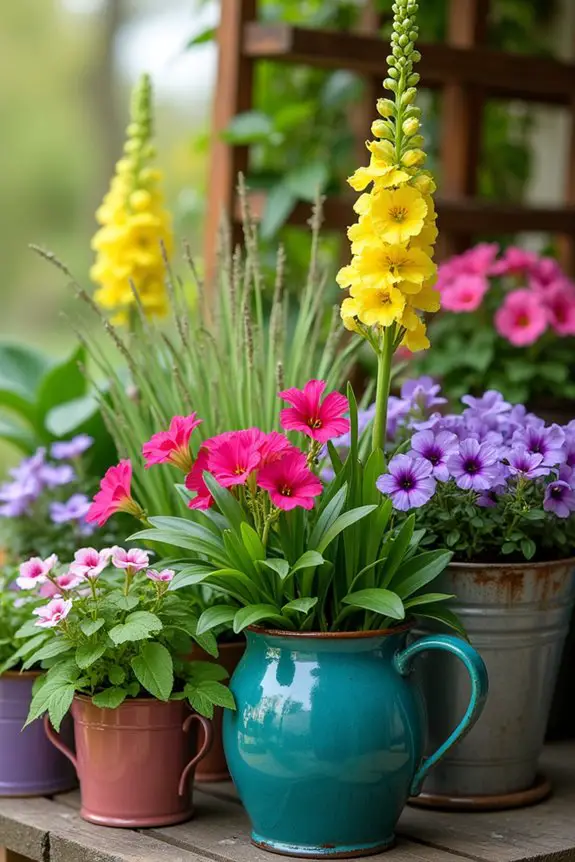
When it comes to maximizing space and adding a pop of personality to your tiny garden, colorful container combinations are a game changer. Harnessing the vertical gardening trend allows you to not only save precious ground real estate but also create an eye-catching display that can make your garden feel like a vibrant oasis.
So, let’s talk about how to get those containers singing together like a harmonious chorus.
First things first, grab your favorite containers—whether they’re ceramic, metal, or even repurposed items like old teacups (I won’t tell if you don’t). The trick to colorful container combinations is to play with height, texture, and, of course, color.
Choose a mix of plants that come in various sizes. You can use tall plants like snapdragons or ornamental grasses to sit proudly at the back and then layer in shorter blooms like petunias or coleus at the front. This layering creates visual interest and depth, almost like a multi-tiered cake (and who doesn’t love cake?).
Now, consider the colors. If you want a bold statement, go for contrasting colors—think bright yellows paired with deep blues. On the other hand, if subtlety is your jam, stick to shades within the same color palette, like soft pinks and lavenders.
But remember, it’s all about your personal flair. If you have a favorite color combo that makes you feel all warm and fuzzy inside, go for it! There are no rules in the garden, just happy plants.
Next up, don’t forget to mix in trailing plants. They’re the stars of the container world, cascading down the sides and giving that gorgeous waterfall effect. Sweet potato vine and cascading petunias can make even the drabbest container look chic and sophisticated.
And here’s a tip: when you’re planting, don’t be afraid to get your hands dirty. Seriously, it’s part of the fun. Digging in the soil is almost therapeutic—just watch out for those pesky dirt explosions (yep, learned that the hard way).
Once you’ve planted, give your combos some time to grow. Water them when needed and remember to rotate the containers if they aren’t getting even sunlight.
You’ll be surprised how a little turn here and there can make your vibrantly filled pots look even more stunning.
4. Natural Stone Pathways
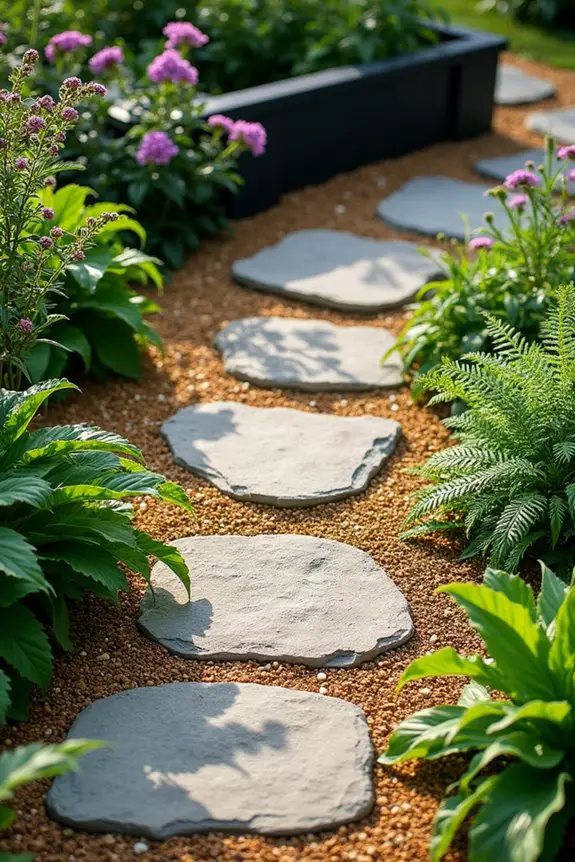
When you think of creating pathways in your tiny garden, natural stone is a wonderful choice. Not only does it blend beautifully with greenery, giving a backyard an earthy vibe, but it’s also super functional. Imagine stepping carefully on smooth, cool stones as you smell the fragrance of blooming flowers. You’re setting the stage for serene strolls and inviting gatherings.
To begin your pathway project, first gather your stones. Make a trip to a local garden center or a stone yard—don’t be shy about asking for ideas; the folks there generally love sharing their wisdom. Look for stones of varying sizes and colors. A mix creates a more natural, laid-back feel rather than a rigid, manufactured look. Trust me, your garden will thank you. Incorporating corn stalk support poles can also provide essential support to your plants as they grow.
Once you’ve got your stones, it’s time to mark where your path will go. Grab a roll of string or even some garden stakes and lay out a design that feels organic. Curves often look nicer than straight lines; think of a gentle river flowing through your garden. Pro tip: you could even sketch it on paper first if you’re a bit of a planner or, like me, you just need a visual before launching into a project!
Next, you dig a shallow trench along your marked path. Recommended depth? About 2-3 inches is perfect for creating a solid base. Now, here’s where the fun (and admittedly messy) part comes in: laying down a layer of sand or gravel for your stones to sit upon. Not only does it help with drainage, but it also keeps your stones from wobbling and shifting when you tread on them (since nobody enjoys an ankle twist during a garden stroll). Make sure your pathway is nearby a metal raised bed kit to enhance the overall structure and aesthetics of your garden.
Once your base is set, start placing those beautiful stones down. Experiment with different arrangements; you want it to feel casual and inviting. Are you feeling more like a modern artist? Maybe throw in some larger stones amidst the smaller ones for a bit of contrast. And if you accidentally misplace one, no stress. Just lift it and try again. The garden gods don’t mind, and neither do your entertaining guests.
After you’ve laid your path, fill in the gaps with soil, sand, or even ground cover plants. This will help your stones look more anchored and add a lovely finishing touch. And voila! You’ve created a natural stone pathway that’s functional, rustic, and beckons the spirit of exploration. Just imagine the compliments you’ll receive next time you show off your garden.
Now, go ahead and take a weekend to dig and lay down a pathway that draws your guests right into your little piece of paradise. Who knew your backyard could be the new hot spot?
5. Creative Use of Space
When your garden space is tiny, thinking vertically can completely transform the landscape. Vertical gardens not only save space but also add a dynamic layer of beauty and texture to your little patch of nature. Imagine lush greenery climbing skyward, creating a living tapestry that draws the eye up and makes your garden feel expansive. It’s a practical solution that’s as stylish as it’s functional.
To start your vertical garden journey, consider what structures you already have. Do you have a sturdy fence? Or maybe a bare wall in need of some life? You can easily attach planters or trellises to these surfaces, creating a vibrant display. Just make sure whatever you secure can handle the weight of your plants and soil. Trust me, no one wants a planter (or their precious plants) crashing down unexpectedly.
I learned that the hard way when my DIY trellis took an unexpected tumble. Oops.
Next, think about the plants that will make your vertical garden pop. Taller plants like pole beans or climbing roses pair beautifully with trailing plants like pothos or ivy for that lush, cascading effect. If you’re feeling adventurous, mix in some herbs like basil or mint, not only pretty but useful too.
Remember, layering plants with different heights and textures will create visual interest, and hey, everyone loves a fragrant garden, right?
Plant your chosen greenery in lightweight containers that allow for proper drainage—trust me, soggy roots aren’t plant-friendly, and your plants will thank you for not giving them a swimming pool. Attach your planters to your chosen structure, and with a little bit of patience (and maybe some trial and error), you’ll have a vertical garden that drips with charm.
Lastly, don’t forget about maintenance. Regularly check your plants, water them as needed, and make sure they’re getting enough sunlight.
Oh, and watch out for pests—they love a good vertical garden feast just as much as we do. If you notice something munching on your beloved basil, don’t panic. A little neem oil spray usually does the trick.
6. Layered Planting Techniques
So, let’s talk about layered planting techniques. This approach not only maximizes space but also creates an eye-catching arrangement that feels alive and energetic. By stacking plants at various heights, you’re giving your tiny garden a full-bodied look, and trust me, it adds a whole new dimension—like wearing a stylish layered outfit instead of that old, out-of-style t-shirt.
To start layering, you’ll want to focus on three key levels: the tall, the medium, and the low. Think of taller plants like sunflowers or pole beans reaching for the sky. Next, introduce medium-height plants like bushy marigolds or lavender. Finally, you can sprinkle in low-growing plants—maybe some charming ground covers like creeping thyme or dwarf ornamental grasses. It’s like a friendly plant community, each playing its part to make your garden feel lush and vibrant.
Don’t worry too much about spacing right off the bat—this is gardening, not a wide-open field, after all. Clumping plants closely together can create a more dramatic effect. Just be sure larger plants are in the back or at the top if you’re building vertical layers.
I may or may not have once planted my tiny petunias in front of a huge tomato plant, and let’s just say, it was like trying to spot a mouse in a lion’s den.
Once you’ve arranged your plants, consider using containers that allow water to drain properly. No one wants their plants drowning in soggy soil.
And remember, the more you mix up colors and textures, the more enchanting your little oasis becomes. Adding trailing plants like ivy or sweet potato vine won’t only fill in those nooks and crannies but also create a gentle cascade that adds drama to your vertical landscape.
After you’ve put everything in its place, don’t forget about maintenance. Frequent watering is key, especially for those higher tiers—tall plants tend to dry out quicker than you’d expect.
And don’t turn your back on pests; they’ll sneak up on you faster than an unexpected text from an old friend. A good organic insecticidal soap can help keep your leafy friends safe, while you enjoy your beautiful layered garden that just keeps thriving.
7. Whimsical Garden Art Installations
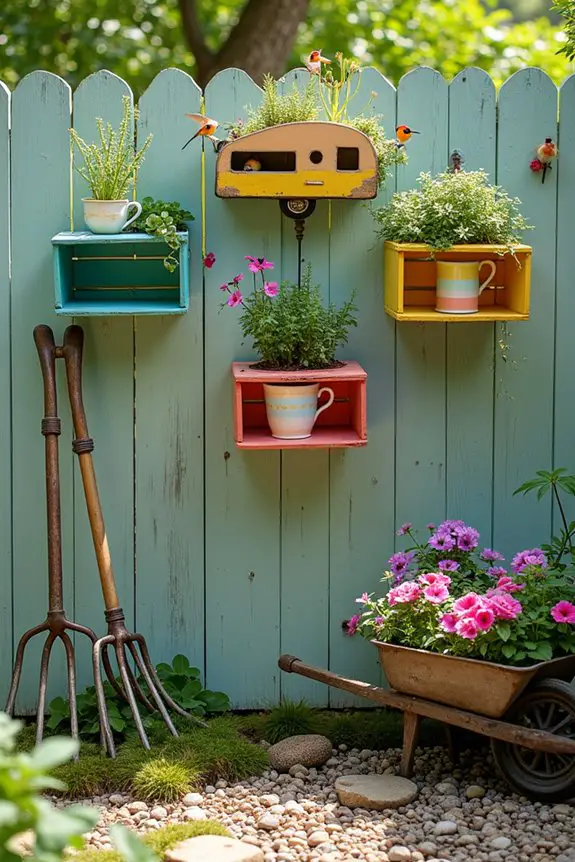
When it comes to adding personality to your tiny garden, whimsical garden art installations can truly bring your space to life. Not only do these creative touches add character and fun, but they also serve as eye-catching focal points that can draw the eye and heart of anyone who strolls by. Think of them as the quirky accessories that really elevate an outfit—they’re that extra sprinkle of magic that makes your garden feel uniquely yours.
For a start, consider incorporating things like colorful birdhouses, silly garden gnomes, or even handcrafted wind chimes. These little treasures can serve as playful reminders of the joy that gardening brings. I once hung a homemade bird feeder shaped like a retro camper, and I swear, it turned into an instant party spot for the local feathered friends.
It’s all about finding items that resonate with your personal style and infuse your garden with warmth.
You can also explore using vertical garden layouts as a canvas for your art. For example, consider mounting a series of painted wooden crates on a wall or fence to create an eye-catching display for small plants and mismatched ceramics. It not only gives you more planting space, but it also turns an ordinary wall into a vibrant gallery.
I hung some old teacups (because why not) and planted little succulents in them. Let me tell you, I’d more compliments than my last cooking attempt.
And don’t shy away from upcycling materials, either. Old tools, like rakes or shovels, can be transformed into charming plant holders or wall decorations. A broken wheelbarrow filled with petunias can evoke nostalgia, transporting you to simpler times spent in the garden.
It’s like showcasing a piece of your history, wrapped up in greenery. Just watch your step if you’re using something sharp—trust me, I’ve had my fair share of ‘oops’ moments.
Once you’ve found the perfect installations, take a moment to arrange them with balance in mind. Position taller pieces toward the back and let those shorter, whimsical accents peek from the front.
It’s about creating layers, just like you did with your plants. Before you know it, your garden will be a delightful playground, not just for you, but for all visitors. Give it a whirl; after all, there’s no right or wrong here—just make it a reflection of you.
8. Zen-inspired Garden Elements
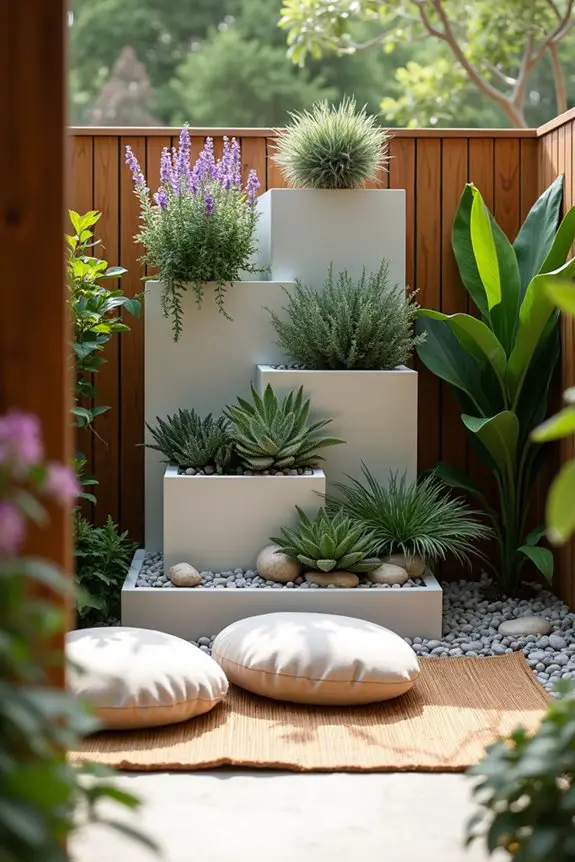
Creating a Zen-inspired garden in your tiny space isn’t only about aesthetics but also about cultivating peace and calm. These elements work wonders in transforming your garden into a serene getaway right at home. Imagine stepping outside and immediately feeling that wave of tranquility wash over you. That’s the magic of incorporating soothing designs and layouts.
Start by selecting key components that embody the Zen spirit—think smooth stones, minimalist planters, and gently flowing water features. A small tabletop fountain can provide that gentle, gurgling sound that feels like a hug for your ears. I once set up a tiny stone basin with a little solar fountain, and, wow, I could sit there for hours just listening.
Another great idea is to implement a vertical garden layout. Use sleek, linear planters to create height and dimension without taking up too much ground space. Layer them with calming plants—consider soft succulents, feathery ferns, or even calming lavender for that extra touch of peace. The green hues paired with soft pinks or whites provide a minimalist, yet stunning display.
Plus, you can always toss in a few decorative pebbles for that Zen flair—trust me, it elevates the whole vibe.
Consider adding a personal touch like a small meditation spot. A simple bamboo mat, perhaps with a few cushions, can invite quiet moments. I laid down a couple of old yoga mats in mine (yes, they’re a bit weathered, but *chic*), and those sunny afternoons spent meditating in the garden? Pure bliss. This dedicated space creates a focal point of mindfulness within your mini oasis, encouraging you to slow down and breathe deeply.
The key here is to maintain simplicity. Keep your decor minimal, avoiding clutter. Less is often more when creating that calming atmosphere, so don’t feel pressured to fill every nook and cranny. Instead, let each element breathe and shine, creating a space that truly resonates with your inner peace.
9. Ergonomic Planting Bed Design
One of the most delightful aspects of creating a tiny garden is how you can play around with space, like a well-choreographed dance. And here’s where ergonomic planting beds come into the spotlight, especially in the form of vertical garden layouts. They not only maximize your limited space but also add a striking visual appeal that can transform any bare wall or fence into a lush masterpiece.
Imagine having your herbs, flowers, and even veggies growing vertically, cascading like a green waterfall. It’s like stacking your favorite books neatly on a shelf – you don’t need extra square footage to expand your collection. I remember setting up my own vertical garden and being amazed at how much life I could fit in just a small corner. It was like discovering a hidden treasure of flavors—fresh basil, vibrant nasturtiums, and delicate thyme, all growing happily inches from my kitchen door.
To get started with your ergonomic planting beds, look for wall-mounted planters or create your own using wooden pallets. With just a little elbow grease and some paint (or maybe a lot of paint if you’re me), you can turn a simple structure into a charming garden feature. Fill each tier with a mix of plants that complement each other, like the way iced coffee pairs with a cozy blanket on a chilly day.
And let’s not forget about accessibility. Those vertical arrangements keep your plants at eye level, so no more bending over or squatting like an acrobat just to check if your herbs need watering. You can easily snip away at those minty leaves for your next mojito while standing comfortably. What a win-win situation—your back will thank you!
Incorporating recycled materials can add a unique touch. Use old gutters, shoe organizers, or even hanging baskets. Just think about all those “what can I do with this?” items you might’ve lying around.
Isn’t it wonderful how your creativity can breathe new life into stuff others might toss out?
10. Cohesive Color Palette Integration
When it comes to tiny gardens, a cohesive color palette can take your vertical garden from “meh” to “wow” in no time. Imagine this: a harmonious blend of greens, yellows, purples, and even some fiery red flowers cascading down your wall like a painter’s dreamy brush strokes. Not only does it look good, but it also brings a lively vibe to your space, making it feel like a mini paradise right outside your door.
Now, how do you achieve this color harmony without feeling like you’re attempting an advanced art project that requires a degree? Start by selecting plants with colors that complement each other. Think about how sunflowers and lavender hang out together in nature. It’s like they’ve got a friendship bracelet. You can also choose a “trio of colors”—a mix of cool tones (like blues and purples) plus warm tones (like yellows and orange). It’s like choosing just the right outfit for a date and hoping they notice you.
As you arrange your plants, keep in mind that not all colors shine equally. Some plants, like the flashy purple basil or vibrant red geranium, deserve the spotlight. Position them so they stand out against the backdrop of lush green foliage. This way, you create depth and make it easier for your eyes to dance across the arrangement.
But hey, if you accidentally plant a color combo that looks more like a toddler’s finger painting, don’t stress it. Sometimes those unexpected mixes can surprise you in the best ways.
For added fun, you might want to incorporate some colorful pots. A cheerful blue pot nestled among green plants will pop like a fresh blueberry in a bowl of fluffy whipped cream. You can even paint or decorate your existing pots to match your color vibe; I once went wild with glitter and ended up with something that looked more like a disco ball than a container for plants. Lesson learned: proceed with caution and maybe set glam boundaries.
In the end, a cohesive color palette doesn’t just beautify your garden; it creates an inviting atmosphere that feels both relaxing and invigorating. Plus, you’ll gain major bragging rights amongst your friends. So, why not grab those paintbrushes or planters and get going? Your tiny garden deserves to be the star of the show.
Mulch for Moisture Retention
Mulch might just be the unsung hero of your tiny garden, working silently behind the scenes to keep your plants smiling. Think of it as a cozy blanket for your soil, locking in moisture like your favorite old hoodie retains warmth.
It’s not just for looks—this stuff helps regulate temperature, too. You might wonder how it fits into tiny garden ideas. Let’s say you’ve got a patch of thirsty flowers; sprinkle some mulch around, and boom—better water retention.
Plus, it smothers pesky weeds that think they own the place. You’ll find it easy to apply, and your plants will thank you for the extra love and care. Who knew something so simple could have such a big impact?

