So, you’re thinking about sprucing up your outdoor space? A rock garden could be just the thing. Imagine meandering paths made of smooth stones, cozy benches tucked away for quiet moments, and vibrant plants peeking through rock layers. It’s like nature’s puzzle, and you’re the artist. But where do you even start? Stick around, and we’ll explore 10 rock garden design ideas that’ll turn your yard into a tranquil retreat, maybe even a little bit enchanting.
Unique Rock Arrangement Concepts
When it comes to unique rock arrangements, you’ve got options that can really elevate your garden.
Imagine a zigzag stone pathway guiding you through the greenery, or maybe a cozy curved stone bench where you can sip tea and soak in the view.
From stepped rock terraces to layered mosaics and circular fire pits, these concepts bring both flair and function to your outdoor space—who wouldn’t want that?
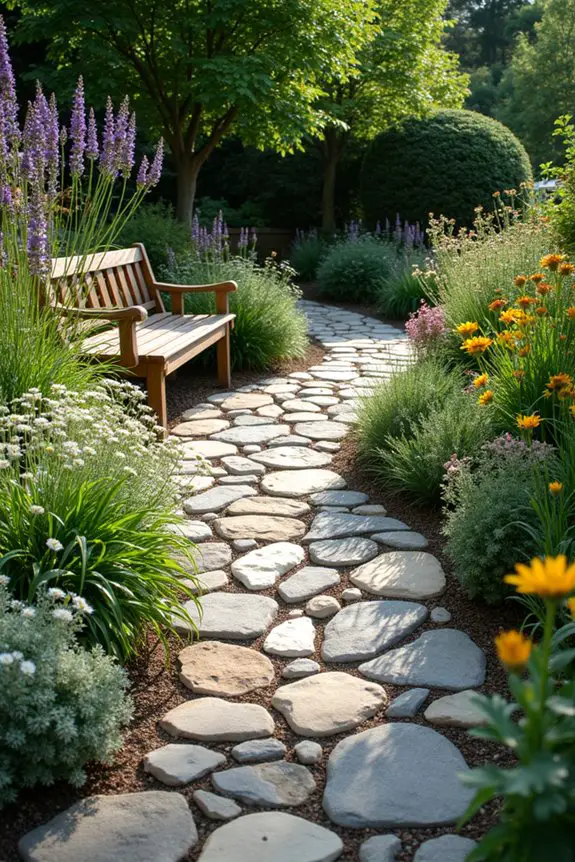
1. Zigzag Stone Pathway Layout
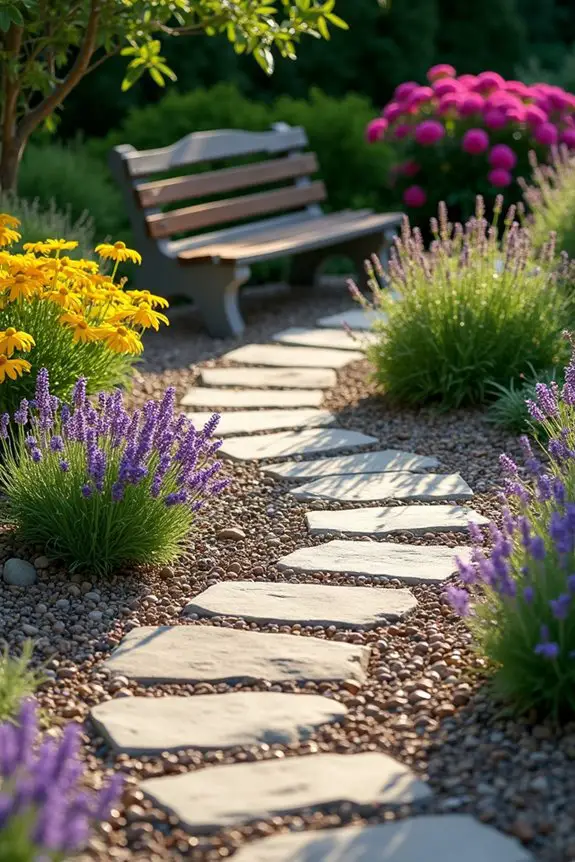
When it comes to rock gardens, especially with a zigzag stone pathway, you’re not just creating a walkway; you’re setting the stage for an enchanting journey through your outdoor space. Imagine winding your way through a lush garden, meandering over stones while feeling like a character in a serene escape. This design idea not only makes your garden more functional—allowing you to traverse it easily—but it also adds that whimsical touch, transforming the ordinary into something extraordinary. Who wouldn’t want to stroll through a garden that feels like an adventure?
Now, let’s dig into how to create that zigzag pathway. Start with a vision. Picture the layout. You’ll want to map out your pathway—grab some stakes or even a hose to outline your design. Keep in mind, the zigzag doesn’t need to be sharp angles; smooth curves add a gentle flow and keep it interesting. It’s like trying to make the perfect brownie; you can’t rush the process. Each turn should feel inviting, not jarring.
Next, decide on your stones. Choose a mix of sizes and colors for an appealing look. Think of it as adding sprinkles to your favorite cupcake. Large stones can anchor corners, while smaller gravel or pebbles can fill in gaps. Lay them out dry first to see how they fit together before digging in. The process can be like a puzzle, and honestly, I can be terrible at puzzles. More than once, I’ve had to redo a section because I got a bit too carried away with one color scheme—lesson learned.
After you have your stones in place, it’s time to secure them. You’ll want to dig out a bed to set the stones in. This will help with drainage—part of the function we love—so water doesn’t pool on your lovely new path. To create a sturdy base, you can add some sand or gravel, giving the stones a strong foundation. Now, picture yourself back at that brownie-making stage, pressing down the batter—these are your stones caking into position, firm but gently placed.
Lastly, finish it off with some greenery. Plant clusters of flowers or shrubs on either side of your path, softening the edges and bringing a bit of nature’s magic into the mix. It’s like the icing on the cake, delightfully unexpected yet absolutely necessary. As you step back to admire your handiwork, you might find yourself smiling like the proud gardener you are—or at least laughing at the fact that, yes, you finally made it past the dreaded puzzle stage of garden design.
2. Curved Stone Bench Seating
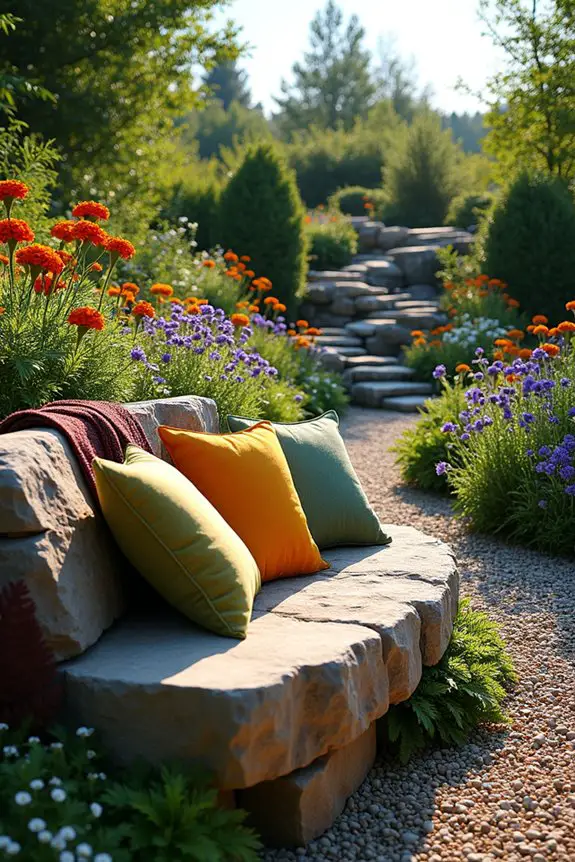
When you think of a cozy spot to relax in your rock garden, a curved stone bench might just be the perfect addition. Not only does this bench provide a functional place to sit and enjoy your surroundings, but its unique shape creates a soft, inviting vibe that sets your garden apart from the rest. Imagine plopping down after a long day, surrounded by your vibrant plant life, feeling like you’re tucked away in your own secret sanctuary. Could anything be better?
Creating a curved stone bench seating starts with selecting the right stones. You want to look for large, flat stones that are both sturdy and comfortable. Picture yourself lounging, legs stretched out, and the last thing you need is a rock digging into your back. So, as you scour through your options, give them a test sit whenever possible. It’s like trying on shoes; you need to verify they’re just right for your garden stroll and rest. A transplanting trowel is a great tool to help position your stones accurately.
Next, envision where the bench will go. Aim for a location that offers a nice view of your garden—maybe near those vibrant blooms you love or close to your new zigzag pathway. Once you’ve got your spots scoped out, you’ll want to stake it out. This step is essential, folks. If you skip this, you might end up with a bench that’s hidden behind a bush, and no one wants to find their serene space while fighting through flora like it’s an obstacle course.
Now, let’s talk about arrangement. For a curvy bench, lay down the stones in a gentle arc, allowing the design to flow with the natural lines of your garden. You can use larger stones at the back for support and smaller, decorative rocks in front for that polished finish. Think of it like an artist creating a masterpiece; while you’re piecing everything together, allow your own creativity to shine through.
Once the stones are positioned just right, you’ll want to secure them. You can use strong mortar or even gravel to hold everything in place. Okay, here’s the thing: I once thought I could skip this step, convinced I’d just sit gingerly. Let’s just say I discovered the hard way that rock seating needs a solid base. So, go ahead and roll up your sleeves—mix that mortar and make certain each stone has a snug fit. It’s like making the perfect lasagna; layer by layer, you’re building something beautiful.
As a final touch, consider adding some cushions or throw blankets. Not only do they add comfort, but they also introduce a splash of color and texture, enhancing that garden oasis feel. Just imagine curling up with a good book, tucked up in a cozy blanket, as the sun sets—sounds lovely, right? It’s the little things, like a soft sitting spot surrounded by nature’s beauty, that can truly make your garden a cherished retreat.
In the end, remember that your curved stone bench isn’t just an addition to your outdoor space; it’s a gathering point, a storytelling nook, or a quiet refuge. Additionally, using a compost thermometer can help you monitor the conditions of your garden compost, ensuring healthy plant growth. So, get your creativity flowing, and let the stones guide you to the perfect place to unwind. Happy gardening, and may your bench become the heart of your rock garden escape.
3. Stepped Rock Terraces
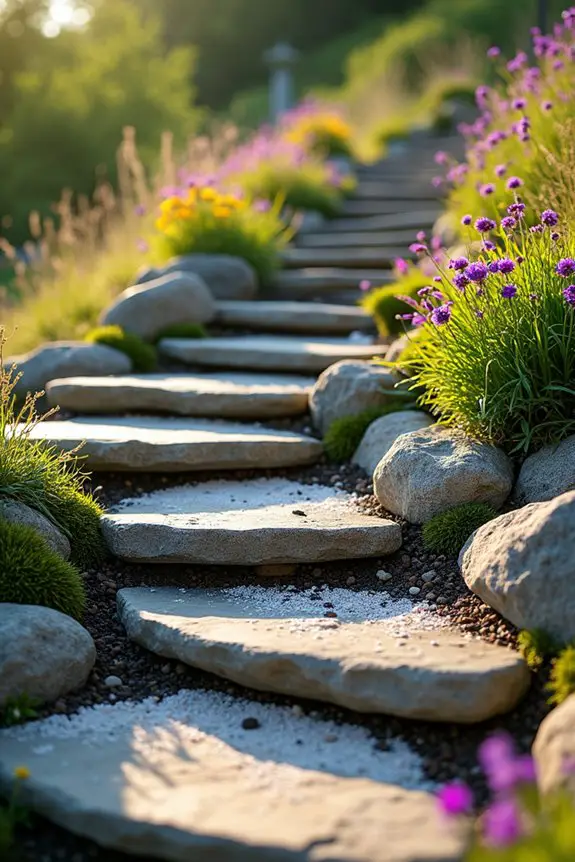
When it comes to creating a rock garden that speaks to both beauty and practicality, stepped rock terraces take the cake. Imagine this: you’re on a hillside, surrounded by lush green plants, and there’s a series of stone steps leading you to various levels of your garden. It’s not just a feast for the eyes, but it also gives you easy access to all those gorgeous blooms you’ve painstakingly nurtured. Who doesn’t want a mini adventure in their backyard, right?
Let’s start with the basics. The first thing you’ll want to do is choose the right stones for your terraces. Look for flat stones that can easily stack. If they’re too wonky or uneven, your terrace could end up looking more like a game of Jenga than a serene rock garden. Trust me, I’ve learned this the hard way. The first time I attempted a stepped terrace with uneven stones, it felt like I was building a wobbly tower of a million regrets. Go for stones that aren’t only flat but of varying sizes to create visual interest when you start stacking them. Using a garden hand fork can help ensure that the soil is packed tightly between stones for stability.
Next, think about the slope of your garden. You want to create a gentle incline where each level is distinct yet harmoniously connected. Mark out the spaces for each terrace. This part is a game changer, folks. Grab some string and stakes, then outline each level so you have a clear visualization in your head of the layout before you start stacking. It’s like mapping out your favorite recipe before diving in—believe me, it saves you from potential kitchen catastrophes.
Now, let’s get stacking. Begin at the bottom and work your way up, placing larger stones as the base for stability. Think of this like building a sturdy lasagna; lay the foundation before layering anything else. As you add each level, gradually decrease the size of the stones, creating the steps. It’s all about that smooth progression from one step to the next. Don’t forget to check whether the steps are level; jumping onto a tilted step could result in a not-so-graceful tumble.
Once your stones are stacked and it’s looking oh-so-fine, fill the gaps with soil or pebbles, planting small flowers or ground cover that cascades over the edges. This addition will soften the hard lines of the rocks and create a lush, inviting atmosphere, like a cozy blanket wrapping around your garden. You may find that you stare at the finished steps a little too long, admiring your own handiwork—because let’s be honest, you deserve a moment of self-pride for the sweat and effort you’ve put in.
Finally, consider the vibe you want to enhance. A light dusting of sand between the stones can lend a beachy feel, while some moss or creeping thyme can help your garden look like it’s from a fairy tale. Either way, you’ll end up with a rock garden that not only serves as a stunning focal point but also draws you in, inviting you to explore each beautiful level. Don’t forget to equip yourself with essential garden scissors for those precise cuts while shaping your plants around the rocks.
4. Layered Stone Mosaic Patterns
When it comes to jazzing up your rock garden, layered stone mosaic patterns are like the artistic drizzle on a perfectly baked cake. Not only do these designs add a pop of creativity to your landscape, but they also serve a functional purpose by improving drainage and reducing soil erosion. So, if you’re looking to elevate your outdoor space with some flair, layering stones in a mosaic pattern is the route to take.
First off, let’s discuss the stones themselves. You want a collection that boasts a variety of sizes, shapes, and colors. Think of it like gathering ingredients for a colorful stir-fry; you need the crunch of bell peppers, the warmth of carrots, and the pop of green peas. The same principle applies here—maximizing visual appeal. Get yourself some flat stones, rounded ones, and maybe even a few jagged pieces to guarantee you have texture galore.
Now, before you plunge into building your mosaic, outline your pattern on the ground. Use some chalk, flour, or even a garden hose. Picture it like sketching out your dinner plate before you start cooking; it really helps to visualize what you want to achieve. Play around with different arrangements until it feels just right. Maybe you want a swirling effect that draws the eye in, or perhaps a more structured, geometric design. The world is your oyster, or should I say, your rock garden.
Next, it’s time to get your hands dirty—literally. Starting with the largest stones, lay them down according to your design, making sure each piece is stable. You might find yourself treating this step like crafting a larger-than-life jigsaw puzzle. Carefully place smaller stones around the larger ones to fill in gaps, just like you’d when making a delicious chunky salsa. Add soil or sand between the stones for extra stability, and don’t be shy about playing with the heights; layering stones to varying depths can create a lovely ebb and flow in your garden.
Once you have your mosaic laid out, stand back—yes, take that moment to marvel at your creation. You’ve earned it. Now, consider filling in the spaces with gravel, pebbles, or even tiny succulents that gently cascade over the edges. This not only softens the hard look of the rocks but also brings a vibrant freshness that invites you to explore your masterpiece. Incorporating tools like a stirrup scuffle hoe can make the initial soil preparation more efficient, setting the stage for your beautiful design.
Just imagine sinking your toes into the cool stones while sipping a glass of lemonade, basking in the warmth of a sunny afternoon. Sounds dreamy, doesn’t it?
5. Circular Stone Fire Pit
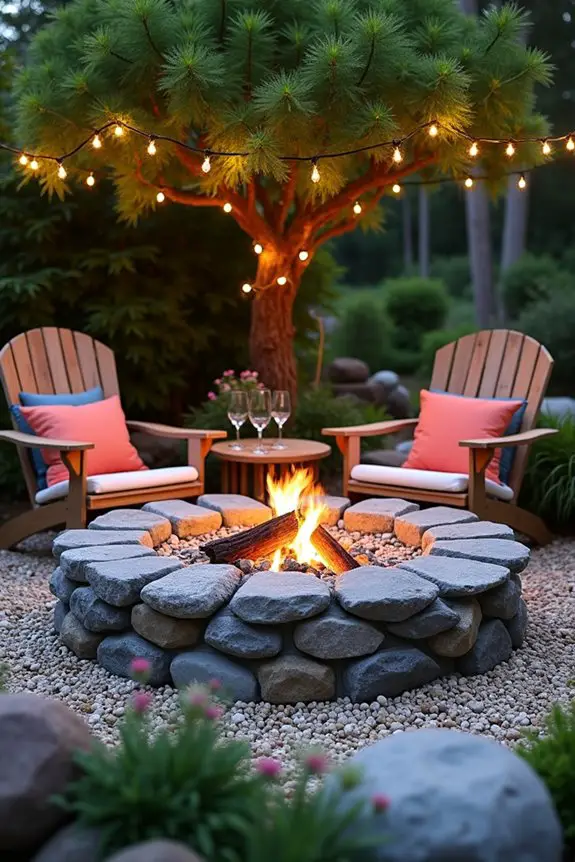
When it comes to adding warmth and a unique touch to your rock garden, a circular stone fire pit is like throwing a cozy blanket over your favorite chair—it transforms the whole vibe. Not only does it serve as a central gathering spot for chilly evenings, but it also enhances the overall aesthetic of your outdoor space, creating a welcoming atmosphere that draws friends and family together.
Imagine this: flickering flames, laughter in the air, and the mesmerizing glow of stones surrounding you. Pretty inviting, right?
So, how do you create this charming centerpiece? First, choose a location that’s both safe and visually appealing—perhaps a clear patch in your garden where you can set up shop without worrying about low-hanging branches or wild underbrush. Ideal spots are usually flat and a bit away from flammable materials. It’s like selecting the perfect place to set up your grill for burgers; you want something accessible and fun without the risk of kitchen disasters.
Once you’ve picked your spot, it’s time to gather your materials. For the fire pit itself, look for sturdy, heat-resistant stones—think granite or river stones. You’ll want enough to create a circular enclosure about three feet in diameter; this way, it’s cozy enough for chatting, but roomy enough to not feel cramped.
If you have a collection of mismatched stones from past projects, bring those out; a mix and match of colors and textures can add a charming, rustic feel that screams personality.
To start, outline your fire pit’s perimeter using string or simply by arranging stones in a circle. Now, let’s get to the fun part: stacking your stones. Begin with larger stones at the bottom, forming a stable base, and work your way up with smaller ones.
This is where you can get a little creative; don’t worry about making everything perfectly symmetrical. The key is to channel your inner artist—perhaps think of it like a pizza, where every piece adds to the overall flavor, but not every topping needs to be exactly the same.
While you’re stacking, you may want to create a slight inward slope with the stones to help contain heat. Plus, it makes for a nice visual effect! Look around and visualize what it would feel like to sit there. Would you throw in a few comfy outdoor chairs or bean bags? Maybe some strings of lights to add a magical touch at night? This is your garden, after all—let it reflect your personality!
Once the structure is in place, consider adding a fire ring or a metal insert to keep everything safe and to help maintain a stable fire. It’s like making sure your cake doesn’t fall apart when you serve it.
Fill the bottom with gravel to promote drainage and avoid any muddy mishaps—nobody likes a soggy bottom, right? For a finishing touch, add decorative stones or even some potted plants around the fire pit to help it blend seamlessly into the rock garden.
6. Interlocking Rock Edging Design
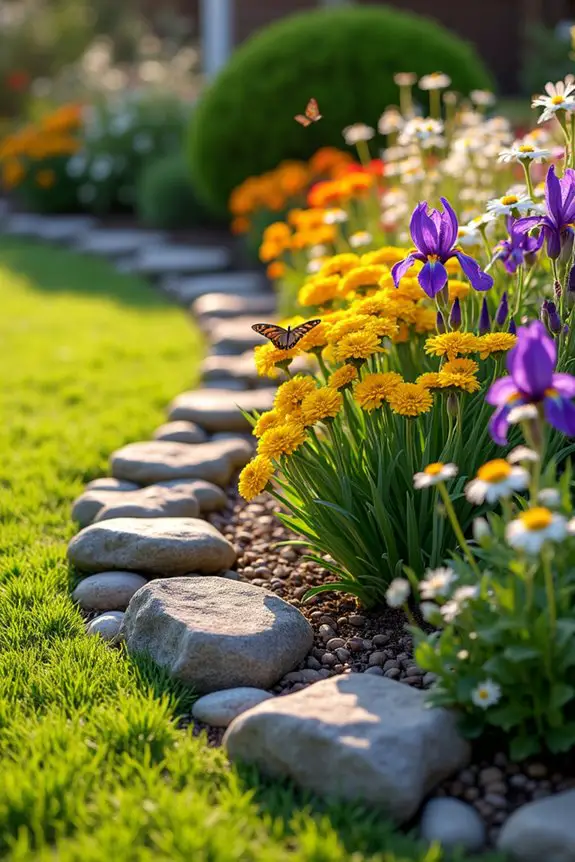
If you’re looking for a way to define spaces in your garden, while also adding a stylish flair, interlocking rock edging is like the perfect accessory to an outfit. It not only keeps your lawn and garden beds neat and tidy, but it also contributes to a wonderfully natural look that blends beautifully into the landscape.
Think of it as a gentle hug around your flowers or shrubs, giving them a space to shine while maintaining order in the midst of nature’s delicious chaos.
To get started, you’ll first want to decide where you’d like to use these rock edges. Look around your garden—maybe there’s a flower bed that looks like it could use a bit of love, or a pathway that’s seen better days.
Then, gather your rocks. Here’s the fun part: you don’t have to go all corporate with perfectly shaped stones. Instead, hunt for an assortment of rocks in different sizes and textures. Not only does it add interest, but it gives your garden that unpretentious, “I did this myself” vibe. Picture your grandma’s old garden—rustic, charming, and filled with stories.
Once you’ve gathered your stones, it’s time to map out your design. You can create straight lines to define spaces clearly or get adventurous with curves that mimic the natural flow of your garden.
Lay the stones out without setting them in place first—this is like drafting your grocery list. It helps you visualize what you’re working with. Don’t forget to step back occasionally to see how it all looks together. Does it feel balanced? Does it spark joy?
Next up, it’s time to start building. Begin laying down the stones, placing larger stones on the outer layer for stability, and fill in with smaller ones for a snug fit.
As you stack, try to interlock them. This is where that whole “interlocking” magic happens. It’s a bit like Tetris but in a garden—satisfying and oh-so-fun! Not everything needs to be perfect; nature isn’t symmetrical, so don’t stress if it’s not picture-perfect. Just let the stones settle into each other, seeking their place.
If your stones seem too far apart, don’t panic. You can fill the gaps with soil or smaller pebbles, giving it that final touch that screams, “Look at this beautiful masterpiece!”
And while you’re doing this, think about the plants you want to showcase. Imagine vibrant flowers complementing the earthy tones of the rocks—it’s all about that contrast that can really make your garden pop.
Lastly, step back once more to admire your handiwork. You did that! Your garden now has that perfect blend of form and function, showcasing your creativity while maintaining a solid structure.
Plus, you can now confidently entertain friends, showing off your handiwork and saying things like, “Oh these? Just a little interlocking rock edging I designed.” Now just picture the impressed looks on their faces. Who knew rocks could be this chic?
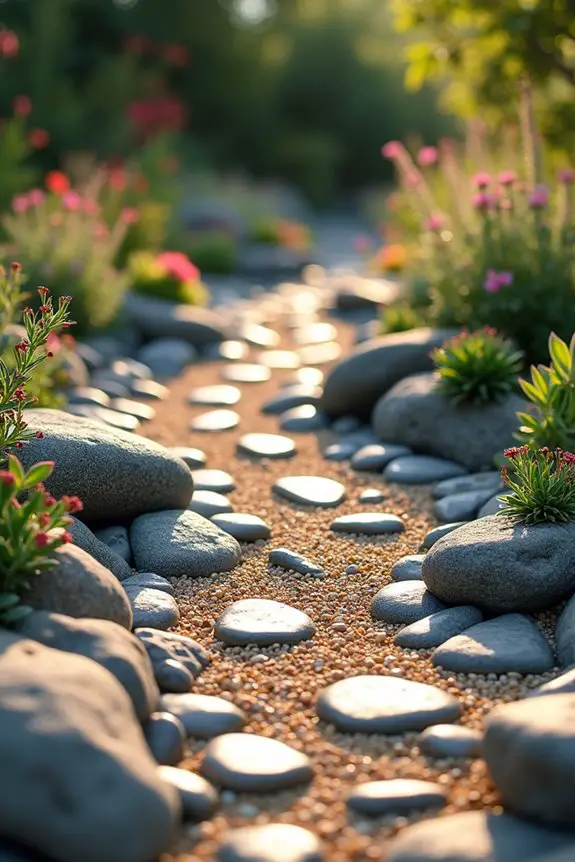
7. Rock Spiral Pathway Design
When you think of pathways, what comes to mind? A simple stone path might do the trick, but have you ever considered adding a rock spiral pathway to your garden? This unique design not only serves a practical purpose—guiding you through your outdoor space without any detours—but it also creates a serene, enchanting vibe that beckons you to slow down and take in the beauty around you.
First things first, pick your spot. Ideally, you want a place where folks naturally wander—maybe near a favorite seating area or heading towards a lovely flower patch. Envision this: you’re sipping your morning coffee while watching the sun creep over the horizon, and your eyes are drawn along a spiraling path formed by thoughtfully arranged rocks. It’s a little slice of tranquility, don’t you think?
Now, let’s talk rocks. You’ll want to gather various sizes and shapes, but don’t go overboard—between you and me, lugging around heavy boulders can lead to sore muscles, and nobody wants that. Aim for pieces that suit your desired look, from smooth river stones to rustic, jagged edges.
Feeling overwhelmed by your rock collection? Try laying them out in your desired spiral pattern without securing them just yet. This way, you can adjust the arrangement until it feels just right, and trust me, it’s way more fun to play with configurations before getting down to business.
When you’re satisfied with your design, it’s time to get your hands dirty. Start by marking the outline of your spiral on the ground; this gives you a visual guideline for rock placement. As you begin laying stones, try to make the spiral gradually widen as it moves outward. This trick not only draws the eye in but also invites anyone strolling along to explore.
Remember, not every stone has to fit perfectly—embrace the imperfections. They add character, much like those odd socks I can never seem to find a partner for.
As you build your pathway, carefully stack and interlock the rocks. It’s like putting together a puzzle, so play around with different arrangements until everything feels snug. If gaps appear, you can fill them with soil or smaller stones—it’s a bit like frosting a cake, just with rocks.
Once your spiral pathway is complete, take a moment to pat yourself on the back. You just crafted a unique feature that gives your garden a warm and inviting atmosphere, while also showcasing your creativity.
Imagine how lovely it’ll be when the flowers bloom and butterflies flutter nearby, guiding you gently along your rock spiral pathway. So why not embrace the charm it adds to your garden? With each step along this winding path, let the natural beauty of your outdoor space unfold around you. Happy gardening!
8. Asymmetrical Stone Feature Arrangement
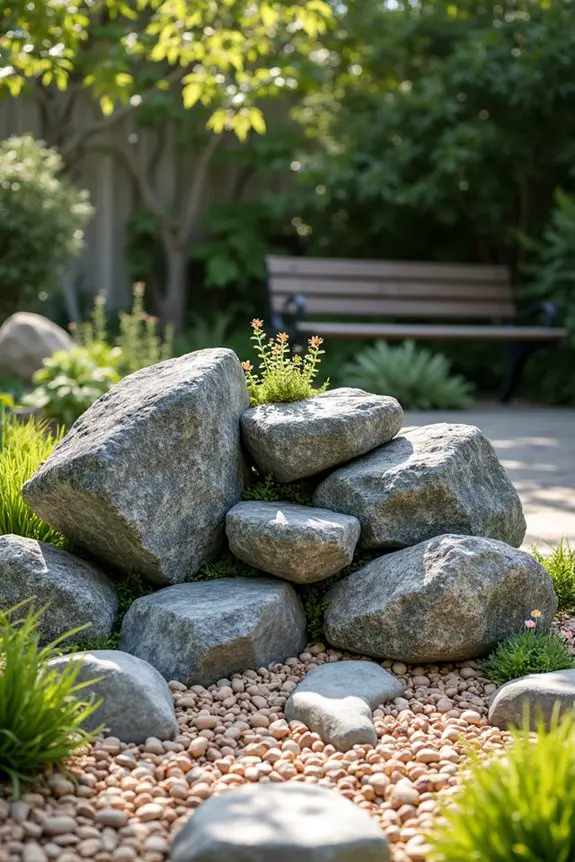
When it comes to rock gardens, the charm often lies in the irregularity of their design. That’s where asymmetrical stone arrangements come into play. This approach not only adds a dash of interest to your landscape but also promotes a more relaxed and natural vibe.
Think about it—a garden with perfectly arranged stones can feel a bit too stiff or formal, but with asymmetrical placements, you invite a sense of whimsy and organic beauty that makes visitors feel right at home.
So, let’s explore how you can create your own asymmetrical stone feature. First off, choose your rocks. Mix and match various shapes and sizes, from chunky boulders to sleek pebbles. You want a bit of variety to keep things visually appealing.
Don’t stress too much about attempting to achieve equal balance—think of it like art rather than a math equation. Sort of like how I love a good slice of cake with a generous dollop of frosting, your rocks should feel like they’re comfortably piled together, without fear of toppling over or looking too forced.
Next, find a meaningful spot for your stone arrangement. Maybe it’s near a garden bench where you can sit and enjoy the view, or by a beautiful flower bed that needs a focal point.
Lay the stones down in a way that feels free-form—pick up a rock, set it down, and step back. Do you feel that spark of excitement? If not, shift it around until it speaks to you. The beauty of this method is in the freedom of expression, so don’t be afraid to let your creative instincts shine like a disco ball at a wedding.
Once you’ve settled on an arrangement that feels just right, it’s time to get into the nitty-gritty. Start with your largest stones as the base. These will anchor your design and give it stability.
Think of them like the sturdy legs of a table — if they’re not solid, everything else is bound to wobble. Position them in a somewhat clustered fashion but with angles that feel spontaneous. Then, gradually layer smaller stones around them, filling gaps and creating levels. This layering technique gives your arrangement depth and character.
As you’re working, keep in mind that a little bit of imperfection goes a long way. Nature isn’t perfect, and your rock feature shouldn’t be either. If a rock is sticking out at an odd angle, lean into it—let it be a unique quirk that gives personality to your garden.
On top of that, you can also sneak in some ground cover plants or succulents around the stones for an added splash of color and softness. It’s like accessorizing an outfit; a pop of greenery can pull everything together.
9. Vertical Rock Wall Feature
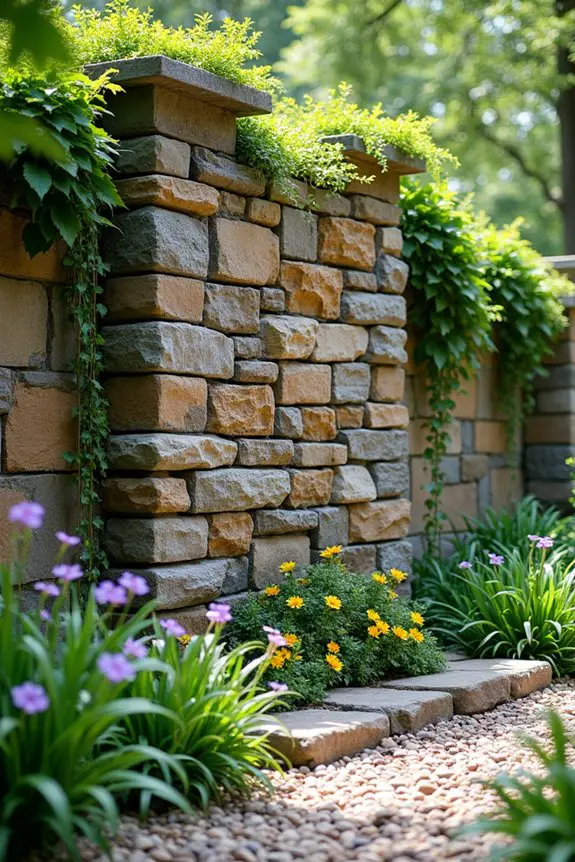
Creating a vertical rock wall feature in your garden can transform an ordinary space into a stunning and functional display. Not only does it save ground space, but it also adds a dramatic vertical element that brings a whole new vibe to your outdoor area. Imagine this: a cascading wall of stones adorned with creeping plants and vibrant blooms, inviting the eye and stealing the show. Sounds dreamy, right?
To kick off your vertical rock wall project, start by selecting your stones. You want a mix of sizes and shapes—think large flat stones for the base and smaller ones for the in-betweens. It’s kind of like building a sandwich, if you think about it. You’ll want a solid foundation (the bread) with tasty layers (your stones) that stack up neatly. Choose stones that have interesting textures and colors; they’ll add character and depth, making your wall look like it’s been there for ages.
Next, pick a spot that gets some sunshine but also has shade during the hottest parts of the day. This is crucial for keeping the plants on your wall happy and thriving. You might want to sketch out a rough design before you start to visualize how everything will come together. Just like a good recipe, a little planning can make the process smoother.
Now, it’s time to start stacking those stones. Begin at the base with your largest stones, placing them in a straightforward, stable manner—think of each stone as having a job. Your larger rocks are there for support, while the smaller ones will fill in gaps. Once you have the sturdy foundation set, it’s time to go wild. This is the part where you can really embrace the “art” aspect. Adjust their positions, tilt them a little, or even let a few rocks hang out slightly over the edge. You want character, not a corporate retreat vibe.
After you’ve got your stones in place, it’s time to introduce your plants. Creeping plants, like sedum or even some lovely ivy, work really well because they grow downwards and can help soften the sharp edges of your stones. Plant them in the crevices, where the stones meet, or even pop a few pots on ledges if you really want to show off. Watching them cascade over your rock wall is like having a living piece of art that changes with the seasons – and who doesn’t want that?
Lastly, don’t forget that maintenance is key. Give your vertical wall a little love every now and then—check for any pesky weeds, and trim back any overzealous plants that start to overshadow your stones. It’s not just about aesthetics; you also want to keep the structure sound and enjoyable to look at.
And remember, even if it’s not perfect, it’s yours, a reflection of your personality; embrace the quirks, just like how I reluctantly accept that I can never perfectly fold a fitted sheet.
Enjoy your new vertical rock wall; it’s likely to become the new favorite photo-spot for visitors and a serene escape for you!
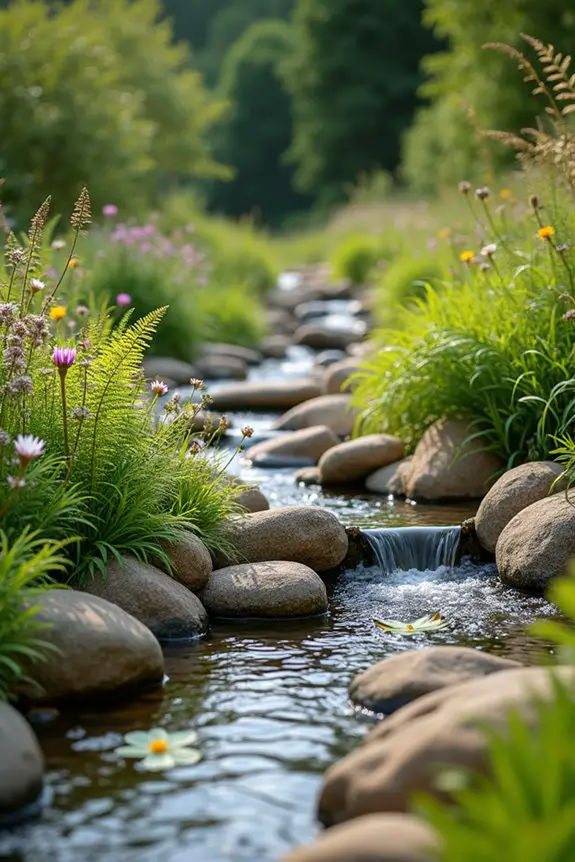
10. Natural Streambed Rock Layout
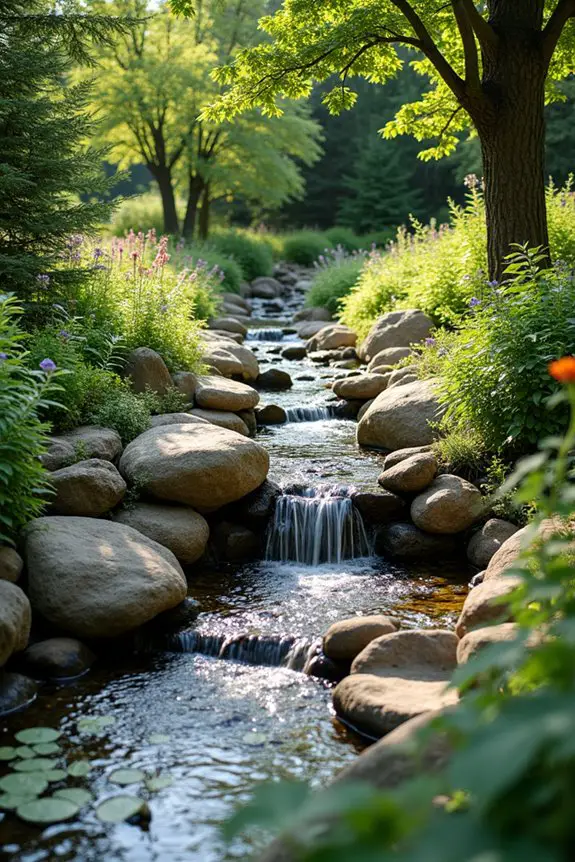
Creating a natural streambed in your garden not only enhances the aesthetic appeal but also adds a soothing soundscape, turning your backyard into a tranquil retreat. Imagine the gentle trickle of water weaving through smooth stones as sunlight dances across the surface, creating a peaceful vibe that feels like a mini getaway right at home.
Plus, it’s a great way to manage rainwater runoff—you know, keeping that soggy mess from turning your garden into a swamp.
To get started with your natural streambed rock layout, the first step is to envision where you’d like this little aquatic paradise to flow. Think about the slope of your yard; a natural incline works wonders, as it allows the water to flow gracefully. If you’re not blessed with a slope, no worries—grab a shovel and create a gentle slope for your streambed. We’re not making a mountain here; just a nice little dip will do the trick.
Next, it’s time to gather your rocks. You’ll want a blend of sizes; larger stones can form the banks while smaller, flatter stones can create the streambed itself. Picture the rocks as a jigsaw puzzle, where pieces fit together, creating a flow that guides the eye. This is no time for mismatched socks; select stones that harmonize with each other. After all, if they were invited to a party, all the stones would need to get along, right?
As you lay down your stones, create curves and meanders—straight lines are a little too rigid for a stream. Make it feel natural and inviting, like a winding path through a forest. Start by placing your bigger stones as anchors to hold the banks together, and then fill in with those smaller guys, kind of like making a lasagna with different layers.
You want to make certain that the streambed is functional, so keep it slightly deeper in the center for water flow, and shallower on the edges for a soft change.
Now, let’s bring in the element of water. If you plan on using a small pump to keep water flowing, position it at the top of your streambed. This way, the water cascades down, creating that soothing sound we all love. Just think about how nice it will be to sit outside with a book while you listen to that gentle trickle—you might never want to leave your yard again.
Once your water is flowing, it’s time to add plants around your streambed. Native plants work wonders as they often thrive without much fuss. Incorporate some lovely ferns and colorful wildflowers—think of them as the dress code for your stream bed. Not only will they stabilize the soil, but they’ll also give your water feature that lush, inviting feel.
If you’re feeling particularly adventurous, try adding some aquatic plants or even a few water lilies. Who doesn’t want a touch of classic elegance?
Lastly, maintain your natural streambed like a pro. Keep an eye on those pesky weeds that want to crash the party and make sure to clear any debris that might block the water. After all, nobody likes a jammed creek; it’s the perfect recipe for chaos.
Enjoy the serene view and sounds, and pat yourself on the back for creating your own little oasis. Who knew transforming your garden could be this delightful?
Soil Drainage Considerations
Soil drainage considerations can make or break your rock garden, and trust me, you don’t want to end up with a soggy mess.
Imagine this: you’ve crafted stunning rock garden ideas, only to see your precious plants floored by standing water. Not ideal.
First, you’ll want to build your garden on a slope. It’s like nature’s own water slide—runoff will flow right past your plants.
Next, mix in some sand or gravel with your soil to boost drainage. It’s basically your rock garden’s secret weapon.
Remember to check drainage regularly; standing water means trouble.

