
Let’s just say gardening can be a bit of a wild ride. If you’ve ever felt lost in a jungle of flowers or weeds, you’re not alone. Gravel gardens are your calm oasis, offering beauty without the fuss. Imagine vibrant container plants mixed with cool gravel patterns, all inviting you to create your own tranquil escape. How do you start? Well, keep in mind, the best part is yet to come.
Contemporary Gravel Arrangements
When you think about contemporary gravel arrangements, imagine the vibrant mix of colorful containers and those sharp geometric gravel patterns.
You can layer different gravel textures to keep things interesting, and adding natural stone borders just elevates everything—it’s like giving your garden a classy suit.
Plus, why not throw in some bold sculptural elements for a bit of drama? It’s all about making your space feel fresh and alive.
1. Colorful Container Arrangements
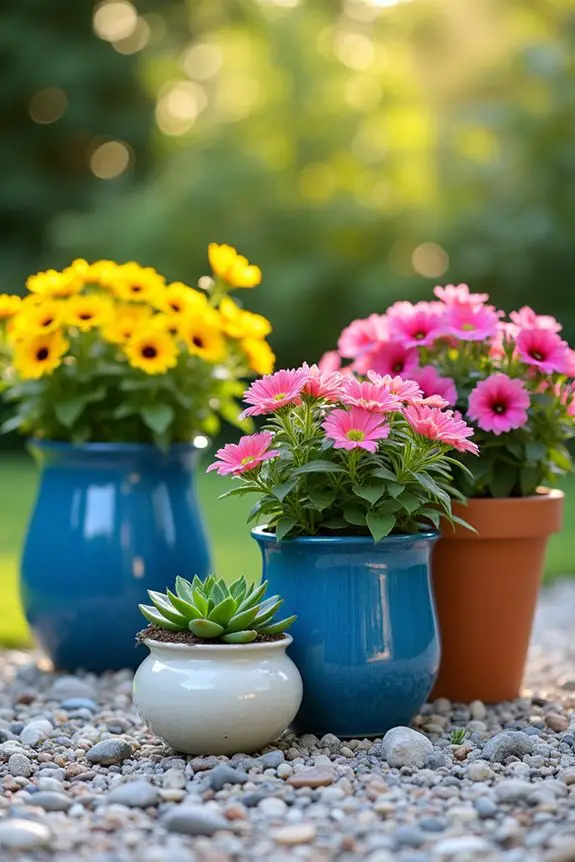
When you think of a gravel garden, you might picture a dry, drab landscape lacking in color and character. But let me tell you, colorful container arrangements can really flip the script. Imagine vibrant pots bursting with flowers and lush greens, sitting pretty among the gravel. This idea not only spices things up visually but also gives your garden some personality. It’s like putting on a bold accessory that may just become the conversation starter at your next gathering.
First things first, choose your containers wisely. You want them to stand out, but not clash with the gravel’s natural tones. Bright blues, sunny yellows, or earthy terracottas can create a gorgeous contrast, and yes, I know that’s a lot of colors—who said gardening didn’t involve a bit of artistry?
Right, so once you’ve got your pots, pick plants that match your vibe. Think cheerful daisies, lovely petunias, or even some interesting succulents for a modern twist. And here’s a little secret: using varying heights can create an eye-boggling effect. Place taller plants in the back, and let the shorter ones shimmer in the forefront. It’s like creating a layered cake, except nobody’s getting cake crumbs all over their shoes.
Don’t worry if you’re short on space. Containers work like magic to capture attention. Just plop them down among the gravel, and voilà, suddenly your garden has focal points that draw the eye. Plus, you can easily switch them out with the seasons—who doesn’t love a little variety? Just think about how you can change up your arrangement with winter pansies or even ornamental peppers when fall rolls around.
Watering can be tricky; I mean, what’s worse than forgetting about that sweet little plant tucked in the corner? Use lightweight pots, and check how they respond to the weather. It helps to group containers together; they can help each other hold moisture. Just make sure your new pot friends aren’t creating a jungle inside, because nobody likes a tightly packed party.
And let’s be honest: colorful containers can also be a bit like therapy. There’s something magical about getting your hands dirty, planting those little beauties, and watching them flourish. It can be an unintended stress reliever, and trust me, it beats doom-scrolling any day.
2. Geometric Gravel Patterns

When it comes to designing a gravel garden, geometric gravel patterns can elevate your space from ordinary to extraordinary. Not only do these patterns add visual interest, but they also create a sense of structure that makes the garden feel polished.
Imagine this: interlocking shapes and clean lines that guide the eye across the landscape, invoking a modern and artistic vibe.
To get started, choose a simple geometric design that reflects your personal style. Whether you fancy triangles, circles, or a checkerboard effect, sketch it out on paper first. It doesn’t need to be a masterpiece; just a rough guide will do. Measure the area where you’ll be working to guarantee your design fits perfectly and knows how much gravel you’ll need—trust me, running out halfway is a rookie move.
Next, prepare your ground. Clear it of any weeds or debris so you have a fresh canvas. Level the surface and maybe lay down some landscaping fabric to keep those pesky weeds at bay.
Then, depending on your design, start laying down the gravel in sections. For a triangle pattern, alternate colors or textures for each triangle to really make them pop. Don’t be shy about mixing and matching; think of it like creating a stunning quilt from nature.
As you work, keep stepping back to check your pattern from different angles. Remember, this isn’t just for you; your neighbors will be peeking over the fence, and you want them to do a double-take. It’s like showing off the new haircut that you spent hours perfecting—yes, I’m talking about the one where you agonized over every snip.
Once your gravel is beautifully arranged, consider how it plays with the plants around it. Use low-growing plants or decorative stones to further emphasize the geometric shapes you’ve created. It’s all about layering and maintaining that clean, modern aesthetic.
And yes, feel free to toss in a pot or two for more pops of color. Using tools like garden leaf grabbers can help keep your new design tidy and free of debris.
In the end, you won’t just have a garden; you’ll create a visual story. One that speaks to careful planning and creative expression, all while still being a relaxed, enjoyable space to unwind in after a long day.
Plus, you’ll have the added satisfaction of knowing you pulled it off without breaking a sweat—unless you count the weather, which can be a real party crasher on a gravel adventure.
3. Layered Gravel Textures
When you think of a gravel garden, you might picture a flat, uniform spread of stones. But why stop there? Layered gravel textures add both depth and visual intrigue, making your garden feel more dynamic and modern. This idea works not just for looks; it helps with drainage too, keeping your plants happier with every rain.
To get started, take a stroll through your local garden center, or browse online for different gravel types—yes, there’s a whole world just waiting for you beyond plain ol’ gray pebbles. Contemplate varying sizes and colors.
Maybe you want some larger rocks as a base, with finer gravel filling in the gaps, or a mix of smooth and jagged stones to create contrast. Whatever you choose, just remember that variety is your friend.
Next up, plan your layering. You can use the larger gravel at the bottom for stability, then layer on finer gravel or colored stones for added flair. If you’re feeling adventurous, you might even want to create pathways of different textures spiraling through your garden—talk about a Pinterest-worthy space.
As you layer, don’t forget to reflect on the plants you’ll be using. Position taller plants with broader leaves behind lower-growing ones—it’s like a natural stage setting, where each plant has its moment to shine.
I’ve learned the hard way that placing a towering plant right in front of a delicate flower isn’t just a bad look; it’s downright cruel.
Once you’ve finished layering your gravel, take a step back and appreciate your handiwork. Imagine yourself lounging in this textured wonderland, a gentle breeze swaying the plants, and maybe a bee buzzing about. Ah, the life.
And the icing on the cake? A garden that feels effortlessly chic with minimal maintenance. Less time on upkeep means more time on your favorite hobbies—like binge-watching your latest obsession or honing your culinary skills… or maybe that’s just me.
In the end, layering gravel isn’t just about aesthetics; it connects the beauty of your garden with the practicality of easy care and improved plant health. So go ahead, experiment and create your own stylish, layered gravel masterpiece. It might even become your favorite weekend project—unless you accidentally create a backyard beach; then we might need to talk.
4. Natural Stone Borders

Alright, let’s talk about natural stone borders. Imagine a gravel garden that not only looks good but also functions harmoniously. These borders do wonders, separating different areas while providing that organic vibe to your outdoor space. They’re like the borders of a great painting, framing everything else beautifully. Plus, with the right stones, they can elevate your gravel garden from dull to delightful. Solar lights can also highlight these borders, bringing an enchanting glow to your garden at night.
Starting with natural stone borders, it’s important to contemplate the sizes and shapes of your stones. Go for a mix, like round river stones paired with jagged slate. It’s like having a party where all types of guests get along. You can either arrange the stones in a casual manner, tossing them around like they just naturally landed there, or you can create a more structured look, carefully aligning them for a clean edge. Just remember, the right balance will maintain that contemporary touch while keeping everything visually interesting.
When you’re building those borders, think about how they’ll frame the plants you’ve selected. Imagine your colorful pots or airy plants peeking playfully over the stones. Trust me, it’s a win-win. And here’s a little insider tip: using stones with different hues can create contrast. This makes your garden feel richer and more inviting, while helping with drainage too. Plus, each time you step outside, it’ll be like entering your own little retreat. Garden edging solutions can also enhance the overall appearance by providing a clear separation.
Let’s not forget about the maintenance part. Natural stone borders might seem like a lot of work at first—oh, the lifting and placing—but they actually reduce how much gravel ends up everywhere. You know, like those relationships where one person just keeps cleaning up after the other? Not having to chase gravel across your yard is a delightful peace of mind.
Incorporating natural stones in your gravel garden adds not just structure but beauty, too. They allow the plants to shine while creating little paths or edges that your family and friends will notice. Who knows, they might even comment on how stylish your garden looks while sipping their iced tea, and you can casually nod and take all the credit, because you did all the hard work. You’re not just a gardener—you’re now a gravel garden artist. Fancy, huh?
5. Bold Sculptural Elements
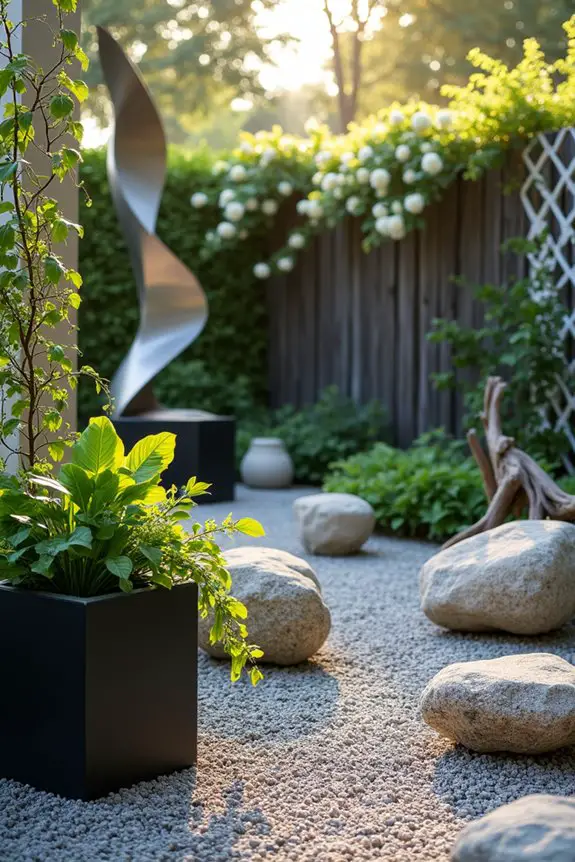
Creating bold sculptural elements in your gravel garden can add a striking contrast that catches the eye and draws everyone in. They not only enhance the overall design but also create focal points that transform what could be just a plain space into something extraordinary.
Imagine stepping into your garden and being greeted by stunning shapes and forms, all harmonizing beautifully with the gravel.
So, how can you incorporate these sculptural elements? First, think about adding oversized planters or unique sculptures that stand tall amidst your plants. This breaks up the flatness of the gravel while providing height variation. It’s like adding an unexpected guest to your dinner party—suddenly, the whole thing feels more dynamic.
You could use something as simple as a tall, elegant metal sculpture or a dramatic geometric planter filled with vibrant, leafy plants.
Next, look into natural materials that complement the gravel. Large boulders or driftwood can serve as nature’s sculptures, blending seamlessly into the garden while adding that ‘wow’ factor. They also create tiny ecosystems, inviting critters and adding life to your space.
Last weekend, while sweating a bit over some boulders (seriously, those things could use their own workout routine), I realized they became the perfect resting spots for curious songbirds. Talk about a bonus.
Finally, don’t shy away from incorporating unusual shapes or artistic designs, like a zigzagging trellis or even a playful stone arrangement. Play with angles and lines; remember that gravel gardens can be modern, informal, and playful.
Each element should feel intentional yet relaxed—a bit like an artist’s studio where creativity flows freely.
Just don’t take it too seriously. If one of your sculptures ends up in a position that’s a bit off-kilter or if a pot falls over, it’s all part of the charm.
Embrace the imperfections; it adds to your garden’s character. Every time I see one of my planters slightly askew, I just chuckle and think, “Well, that’s one way to keep those plants on their toes.”
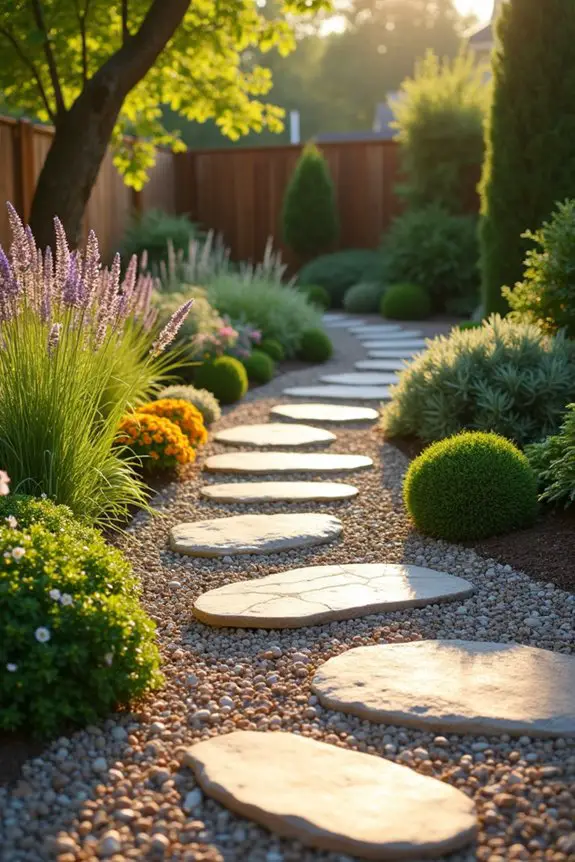
6. Layered Stone Pathways
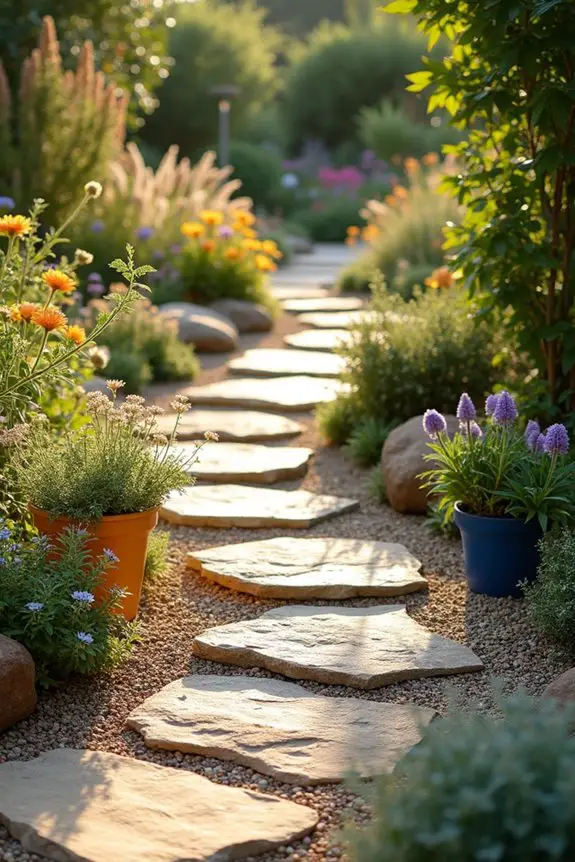
Creating layered stone pathways in your gravel garden isn’t just about getting from point A to point B; it’s about adding depth, interest, and a good dose of charm to your landscape. Think of stone paths as the welcoming arms of your garden, pulling guests in to explore all the little nooks and crannies you’ve lovingly designed.
Plus, they pair so wonderfully with airy plants and vibrant pots, effortlessly guiding the eye and adding a bit of structure to your space.
First off, decide on the feel you want for your pathway. Do you prefer a clean, modern vibe, or something more rustic and whimsical? If it’s the former, sleek, flat stones arranged in straight lines can provide a sharp, clean look that contrasts beautifully with the soft, loose gravel.
But if your heart whispers old-world charm, then uneven, layered stones peeking out from the gravel can create that storybook feel, as if your garden had its own fairy-tale adventure.
Next, gather your stones. You’re going to want a mix—a variety of shapes and sizes to help build that layered look. Imagine me at the rock yard, trying to lift those hefty stones, thinking, “How did I end up in a stone-weightlifting competition?” Spoiler alert: I’m not winning.
But trust me, the effort is worth it. Once you’ve got the stones, lay them down at different heights and angles instead of just stacking them flat. This gives the pathway a playful, inviting touch, and it’s practical too, allowing for good drainage while helping prevent mud from forming after a rain.
After arranging your stones, brush gravel around them to fill the gaps. Not only does this create a beautiful contrast, but it also allows those colorful pots and plants to shine even brighter along the edges.
Take a moment to stand back and see how everything flows together. The pathways almost whisper, “Come explore. There’s more to see.”
Finally, don’t fret if things don’t look perfectly symmetrical. That little quirk adds personality! A bit of unevenness here and there might make you question your stone-arranging skills, just like I do when I recall my last attempt at baking a cake.
But hey, the reality is that in gardening, just like in baking, it’s all about enjoying the process, right? Incorporating stylish garden paving slabs can enhance your pathways even further, creating a seamless transition between stones and gravel.
7. Natural Stone Ground Cover
When it comes to designing a gravel garden, one of the most stunning yet practical ideas is incorporating natural stone ground cover. This approach not only enhances the visual appeal of your space but also provides functional benefits—like better drainage and a more natural look that harmonizes beautifully with plants and other garden features. Picture a serene area that feels as if nature itself gently laid each stone, promising a tranquil retreat right in your backyard.
So, how do you make this work? First, gather your natural stones. Think about a mix of shapes and sizes. Large, flat stones can serve as a solid foundation, while smaller pebbles fill in those pesky gaps. When I did this, I felt like a garden architect, orchestrating a masterpiece—albeit a bit of a rocky one. You might even find yourself practicing stone balancing while trying to keep them from rolling away, which adds a comedic touch to the process.
Begin by laying your larger stones first, creating a path or a border around your gravel area. Arrange them in a loose, organic way rather than perfect lines. This gives your garden that inviting, relaxed vibe—exactly like a friend who plops down casually in your favorite chair.
Once your larger stones are laid out, use smaller ones to fill in the spaces, almost like frosting decorating a cake. As you fill those gaps, consider the color palette you’re working with. Natural stones come in a variety of earthy tones—from warm browns to cool grays—that beautifully complement the vibrant greens of your plants.
When I added small, light-colored pebbles around darker stones, it created just the right contrast. It’s like the stones were dressed for the occasion. Finally, step back and admire your work. If things don’t look matchy-matchy, that’s okay! The beauty lies in the individuality of each stone and the way they play together, much like a quirky group of friends at a coffee shop.
Take a moment, sip your brew, and let the beauty of your hard work sink in. There’s joy in seeing how all the elements—the gravel, stones, and plants—come together to tell a charming garden story. After all, who wouldn’t cherish a garden that feels as comforting as a warm hug? Every now and then, remember to prune your plants with anvil pruning shears to keep them healthy and vibrant in your beautiful gravel garden.
8. Sculptural Plant Arrangements
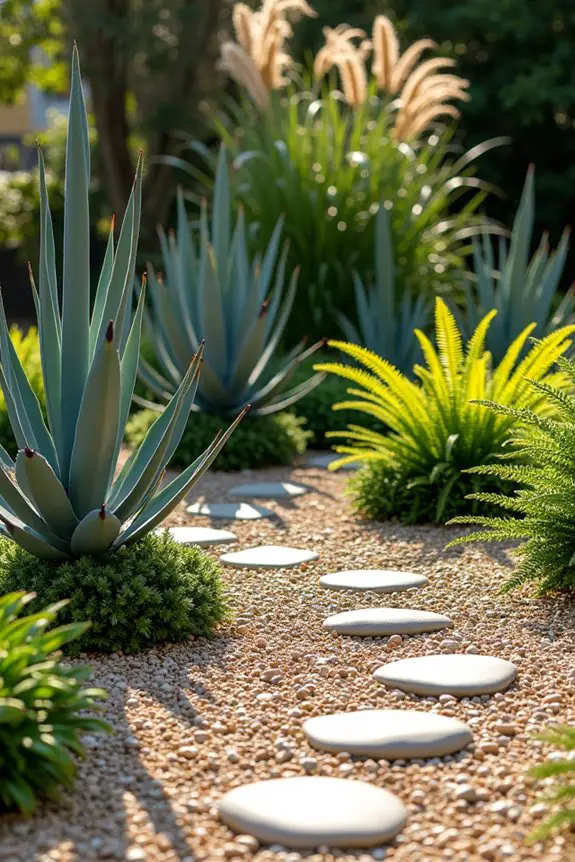
When thinking about sculptural plant arrangements in a gravel garden, it’s like bringing a piece of art to life in your backyard. These arrangements not only create visual interest but also play a functional role, making your garden feel more spacious and intentional. The beauty lies in how these plants interact with the gravel, enhancing that modern, minimalist vibe that so many adore.
First off, choose plants that have unique shapes and forms. Think of spiky succulents or rounded mounds of evergreen that draw the eye up and around. When I first attempted this, I picked some tall, architectural plants to anchor the space, and oh boy, did they add drama!
Balancing taller, sculptural plants with lower, bushier ones creates layers that keep your garden feeling alive and engaging.
Next, arrange your plants in clusters rather than placing them in straight lines. This is where it gets fun; it’s like playing a game of Tetris but with plants. Try grouping them in odd numbers—three, five, or even seven—to create that natural, unruly look.
I once had a mishap where I accidentally planted six succulents together—totally unintentional—but it actually turned out to be one of the most eye-catching spots in my garden!
Remember to leave some space between your arrangements. Just like your favorite cozy café, a little breathing room goes a long way. It gives each plant a chance to shine and lets the gravel show off its lovely textures.
Besides, nobody wants their plants to feel squished, right?
Finally, think about colors and textures. Play around with hues that complement the gravel—silvery greens next to warm, earthy tones can be stunning.
I paired a dark, moody plant with a bright, feathery one once, and it truly was like a match made in garden heaven.
No need for perfection here; the quirks and contrasts are what make your garden unique and charming.
In the end, when you look out at your garden, it should feel inviting, just like your living room—but with gravel. Each sculptural plant reveals its own personality, contributing to a symphony of shapes and colors.
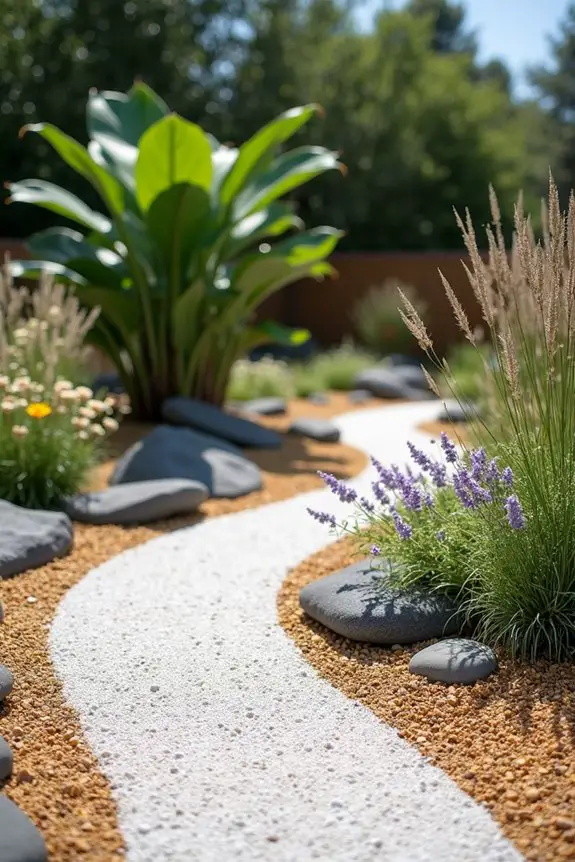
9. Textured Gravel Pathways
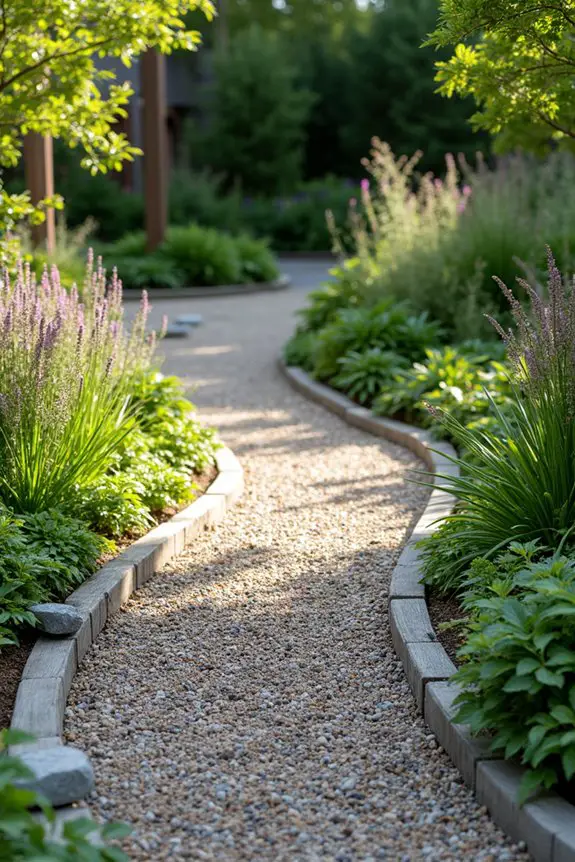
When it comes to textured gravel pathways, think of them as the charming veins that run through your garden, guiding your guests and helping you navigate your own beautiful retreat. Not only do they add functionality by keeping your feet free from muddy mishaps, they create this fabulous modern vibe that screams relaxed elegance. Plus, who doesn’t love the crunch of gravel underfoot? It’s a satisfying sound that makes you feel like you’re stepping into something special, right?
To start, think about the width of your path. Ideally, aim for about three feet wide—thankfully, that’s not the width of the highway. This gives your guests plenty of room to stroll without feeling like they’re on a tightrope. For a more organic feel, curve your pathway a little. Straight lines can be a bit too formal, like a well-pressed suit. Instead, let it weave through your garden like it’s taking a leisurely stroll, allowing different plants to make their entrance as you walk by.
Next up? Choose the right size of gravel. Small to medium-sized pebbles can create a softer feel. I once made the rookie mistake of using giant chunks of rock that practically sent me flying when I stepped on them—trust me, that made for an interesting gardening moment that I’ll never live down.
Now, here’s where it gets a bit creative: mix textures. You can even layer gravel over compacted soil to prevent weeds from making an unwelcome appearance (nobody invited them to this party). You can also add irregularly shaped stones or decorative bricks; they break up the uniformity and add visual interest, like a quirky friend who keeps things vibrant and fun.
How about a little flare? Consider adding edging, such as low metal or wooden borders to keep your gravel contained. It’s like adding a lovely frame to a beautiful picture—the right touch makes everything pop!
And finally, don’t forget about the plants! Create little pockets of greenery alongside your pathway, incorporating low, sprawling plants that seem to spill over the edges. It’s as if they’re gently waving to you as you stroll by. When I first added creeping thyme, I couldn’t help but stop to smell its delightful aroma as I passed—every walk became a mini escape.
10. Simple Zen Garden Elements
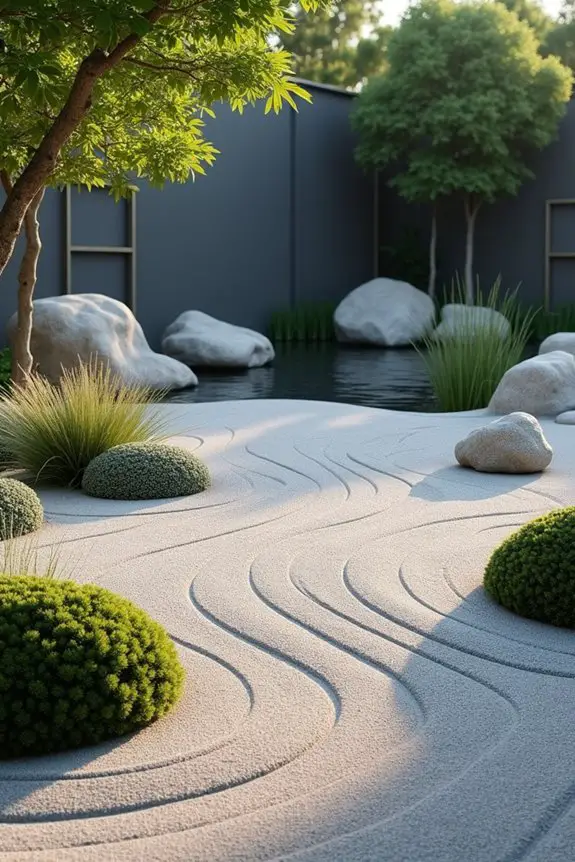
When it comes to creating a simple Zen garden, contemporary gravel arrangements are a real winner. They not only provide a calming vibe, but they also promote a sense of spaciousness and peace. Think of it this way: a Zen garden invites you to slow down, breathe deeply, and really enjoy the beauty of nature. Plus, gravel boasts excellent drainage, keeping your plants happy and thriving, even during those rainy spells.
To begin, envision your space. A neatly raked, smooth layer of gravel acts as a blank canvas, waiting for you to add your touch. You can use white, gray, or even black gravel to contrast against green plants, which creates a striking visual effect. Just imagine walking through your garden, the cool pebbles crunching beneath your feet while you get lost in thought. That right there’s pure Zen bliss.
Place sculptural plants like mounded pines or stonecrop in clusters. These greenery accents stand out beautifully against the gravel backdrop. The trick is to think of shapes—vary the heights and forms of your plants. You want some low, spreading plants alongside those upright varieties for a nice visual journey. This arrangement invites the eye to move, capturing attention without overwhelming your senses, much like a well-composed painting.
And don’t forget about negative space! Leaving some gravel exposed in areas encourages a breathable, open feel in your garden. It’s like giving your plants room to breathe—no suffocating here. Trust me, I learned this the hard way after packing my first garden too tightly, and let’s just say it looked like a wool sweater gone awry.
You can even consider incorporating a small pond or a few strategically placed stones to enhance the serene feeling. Water features not only attract delightful wildlife but also create soothing sounds that elevate your space. Nothing like the gentle gurgle of water to make you feel like you’ve just stepped into a tranquil retreat, right?
Lastly, lean into simplicity. Minimalism is your best friend here. Using fewer plant varieties with differing textures encourages a clean, uncluttered look. So, if you (like me) have a tendency to want to fill every nook and cranny with plants, remember to resist that urge. The beauty of a Zen garden lies in its simplicity.
This is all about balance and tranquility, after all. So take your time, enjoy the process, and create a space that not only looks good but feels good too.
Effective Gravel Maintenance Strategies
Maintaining a gravel garden doesn’t have to feel like a chore, especially if you embrace it as part of your gardening adventure.
Regularly raking the gravel is great, keeping those rocks looking fresh and neat. You know, it’s like giving your garden a little spa day. Hand-pulling weeds is your best friend—trust me, it’s more effective than battling with a hoe. Think of it as DIY therapy.
And don’t forget to top up your gravel every couple of years, filling in any spots that look bare. Using geotextiles underneath can save you work later, acting like a pesky superhero against weeds.

