Remember that secret garden from *Alice in Wonderland*? You might not need a key, but you can definitely create one of your own right at home. Imagine walking through curved pathways that lead to cozy seating nooks, all while surrounded by vibrant blooms and gentle water sounds. Curious about how to bring that magical vision to life? Stick around, because I’m about to share 10 ideas that’ll transform your outdoor space into a charming retreat.
Creative Layout Concepts
When you think about designing your secret garden, have you considered how creative layouts can transform the space?
Picture winding pathways that meander through vibrant flowers, inviting you to explore hidden nooks for cozy seating or a soothing Zen-inspired rock formation.
With elements like a tiny stream trickling by and a charming waterfall, your garden can become that serene retreat you’ve always dreamed of.
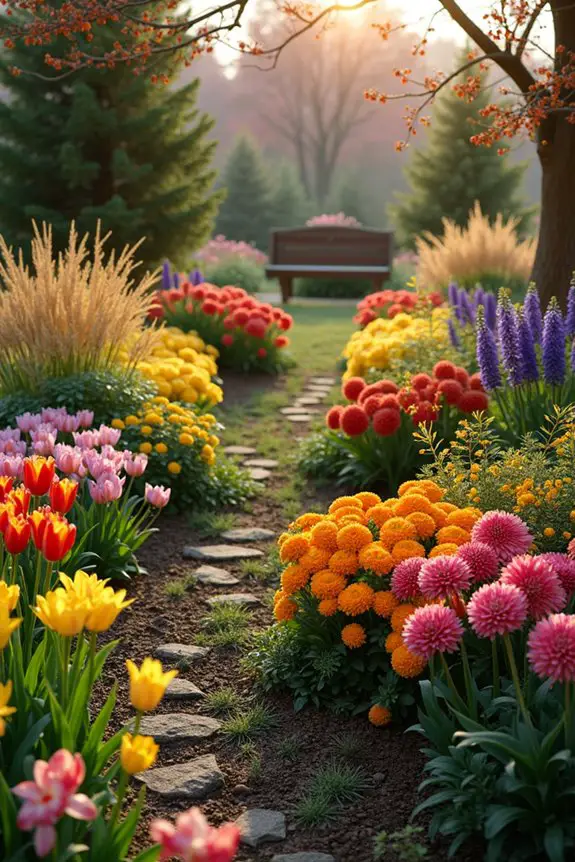
1. Curved Pathways Through Flowers
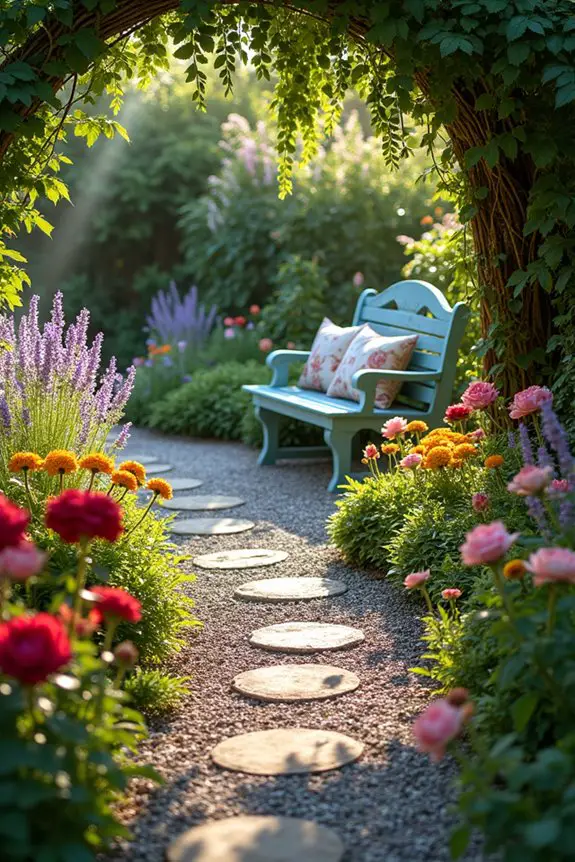
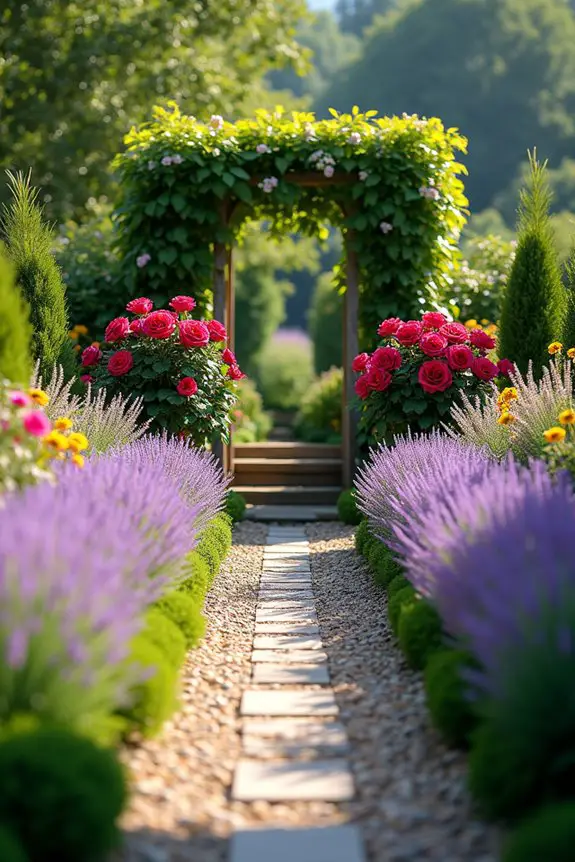
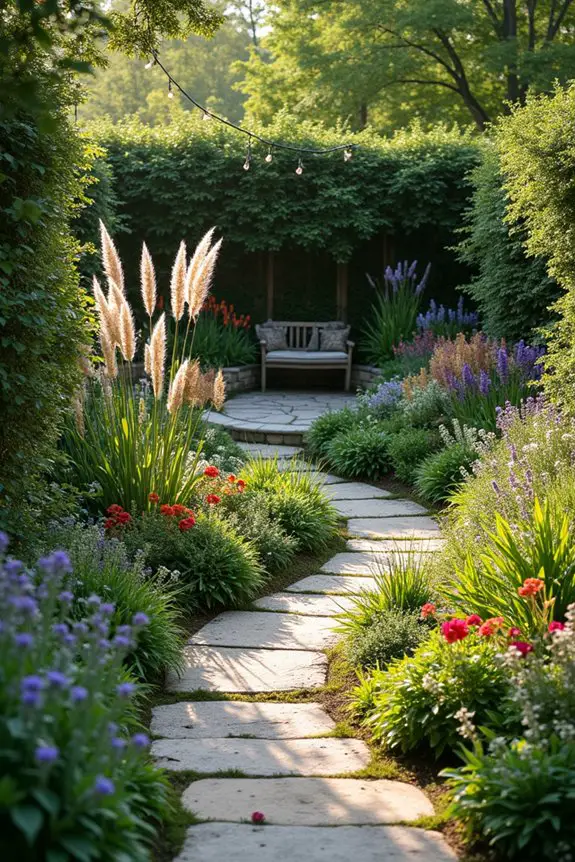
When it comes to creating a secret garden, curved pathways through flowers add a touch of magic and whimsy. They not only guide visitors through your floral wonderland but also encourage a sense of exploration. Imagine wandering down a meandering path, flanked by blooms of every color, texture, and scent—how could that not lift your spirits?
To kick off your pathway project, start by envisioning its shape. Curves are your best friend, so ditch the straight lines. You can create gentle arcs that lead to cozy nooks or unexpected surprises. Grab a garden hose or string, and lay it out where you think it should go. This is your chance to play around with the design—maybe even add a little dramatic flair with tight bends. Just remember, we want to keep it functional; let’s avoid making anyone dizzy while they’re enjoying the view.
Next up is the materials. Gravel is a fantastic option for creating a rustic charm, while stepping stones could add a touch of elegance. If you’re feeling wild and free, a mulch path can blend beautifully with the surroundings, allowing those vibrant flowers to take the spotlight. Just make sure whatever you choose provides good drainage, unless you want to host your own little swamp party. Additionally, incorporating a garden kneeler seat can provide you with comfort while tending to your garden.
Now, onto the fun part—planting! Choose flowers that not only look good together but also bloom at different times. This will keep your secret garden colorful all year long. Think about your favorite blooms—maybe roses, daisies, and lavender—and how they’ll look cascading alongside your path. You can even add some greenery, like ferns or low-maintenance shrubs, to create variety and depth.
And hey, let’s not forget about seating options. A cozy bench or a whimsical garden chair tucked away along the path invites people to pause and take in the beauty. Or, if you’re feeling particularly sneaky, toss in a quirky statuary to catch the eyes of those strolling by, sparking joy and conversations.
Before you plunge into this creative venture, take a moment to think about your own style. Is your garden going to be a serene sanctuary or a colorful riot? Embrace the vibes you want—this is your space, after all.
And if it doesn’t turn out exactly as you pictured, just remember that even nature has its quirks, and sometimes, a wandering path leads to the most beautiful surprises. Alongside your creative planning, consider investing in essential garden knee pads for comfort and support while you work. So, get those hands dirty and let your imagination run wild; your secret garden is waiting.
2. Zen-Inspired Rock Formations
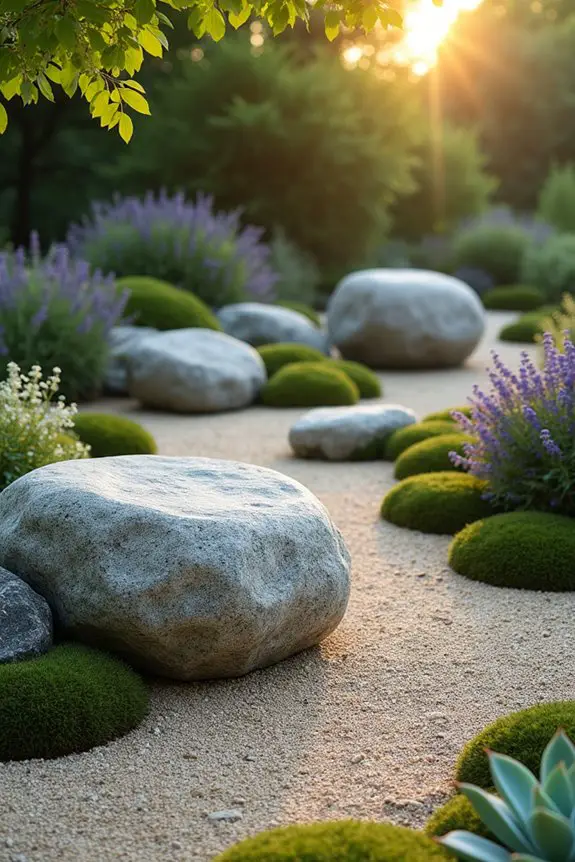
Creating stunning Zen-inspired rock formations in your secret garden is an idea that marries functionality with tranquility. Not only do these rock arrangements lend a soothing vibe to your outdoor space, but they also act as natural focal points that draw the eye and ground the design. Picture yourself strolling through your garden, breathing in the fresh air, and discovering meticulously placed stones that whisper tales of serenity. Who wouldn’t feel a little lighter after encountering such calmness?
To get started, sketch out a few layout concepts that resonate with you. Think about the size and shape of the rocks you want to use. A mix of larger boulders paired with smaller stones can create awesome visual contrast. Lay it all out on paper first; trust me, it saves time and prevents future regret. I mean, have you ever tried lifting a massive rock only to realize, oops, it just doesn’t work there? Yeah, me neither…
Next, consider the placement. You might choose a centerpiece, like an oversized stone that becomes the star of the show—perhaps it’s shaped like an ancient volcano? From there, arrange smaller rocks in a circle or flowing line around it. Think of it like a crown on the head of a king; it should complement and highlight. Make sure to leave some space between the rocks; you want an organic feel, like they just rolled out of nature’s way. Additionally, incorporating bypass pruning shears can help you maintain the surrounding plants that enhance your rock formations.
And don’t forget to have fun with it! One popular method is to incorporate gravel or sand around the rock formations to evoke the soothing feel of a Japanese Zen garden. Rake the gravel into gentle patterns, and just like that, you’ve turned your rock garden into a canvas of calming designs where the small pebbles play alongside your grand boulders. Bonus points if you can manage to make it look effortless—it’s all in the vibes. Remember that anvil pruning shears can be an essential tool for maintaining the plants that accompany your rock formations.
When it comes to plants, think low and slow. Choose succulents or moss that complement your rock setup without overshadowing the natural beauty of the stones. They’ll thrive in the crevices, and you’ll get a delightful pop of green without turning your garden into a jungle. This combination guarantees your rock formations shine just as brightly as any flower could.
Lastly, embrace the imperfections. If a rock rolls over during your setup, instead of fighting it, go with the flow. Sometimes the best design ideas come when we let go of our expectations.
3. Symmetrical Planting Arrangements
Intro: When it comes to creating a secret garden, symmetrical planting arrangements can be a game changer. They not only offer a sense of order and balance but also have a wonderfully calming effect that invites you to linger a little longer in your green paradise. Plus, who doesn’t love the visual symmetry of plants that are evenly spaced and tactfully arranged? It’s like nature’s way of showing off.
Let’s explore how you can make this work in your own outdoor oasis. First, take a little time to plan your layout. Do you want a perfectly symmetrical pattern, like a mini botanical courthouse? Or perhaps a more playful arrangement that still emphasizes balance?
Grab a notepad and sketch out your ideas. Think about the height of the plants—you’ll want taller specimens in the back and the shorter ones up front. It’s all about creating layers, so every plant gets its moment to shine. I once tried to plant taller sunflowers in the front, and let’s just say they weren’t very shy about blocking the view of the little guys behind them.
Next up, select your plants. Try mixing and matching different varieties for texture and color while keeping the overall vibe harmonious. For example, you could use a combination of lavender and dwarf boxwoods. The blueish-purple contrast with the dark green creates a stunning visual. Plus, did I mention how unbelievably fragrant lavender is? It’s like breathing in pure joy.
You also want to think about seasonal interest, ensuring that something is always in bloom—that way, it feels alive throughout the year. Just remember, the symphony of plants is only as good as its conductor (that’s you!).
Once you’ve chosen your plants, start by planting them in mirror-image formations. If you’ve placed a striking rose bush on one side, go ahead and put a similar one on the other side. Keep the spacing between them consistent, perhaps a foot apart, to give them room to breathe while still maintaining that pleasing symmetry.
And if you accidentally plant one a little too close, you can always dig it up later—trust me, it can get messy, but it’s all part of the journey.
After planting, take a step back and admire your handiwork! You might find that your garden looks like a postcard from the countryside. But remember, even in its symmetry, your garden still has room for quirks. Maybe a few wild daisies can sprout up here and there—nothing wrong with a little rebellion in a symmetrical world, right?
Lastly, maintain your garden with care. Regular pruning and deadheading help keep things neat and tidy. Rotate your plants every season to keep the colors vibrant and interesting over time. To assist you with this, having the right tools like essential garden scissors can make all the difference.
And if the squirrels decide to hang out a little too long in your garden, just sprinkle some cayenne pepper to remind them who’s in charge. There you have it; symmetry meets creativity in your secret garden, giving it that cozy yet polished feel. You’ll be pleasantly surprised at how much joy this orderly vibe can bring.
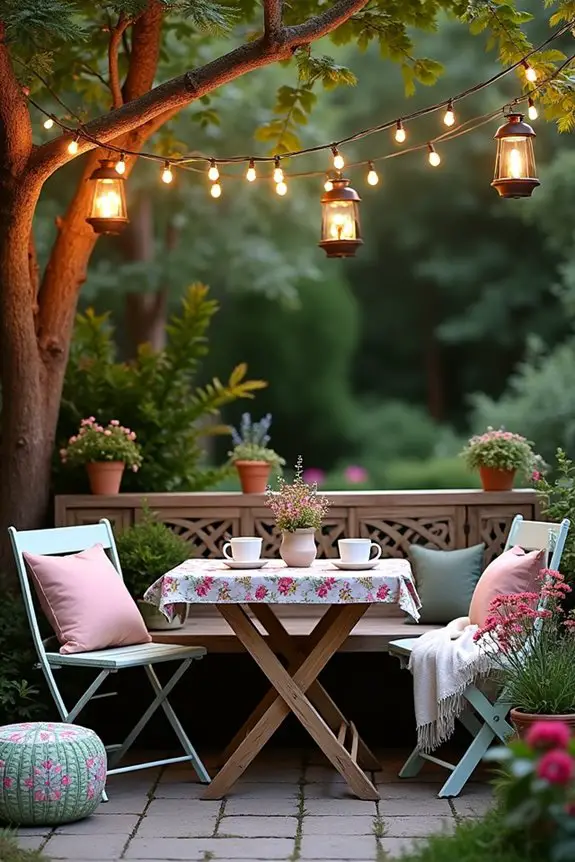
4. Hidden Nooks for Seating

When designing a secret garden, one of the most delightful features you can add is a hidden nook for seating. Think of it as your personal hideaway, where you can escape the hustle and bustle of daily life. Not only does a cozy seat invite relaxation, but it also enriches the vibe of your garden—a charming corner where you can sip tea, read, or simply reflect amidst nature. Plus, it adds an element of surprise and curiosity, inviting you (and your guests) to explore the garden even more.
To create this magical nook, start by choosing the right spot. You’ll want a place that feels a bit tucked away, perhaps nestled between flowering bushes or under the sprawling branches of a tree. I once found the perfect shady spot behind a lovely lilac bush, where the scent was intoxicating. Remember, the aim is to feel hidden yet still connected to your garden’s beauty. If you’re not sure where to start, take a leisurely stroll in your space and envision where you’d want to settle down with a good book.
Next comes the seating itself. While a simple bench can do the trick, why not get a little creative? You could use a couple of large cushions on a bed of pebbles for a laid-back vibe or even a hammock strung between two sturdy trees for that perfect lazy afternoon (just be careful not to fall asleep and wake up with an embarrassing tan line).
When picking your materials, go for something that complements the rest of your garden but adds a sprinkle of charm. A weathered wooden bench can blend perfectly with rustic elements, while a bright, colorful chair can stand out as a piece of art.
Now, let’s talk ambiance. Surround your nook with plants that provide both privacy and beauty. Tall grasses or climbing vines can serve this purpose nicely. Obviously, I’ve had my share of planting mishaps, which sometimes led to unexpectedly prickly situations (hello, rose bushes). To avoid similar mistakes, ascertain your plants are friendly and won’t poke you as you try to unwind.
Adding cozy touches can elevate your nook even further. Think throw pillows, little side tables for your tea or snacks, or even a lantern for those twilight moments when the garden glows with soft light. Once, I tried to turn my garden nook into a ‘glamping’ site complete with fairy lights; let’s just say, mosquitoes weren’t invited but definitely crashed the party.
Lastly, make the space personal. Bring in a little memento that tells your story—like a small sculpture you picked up on a vacation or a wind chime from a special occasion.
It transforms your nook from a generic space into a part of you. Trust me; nothing feels more welcoming than settling into a spot that reflects who you are. So take a breath, lean back, and let your newly created hiding place in your secret garden become your favorite escape.
5. Meandering Stream With Waterfall
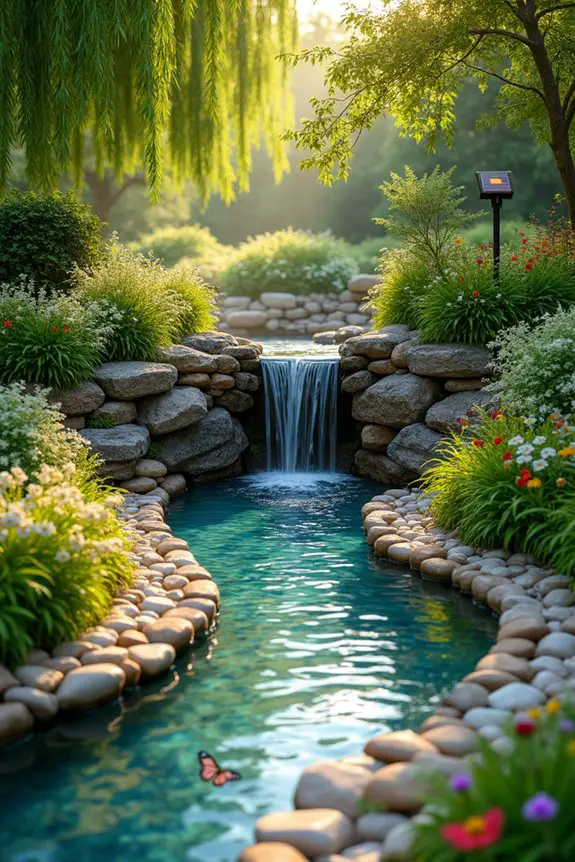
Imagine the gentle sound of water trickling through rocks, the soft splash of a mini waterfall, and the soothing presence of a meandering stream weaving through your secret garden. Not only does this feature add a sense of tranquility, but it also creates an inviting atmosphere that draws you in, encouraging moments of reflection and connection with nature. This idea works perfectly whether you want to cultivate a peaceful retreat or just infuse some charm into your outdoor space.
To get started, begin by mapping out the flow of your stream. A meandering shape mimics the natural patterns found in nature, so think of how a river might wind through a landscape. You’ll want to dig a shallow trench that curves gracefully, sort of like a lazy snake lounging in the sun. The joy is in the journey, not just the destination, and this approach gives your garden a vibrant energy. When I first attempted this, let’s just say my stream ended up resembling a dried-up spaghetti noodle—too straight and lacking charisma. So, take your time to play with the curves and dips.
Once you have your trench, lining it with a water-resistant barrier like pond liner can save you from unexpected leaks. After securing the shape, it’s time to layer in rocks and pebbles—this is where the magic happens. Arrange larger stones at the base, and sprinkle smaller ones around for texture and variety. I’ve discovered that choosing stones with different shapes and sizes can make your stream feel more natural, as if the water wandering through has been there forever. Trust me, it’s a mood enhancer like no other.
Now let’s talk about that dreamy waterfall. You don’t need to go overboard unless your garden vibes call for a mini Niagara Falls. A small feature where water cascades over a stack of stones can work wonders. This could be as simple as a pre-made waterfall kit that you place strategically along your stream. Or, if you’re feeling adventurous, you can pile some stones in a creative way, forming a gentle slope that allows the water to glide down. The trick is to position the rocks in a way that feels organic while guaranteeing the flow maintains your stream’s rhythm—after all, you don’t want it to sound like a clunky faucet.
As you fill your stream with water, consider planting along its banks for that lush, garden feel. Grasses, ferns, or other water-loving plants will thrive in the wet soil and soften the edges of your stream, making it look like it’s a part of nature instead of an artificial addition. Last time I attempted this, I accidentally landscaped with a bunch of plants that were way too aggressive, and let’s just say my stream ended up more “swamp” than “serene oasis.” Choosing friendly neighbors for your stream will guarantee it stays the calm sanctuary you envisioned.
Lastly, don’t forget to incorporate lighting if you’re going for evening magic. Subtle solar lights along the banks can illuminate the water, creating a reflective sparkle as the sun sets. I made the rookie mistake of buying the brightest lights I could find—turns out, I inadvertently opened a disco in my backyard. Soft, warm lights can highlight the flowing water without making it feel like a runway show.
In the end, a meandering stream with a waterfall can elevate your secret garden from ordinary to extraordinary. It wraps you in nature’s embrace, serves as an auditory delight, and creates a stunning visual focal point. Just remember to enjoy the process—because, let’s face it, figuring out the perfect layout is half the fun, even if it means some trial and error along the way. Happy gardening!
6. Rustic Wooden Pergola Retreat
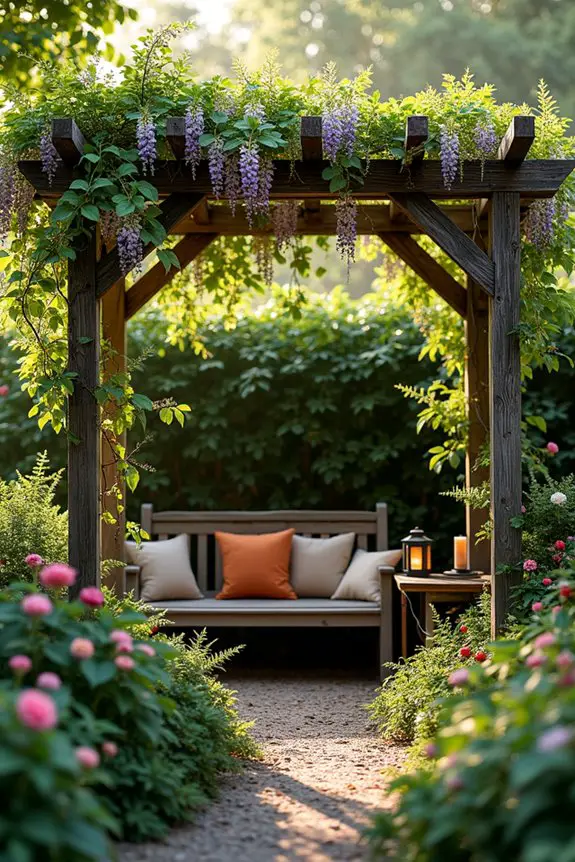
When you think of a secret garden, what often comes to mind? A hidden retreat filled with lush greenery, the sound of chirping birds, and, of course, a lovely spot to relax.
Enter the rustic wooden pergola. This design not only enhances the garden’s aesthetics but also offers a chic yet cozy nook for escaping the hustle and bustle. Imagine sipping your favorite drink under a wooden frame, surrounded by nature, with the sun filtering softly through climbing vines. It’s the perfect blend of functionality and style.
To create your own rustic wooden pergola retreat, start by selecting a location that feels right. You want somewhere that invites you to linger. Ideally, it should be a spot where you can soak in beautiful views or embrace the sound of your meandering stream.
Planning is key, though—consider how much sunlight the spot gets throughout the day and what time you’d like to enjoy it the most. A wrong placement can turn your cozy haven into an experience akin to being in an oven. Trust me, I’ve learned that the hard way.
Once you’ve settled on a prime location, it’s time to gather your materials. For a rustic look, go with weathered wood—or even reclaimed materials if you’re feeling adventurous. Immerse yourself in the charming world of DIY!
If cutting wood sounds intimidating, fear not! There are tons of kits available that can simplify the process. I once tried building my own from scratch, and let’s just say, my vision of a quaint pergola turned into a rather comical three-legged structure. So embrace pre-cut materials or hire a friend willing to lend a hand or two.
Now that you have your materials, create a design. A simple square or rectangular shape can do wonders, but why not get creative? Adding some curves or a semi-circle can add flair.
Remember to keep the height in mind—you want it tall enough to give you that open feeling but low enough to create intimacy. A height of about 8–10 feet works well for most spaces. And if you fancy, plan to incorporate crossbeams or latticework—letting vines and flowers crawl their way up adds unimaginable charm.
Once you’ve marked out your foundation, secure the posts firmly into the ground. This step is essential. No one wants a wobbly pergola that feels like it’s about to topple over at the first breeze.
If you’re in a particularly windy area, consider digging deeper holes and pouring a bit of concrete for stability. My first attempt at setting posts in typical soil ended with an embarrassing swaying structure, reminiscent of my childhood treehouse.
Finally, dress up your cozy nook. Add seating—a rustic bench or even some comfy cushions scattered on the floor—whatever invites guests (or just you) to sit and unwind.
Hanging fairy lights or lanterns can enchant the space, creating a soft, warm glow during those evening hours. And don’t forget to layer in some plants! Trailing vines like wisteria or clematis can climb up your pergola, making it feel more integrated with nature.
As you can imagine, the result is a dreamy retreat that perfectly captures that magical garden vibe.
7. Vertical Garden Walls
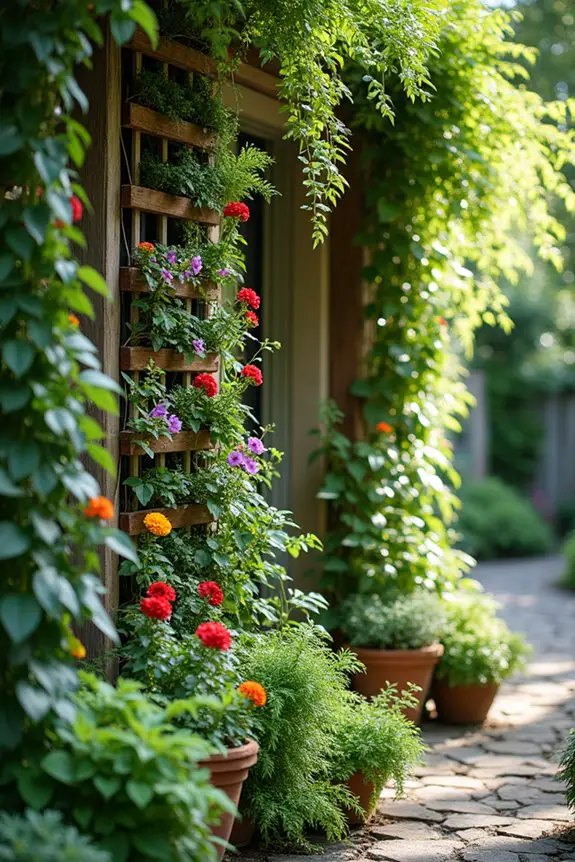
When you think of a vertical garden wall, you might picture a lush tapestry of greenery that converts a plain wall into an eye-catching display. But this concept is so much more than just pretty leaves. It’s a clever way to maximize your limited space and add a splash of color and life to your secret garden. Not only do vertical gardens look stunning, but they also create a revitalizing ambiance and can even help cool down your outdoor area. Seriously, who wouldn’t want a little slice of paradise right in their backyard?
To kick off your vertical gardening adventure, start by selecting the right wall. This could be the side of your shed, a fence, or even a wall of your home. Just make sure it gets some sunlight, or you might end up with a sad-looking collection of brown leaves—not exactly the vibe we’re going for. Depending on the plants you choose, you might want a wall that can shade them from the harsh afternoon sun but still allows for plenty of light.
If you’re like me, constantly battling with plants that need more sunlight, trust me, a wall placement can be a total game changer.
Next up, gather your materials. You want to choose a sturdy vertical garden system. There are tons of options out there, from simple trellises to elaborate pocket systems. I once thought I could DIY with some old pallets—what a disaster that turned out to be. It looked more like a wobbly art project than a chic garden.
Believe me, opting for pre-made modular systems, which are often equipped with built-in drainage and support structures, is a much wiser (and less frustrating) choice.
Now, decide on your layout. This is where the fun begins! You can create a symmetrical look with rows of plants or a more natural, wild aesthetic by mixing different plant heights and colors. Scattering flowering plants among trailing vines can make your wall look fuller and more dynamic.
And did I mention herbs are a fantastic choice, too? They not only look great but can also make your secret garden smell divine. Picture yourself plucking fresh basil or thyme for your next meal. Heaven, right?
Once you’ve mapped out your plant selections and layout, it’s planting time. Start with the larger plants at the bottom to provide some support, gradually evolving to smaller varieties as you go up. Be sure to read the plant labels or do a quick online check about their sunlight and water needs—this can save you a ton of heartache down the road.
I once planted my favorite sunflowers right in the shade, only to watch them droop sadly. Knowing your plant’s requirements can prevent those embarrassing garden missteps.
As you arrange and plant your green friends, be sure to monitor their growth over time. Vertical gardens can sometimes turn into a wild jungle, with tendrils creeping everywhere. So, regularly trim back any overenthusiastic vines.
And if a plant suddenly looks sad or discolored, don’t panic! Just reassess its needs. A little TLC often works wonders.
In short, a vertical garden wall is a delightful way to enhance your secret garden. It’s functional, chic, and oh-so-rewarding, making it a great project for anyone looking to infuse their outdoor space with beauty and a touch of whimsy.
8. Sunken Garden With Steps
Creating a sunken garden with steps is a brilliant way to add dimension to your outdoor space while also fostering a unique atmosphere. It not only serves as a stunning focal point but also provides a cozy hideaway where you can escape the noise of everyday life. Envision descending into your garden, surrounded by lush greenery, flowers, and the invigorating scent of soil; it’s like uncovering a secret treasure right in your yard.
To start your sunken garden, first, visualize the overall shape and size. A rectangular or circular design works well, but if you’re feeling adventurous, try mixing it up with some playful curves. Picture this: a gently winding path leading down into your garden, enticing you further. It’s like a mini adventure every time you step outside, kind of reminiscent of walking into a fairy tale. Just be sure to check how deep you actually want it to go—too deep, and you might feel like you need a rope to get back up.
Once you’ve got your design mapped out, grab your shovel and get ready to dig. It might feel a bit intimidating at first, but trust me, it’s a workout you’ll thank yourself for later. As you carve out the space, make sure to keep the edges neat; this will help define the area when you start adding your steps.
Speaking of steps, you can use stones, bricks, or even wooden planks. I once tried to build steps out of leftover deck wood, only to discover I made something that resembled a wobbly seesaw—didn’t quite capture the garden vibes I was aiming for. So, stick with materials that are sturdy and safe.
After you’ve laid out your steps, consider what plants will populate your sunken garden. This is where the fun really begins. You want a mix of varying heights, so taller plants can stand at the back and gradually get shorter toward the front. Think about ornamental grasses, colorful flowers, and perhaps even some shrubs to create a sense of enclosure.
As I’ve learned the hard way, over-packing can lead to chaos; less is often more. Allow plants to breathe a bit, so they can flourish without fighting for space.
Finally, don’t forget to incorporate some seating. A simple bench or a couple of cozy chairs can transform your sunken garden into a retreat. Add some cushions for comfort, and suddenly you have the perfect spot for sipping tea or meditating with the butterflies nearby. To liven up the space during the evening, consider stringing some fairy lights around the border—it’s an easy way to create a whimsical atmosphere that beckons you back outside.
Creating a sunken garden with steps isn’t just about the looks; it’s about crafting a personal haven where you can escape and enjoy nature at its finest. Who knew that digging holes and planting a few flowers could lead to such joy? It may take a little work, but the end result will surely make you feel like you’ve unearthed your very own piece of paradise.
9. Circular Viewing Decks
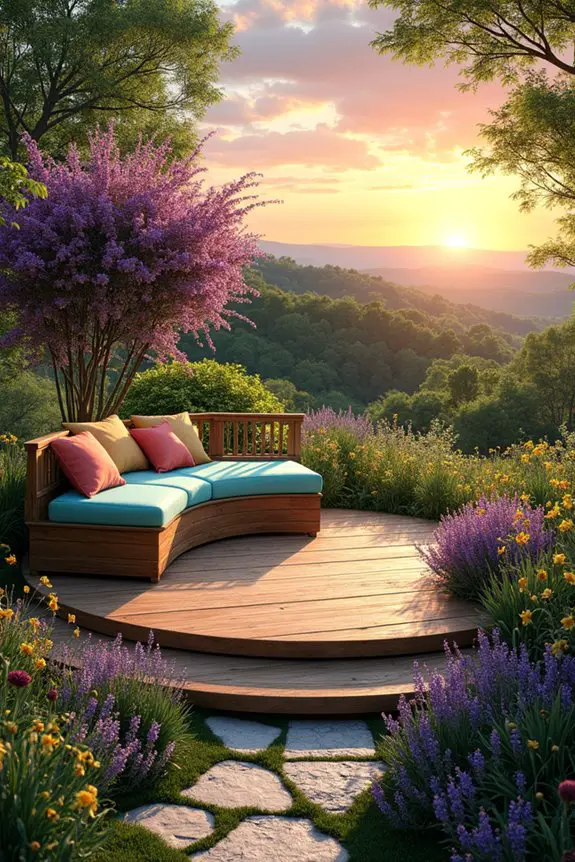
Have you ever wanted a spot in your garden where you can take a break and soak in the view? A circular viewing deck might just be your answer. This design isn’t just about a perch to sit; it’s about creating a cozy oasis that draws you in.
Imagine lounging in a circle made of wood or stone, surrounded by your favorite blooms, with a perfectly framed view of your garden or the sunset. It’s like having your personal Instagram backdrop right at home, complete with a peaceful vibe that invites relaxation.
When planning your circular viewing deck, think about its size. A larger circle can accommodate more seating, making it perfect for gatherings with family or friends. On the other hand, a smaller deck might create an intimate spot for quiet mornings with coffee—or a spot to catch up on the latest book you’ve been meaning to read. You know the type, where you’re two pages in and suddenly your coffee has turned cold—oops.
Next, consider the materials. Wood is a popular choice for its warmth and natural look. If you go this route, make sure to treat it with a weather-resistant finish; after all, no one wants their deck to age like my grandma’s old patio furniture.
If you’re leaning towards a sturdier vibe, stone or bricks can provide a chic and rustic feel. Just keep in mind that if you choose a heavier material, you’ll need to guarantee the foundation is solid. (We don’t want any unintended surprises when taking that first cozy seat.)
As you design your deck, don’t forget the landscaping surrounding it. Plant low-growing flowers or ground cover around the edges to soften the look and blend it with the rest of your garden.
This could be the perfect opportunity to introduce some fragrant herbs or vibrant flowers that attract pollinators—because who wouldn’t want a buzz of bees or a sprinkling of butterflies at their destination? Just remember, it’s okay to get a little wild with your plant choices, but try not to create a jungle that will require a machete to navigate.
Finally, seating is essential; it’s all about comfort. Think about adding a cozy set of chairs, a curvy bench, or even some fun cushions sprawled on the deck floor.
You’ll want to feel at home whenever you’re out there. I recommend throwing in a few outdoor pillows, which, while they might carry the risk of getting tossed off in a sudden breeze, can really cozy up your space.
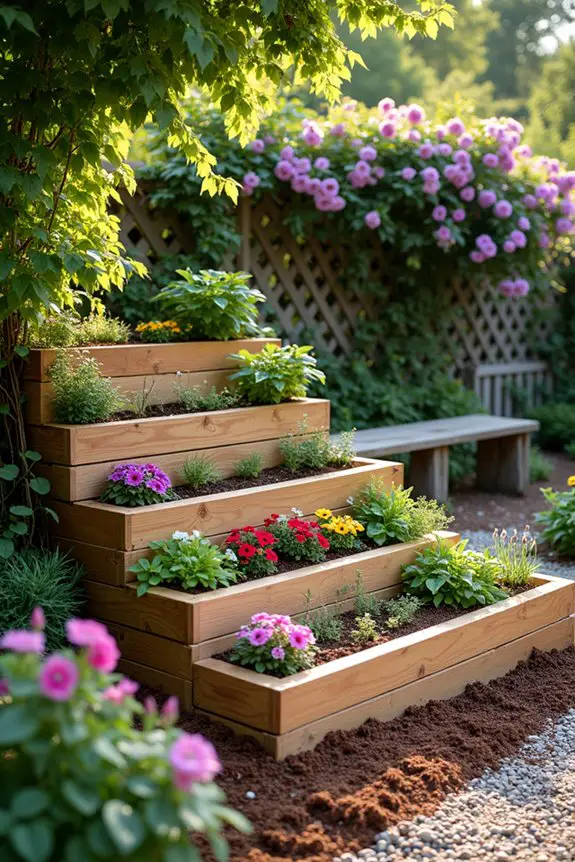
10. Tiered Garden Bed Elevations
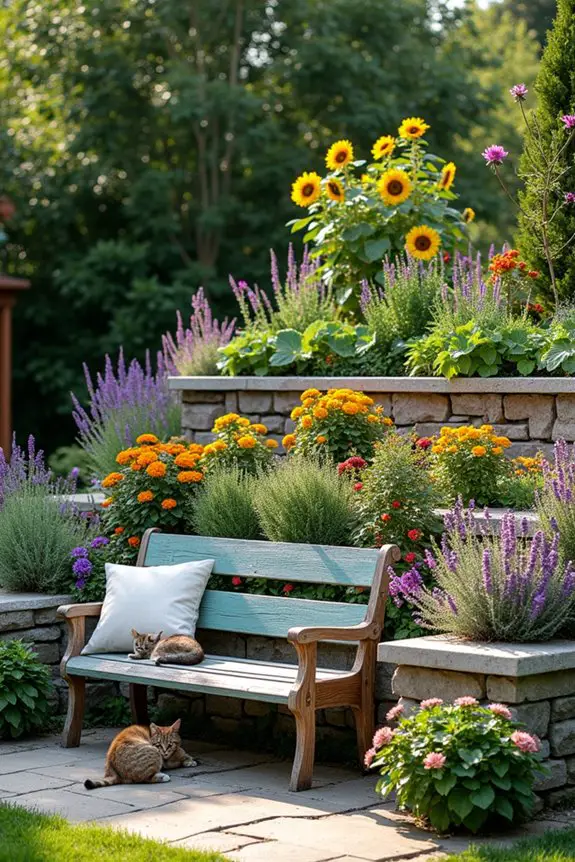
When it comes to creating a visually striking garden that also enhances functionality, tiered garden bed elevations are a fantastic choice. Envision this: instead of a flat garden that feels a bit one-dimensional, you have a cascading landscape that draws the eye and adds depth. It’s like the garden version of a beautiful layered cake—each level revealing its own surprise. Not only do tiered beds make for better soil and drainage, but they also create charming little nooks for various plants to flourish, offering you a smorgasbord of color and texture.
First things first, let’s reflect on the layout. You can start with simple increments, maybe three or four levels, each one just a foot or so higher than the last. It’s all about creating a gentle slope that feels inviting and easy on the eyes. If you have a bit of a slope in your yard, even better—nature’s already done half the work for you. And don’t stress about getting it perfect! An organic, flowing shape often looks more appealing than rigid, geometric lines. Want to balance your love for gardening with a dash of artistic flair? This is your moment to shine.
Speaking of the setup, you’ll need to decide on the material you want for your beds. Wood is quite popular for its natural aesthetic and ease of use, especially cedar or redwood, which resist rot like champs. Imagine laying down the first pieces, feeling like Bob the Builder as you snap those boards into place.
But if you’re craving something a bit more durable, stone or concrete can bring a modern twist that can withstand the test of time—just make sure not to mistake your gardening project for a bicep curl session when lifting those hefty stones.
Once you have those lovely tiers in place, it’s time to evaluate the plants. This is where the fun really begins! Choose plants with varied heights, textures, and colors. Think about placing shorter flowering plants at the front of each tier, gradually allowing taller ones to showcase their majesty at the back.
And for a touch of whimsy, don’t shy away from adding some edible plants to the mix, like strawberries cascading down the sides or trailing herbs that release heavenly scents as you brush by. Your garden could be both a visual delight and a mini pantry—all in one fell swoop.
As you plant, remember to maintain good airflow and sunlight throughout your tiers. We don’t want anyone playing hide-and-seek in darkness now, do we?
And while you’re at it, why not plan for a little seating area nearby? A single chair or a cozy bench can turn your tiered beds into a beautiful backdrop for your morning coffee moments—even if those moments often involve having to rescue the chair from the neighbor’s cat who considers it prime real estate.
Essential Plant Care Advice
Although you might be tempted to dive straight into planting, taking a moment to understand essential plant care can be a game changer.
Think of your secret garden ideas as a recipe; each ingredient needs just the right attention. Start by knowing your plants’ sunlight needs—too much, and they’ll crisp up like forgotten toast.
Water them deeply but less often; nobody likes soggy roots. Then, there’s feeding. Just like you wouldn’t go on a diet of candy, your plants need balanced nutrients.
Don’t forget to prune! It’s the secret to healthy growth, like giving your garden a good haircut. And hey, if they look droopy, don’t panic—next time, you’ll be the plant whisperer, ready to save the day!