Ever wonder how to turn your ho-hum backyard into a stunning garden oasis? You’re not alone. With a sprinkle of creativity, a dash of planning, and maybe a little elbow grease, your outdoor space can become a sanctuary. From vertical gardens that save space to winding pathways that beckon you to explore, there’s a world of ideas waiting. So, grab your garden gloves—let’s get inspired and discover some truly game-changing design concepts for your backyard.
Creative Garden Layout Concepts
When you think about transforming your backyard, have you considered the magic of creative garden layouts?
Picture elevated garden beds bursting with color, or curved pathways that invite you to wander and explore.
With options like vertical gardens for those tight spaces and cozy sunken seating areas, you can make your outdoor space not just beautiful, but also truly unique.
1. Elevated Garden Bed Layouts

When it comes to designing an elevated garden bed layout, think of it as your very own canvas for creativity and practicality. Elevated garden beds not only look charming—like a neatly wrapped gift in your backyard—but they also make gardening accessible. No more backaches from bending over all the time or struggling to pull weeds that seem to have a personal vendetta against you. Plus, they can play up the aesthetics of your outdoor space, creating a visually stunning arrangement that invites a bit of tranquility into your life. Using anvil pruning shears can help you maintain the plants within these beds, ensuring they flourish beautifully.
First, consider the shape of your elevated garden beds. Rectangles are like the classic white tee of gardening—always a great choice and they fit anywhere. But why stop there? Try an L-shape for that “cozy corner” vibe or a tiered design for a dramatic effect. Raise it up on two or three levels—add some flowers at the top and veggies at the bottom. It’s a veritable Las Vegas strip for plants, bringing life to any plain ol’ yard. Can you imagine stepping out your door to a breathtaking display of colors and shapes? Yes, please.
Now, let’s think about how to effectively position your beds. Place them to maximize sunlight—after all, sunlight is like a double shot of espresso for your plants. Ideally, aim for at least six to eight hours of sunlight a day. If your home casts a shadow, consider staggered layouts where taller plants don’t block the light for smaller ones. It’s a symbiotic relationship—just like your friendship where you sometimes give each other space, while still throwing a good potluck now and then.
Next, let’s talk plants. We’re not just tossing seeds into dirt here. Mix up your herbs, veggies, and flowers. Consider putting basil and tomatoes together; they’re like garden besties that help each other grow. Or maybe some vibrant marigolds to keep pests at bay. You can even switch it up seasonally. Just imagine how your neighbors will feel when they’re sipping coffee, peeking over the fence at your flourishing diversity—all the while your garden giving them that mild case of envy, perfect for neighborhood gossip. To keep your plants healthy, investing in long handled pruning loppers will help you maintain their shape and promote better growth.
Don’t forget the pathways around your elevated beds! You want to make sure you’ve got room to navigate without scrambling like you’re in an Olympic sprint. Mulch or gravel paths can look charming and keep things tidy. Plus, a little decorative stone never hurt anyone; it’s like a spritz of perfume for your garden. Lay down some stepping stones or even plant some ground cover to create a cozy atmosphere, making it easy to stroll around and admire your handiwork.
In the end, elevated garden bed layouts are a blend of functionality and flair—an opportunity to showcase both creativity and love for nature. So, grab those gardening gloves, channel your inner architect, and get to designing a garden that brings joy to you and all your guests.
And remember, if you trip over your own garden hose, just laugh it off. After all, gardening is about enjoying the process, even with a few hiccups along the way. Happy planting!
2. Curved Pathway Garden Design
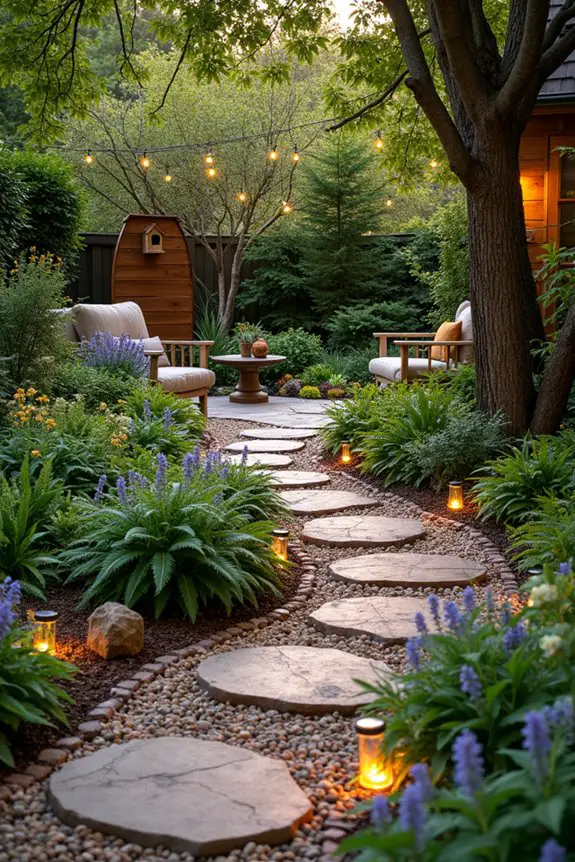
Curved pathways can work wonders in any backyard garden design. They create a relaxed, flowing vibe that invites wandering and exploration, unlike straight paths that feel more like a race to the finish line.
Picture it—your guests strolling leisurely down a gentle curve, their curiosity piqued as they discover what’s around each bend. Plus, a curved design can often fit better within the natural terrain of your yard, making it seem more organic and intentional.
So, how do you make this happen? Start by mapping out where you’d like your pathway to go. You can use a hose or a simple string to outline the curve. This helps you visualize the flow before committing to any permanent features. It’s a little like planning a dish; sometimes you have to taste-test before adding that secret ingredient, right?
Next up, decide on your materials. Think about charming pebbles, soft mulch, or even colorful pavers that can bring a splash of fun to the design. One option to consider are garden scissors snips, which can help you trim plants neatly as you work on your pathway.
If your backyard’s got some whimsy, feel free to use materials that play off your garden’s personality. Maybe you’re going for rustic vibes—wooden stepping stones might fit right in. Or perhaps modern chic calls for sleek, smooth stones. It’s all about creating harmony between the path and your plants.
As you build, consider edging your pathway to define its shape and prevent wandering plants from encroaching and crashing the party. Using bricks, stones, or even a bit of fencing can keep everything in check while adding an extra touch of sophistication—think of it as the garnishing on your gourmet dish.
Another thing to keep in mind is the width of the path. Too narrow, and folks might feel like they’re tiptoeing through a minefield. Aim for at least two feet if you want to comfortably stroll side by side.
While you’re at it, don’t forget to sprinkle in some plants along the sides of your pathway. Think lush ferns, petite flowers, or even those quirky garden gnomes that everyone secretly loves.
Strategically placing plants creates inviting nooks that can turn an ordinary walkway into an enchanting journey. Just like adding herbs to your cooking, it enhances the experience.
Lastly, lighting can take your curved pathway to the next level. Just imagine the pathway gently illuminated at dusk, beckoning you outside for a relaxing evening. You can use solar lights for easy installation—or twinkle lights if you’re feeling particularly festive.
Suddenly, your nighttime garden transforms into a magical retreat where fairytales could be born. Also, think about incorporating a bat house to promote local wildlife and assist with natural pest control.
In the end, creating a curved pathway isn’t just about function; it’s about crafting an experience. So, take a breath, gather your materials, and let that creative spirit guide you! You’ll soon find yourself with a path that not only navigates the garden but also perfectly complements the lovely chaos of nature right outside your window.
3. Vertical Gardening Structures
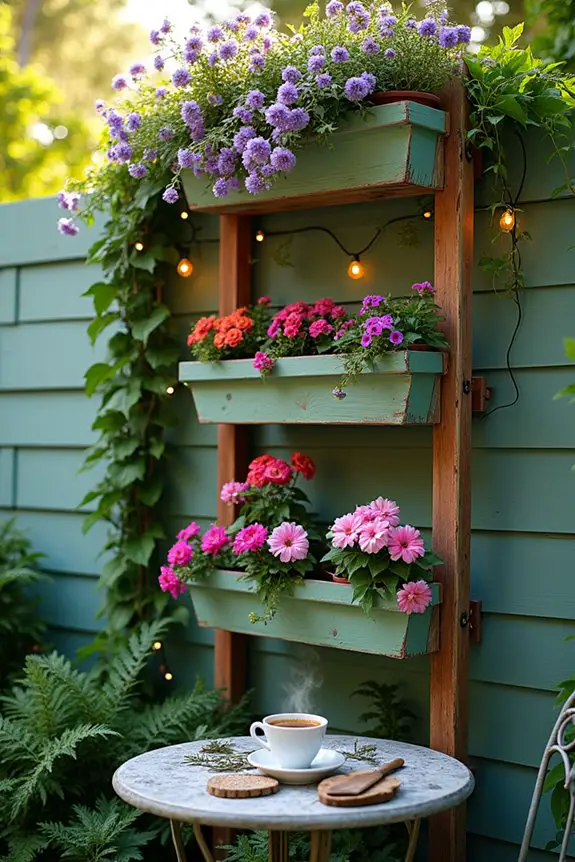
One of the most delightful ways to transform your backyard garden is with vertical gardening structures, and trust me, they’re a game changer. Imagine turning your small yard into a botanical wonderland without sprawling your plants all over the ground. Not only do these structures make the most of limited space, but they also add an eye-catching dimension that draws the eye up and creates a lush, vibrant atmosphere. It’s like taking an artful approach to seasoning your dishes: a little sprinkle of height can elevate the entire experience.
So, let’s get into the nitty-gritty of vertical gardening. First off, you’ll need to decide on the structure. Think trellises, shelves, or even hanging pots. You can easily find pre-made versions at garden centers, or if you’re feeling crafty—a little woodwork can result in something unique to you. Remember the time I tried to build a loft bed? It was… well, let’s just say dimensions weren’t on my side. But that’s the beauty of building your own structure; it’s all about trial and error, right? Just take your time and measure!
Next, let’s pick some plants that do well in a vertical setup. Think about climbing varieties like peas, beans, or flowering vines like clematis. These guys will happily cling to your trellis and can turn a plain wall into a stunning vertical display. If you want something more colorful, try cascading flowers such as petunias or geraniums in pots that hang off shelves. All of these choices will create an enchanting vibe that keeps on giving season after season. Additionally, consider using a vertical garden wall planter to maximize your growing potential.
Now, don’t forget about watering—because, let’s face it, these plants still need love and care. Drip irrigation hoses can be a gardener’s best friend here, gently providing moisture without a fuss. Or, you could set an alarm (or rely on your forgetful memory) to remind you every few days to give your plants a drink. Just try to avoid the “let’s drown everything” approach. For some reason, it doesn’t work out well in the long run… add that to the list of life lessons learned.
As you arrange your plants, keep in mind the art of layering. Taller plants should be towards the back if they’re on a wall, while trailing plants can hang in the front or from shelves. This not only looks beautiful but guarantees that each plant gets the sunlight it needs. Kind of like how you put the spatula on the top rack of the dishwasher so it doesn’t get lost amid the plates—organizing your garden helps maximize beauty.
Lastly, don’t neglect your structure’s aesthetic appeal! You could paint it to match your house or add decorative elements, perhaps some whimsical signs or tiny fairy lights—because who doesn’t love sparkle? A carefully curated vertical garden can become your own little slice of paradise, making it that much easier to unwind after a long day.
Take a moment to envision your own vertical dream. You can sip your tea (or coffee, no judgment here) while soaking in the beauty of your expansive vertical garden, feeling a swell of pride. Who knew you could fit so much life into a compact space, right? So, roll up those sleeves and get ready to grow upward. Your garden deserves to reach new heights!
4. Layered Planting Zones
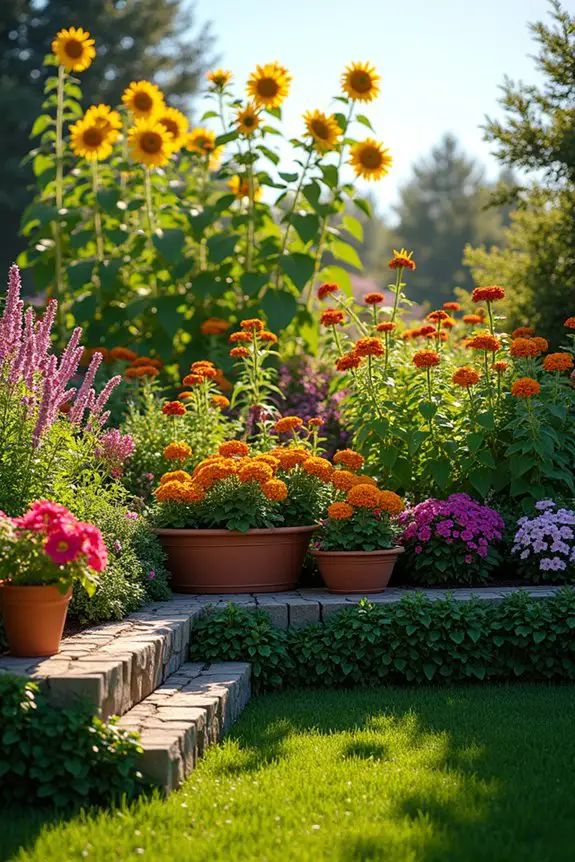
When it comes to designing a backyard garden, layering your planting zones can take your outdoor space from drab to fab in no time. This concept is like building a delightful cake—every layer adds not just flavor, but texture and shape. Plus, having different levels means you can fit more plants, create visual interest, and give your garden that lush, sprawling vibe that makes neighbors a little envious. So, whether you have a sprawling backyard or just a cozy corner, layered planting zones can truly work wonders.
To get started on this style, first, think of how you can elevate certain areas of your garden. Raised beds are a fantastic option—they add height, making it easier to tend to your plants without having to squat like you’re trying to sneak a snack from the pantry. You can even create steps using stones or timber to give the garden a tiered look. Or perhaps you want to use an incline naturally existing in your yard as your foundation. Trust me; it’ll be like prepping your favorite recipe by organizing your ingredients—everything will flow so much smoother.
Now let’s talk about plant selection. When layering, consider using taller plants like sunflowers or hollyhocks towards the back. Then, mix in mid-height plants like zinnias or cosmos in the center. Finally, throw in some shorter plants like marigolds or violas at the front. It’s similar to the way you’d arrange a beautiful charcuterie board—layering meats and cheeses and then filling in the gaps with olives or nuts for a complete, appealing presentation. Your guests (or, in this case, any passersby) will appreciate the thought and effort that went into the layout.
Watering needs? Don’t fret. With a layered approach, you can use a soaker hose that snakes through the beds, ensuring all your plants stay well-hydrated without turning your garden into a swamp. That “flood-it-all technique” I tried last summer? Yeah, let’s not go there. So keep it simple, and make watering easy to manage—your back will thank you later.
As you create your zones, embrace the concept of mixing edibles and ornamentals. Imagine snipping fresh basil from a tiered bed while enjoying the beautiful blooms of trailing nasturtiums. It’s like a garden party where the guests are both beautiful and delicious. And just like a well-thought-out menu, variety is key, creating both harmony and excitement within your space.
Lastly, don’t worry about making everything look perfect. That’s the secret sauce to gardening. It’s a living masterpiece that will change with the seasons. So if a flower doesn’t bloom the way you hoped or a vegetable struggles, remember—it’s all a part of the journey. Just enjoy the process, relish the opportunities to learn, and embrace the beauty of a layered garden that evolves over time. Happy gardening, friend!
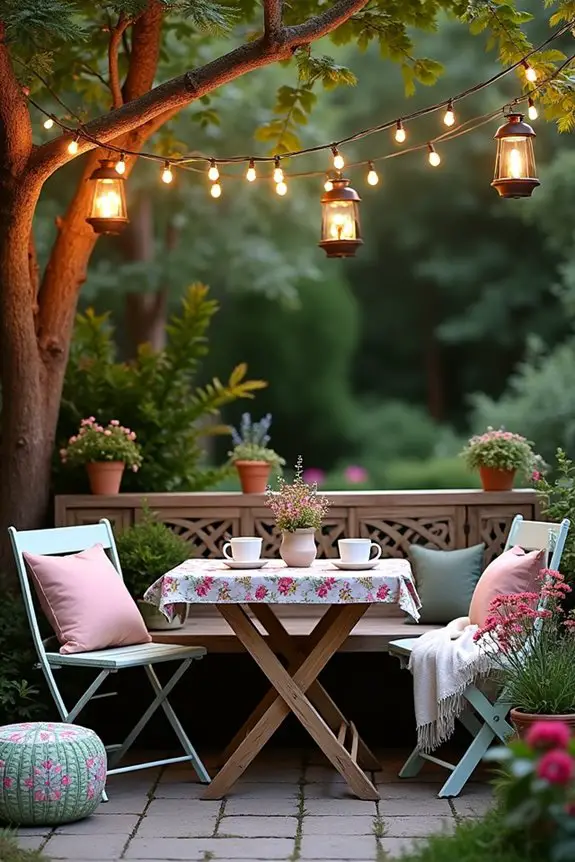
5. Sunken Seating Areas
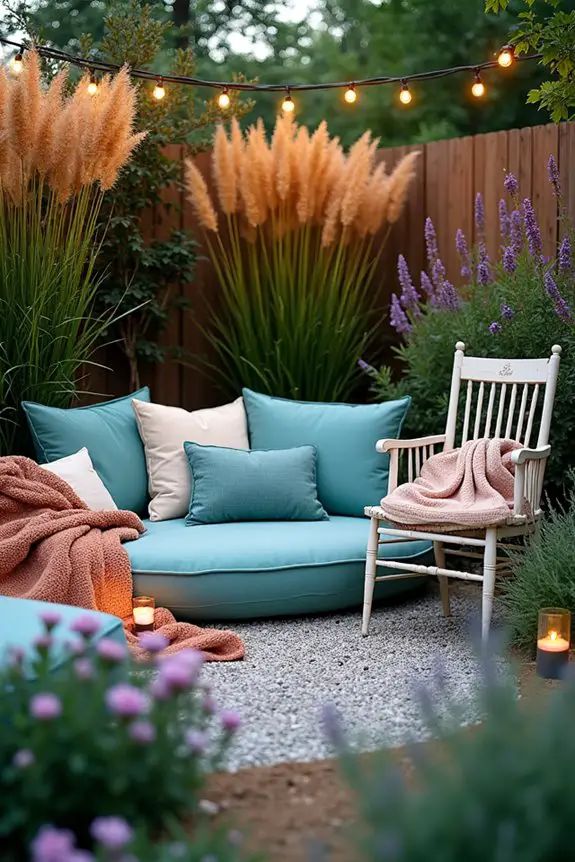
Ah, sunken seating areas—the secret sauce to an extraordinary backyard garden. When you sink those comfy chairs into the ground, it creates a cozy nook that’s perfect for reading, sipping tea, or maybe even plotting the next big neighborhood barbecue.
Functionally, these spots provide a smooth connection between your garden and your seating, giving the whole area a grounded, organic feel. It’s like how a well-seasoned broth sets the stage for a delicious soup; the flavors meld seamlessly, creating warmth and comfort.
To kick things off, think about where you want this little oasis. Look for a spot that gets just the right amount of sunlight, maybe near a blooming rosebush or beside your dazzling vegetable patch.
Once you choose your location, you can outline your sunken area by digging out a section that’s about a foot deep. Bring in some stones or pavers to line the bottom. You don’t want a muddy mess every time it rains, do you? It’s like preventing that weird soup scum from forming—trust me, no one wants that.
Now comes the fun part; seat selection. You can choose some weather-resistant outdoor furniture, a couple of giant cushions, or even vintage garden chairs.
Just picture yourself sinking into those cushions like you’re slipping into your favorite sweatpants after a long day—ahh. And if you’re feeling creative, add in some string lights overhead for that warm glow when the evening rolls in. It’s like turning your backyard into your very own fairy tale—without the talking animals, unless that’s your thing.
Don’t forget to add some greenery around your seating area. Plants won’t only soften the space but also create a natural privacy screen.
Think of it as a garden-hug; tall grasses or fragrant herbs can act like your friendly little bouncers, keeping unwanted glances at bay while still being inviting. You could even plant some low-growing flowers like lavender or thyme in front, so every time you lean back, you’re snuggled in a cloud of delightful scents.
And here’s a tip: when arranging your cushions or chairs, try to position them in a circular layout. This encourages conversation and invites guests to gather ’round like you’re hosting the best potluck ever—without the awkward food fights.
Bonus points if you bring out a soft throw blanket for those cool evenings. Not only will it make your sunken area snuggly, but it’ll also help you channel your inner couch potato, which we all need now and then.
6. Rain Garden Integration
Rain gardens are like a loving embrace from Mother Nature; they not only help manage stormwater runoff but also transform your backyard into a lush oasis. Imagine a space so vibrant that it feels like stepping into a living painting, where beautiful blooms mingle with the soothing sound of trickling water. This idea works beautifully to meld functionality with aesthetics, creating a garden that looks as good as it’s sustainable.
To start your rain garden journey, pick a spot in your yard that captures the natural flow of water. You might want to reflect on areas near downspouts, driveways, or patios, where rain typically collects. After all, you want your garden to drink up that fresh rainwater like a sponge.
Once you’ve chosen the ideal location, it’s time to scoop out a shallow depression about 6 to 12 inches deep. This will be the heart of your rain garden, functioning like a superhero cape that collects and filters water.
Next, think about drainage. It’s vital, or else your charming little rain garden could become more of a swamp scene from a classic horror movie. To avoid this nightmare, check the soil’s drainage capabilities; if it’s too clay-heavy, you might want to mix in some sand or gravel. This is like giving your garden a good stomachache remedy; it needs to “go” easily to flourish.
Now, here’s where the fun truly begins—plant selection. Opt for native plants that thrive in wet conditions, such as purple coneflowers or black-eyed Susans. They’re like the all-stars of the plant world, bringing color and resilience.
You can layer your plants by height; tall plants in the back and shorter ones in front, making a tiered effect that’s visually stunning. Envision how great it’ll feel to sip coffee in the morning, surrounded by those vibrant hues swaying in the gentle breeze.
To add a splash of personality, think about incorporating rocks or boulders as decorative features. Not only do they create visual interest, but they also help with water absorption and can serve as natural seating.
Just think about it—a cozy afternoon, visitors come over, and you casually point to a boulder saying, “Oh, that’s my latest addition—adds character, right?” It’s a conversation starter and a functional element all rolled into one.
Lastly, finish it off with some mulch to keep those pesky weeds at bay and conserve moisture. It’s like putting the icing on a cake, giving your rain garden that polished look while helping it thrive. And, who doesn’t love a well-dressed garden?
Creating a rain garden doesn’t just help the environment; it adds a unique flair to your backyard, turning it into a delightful retreat where you can relax and enjoy the beauty of nature, all while knowing you’re doing your part to protect it. Isn’t that just the cherry on top?
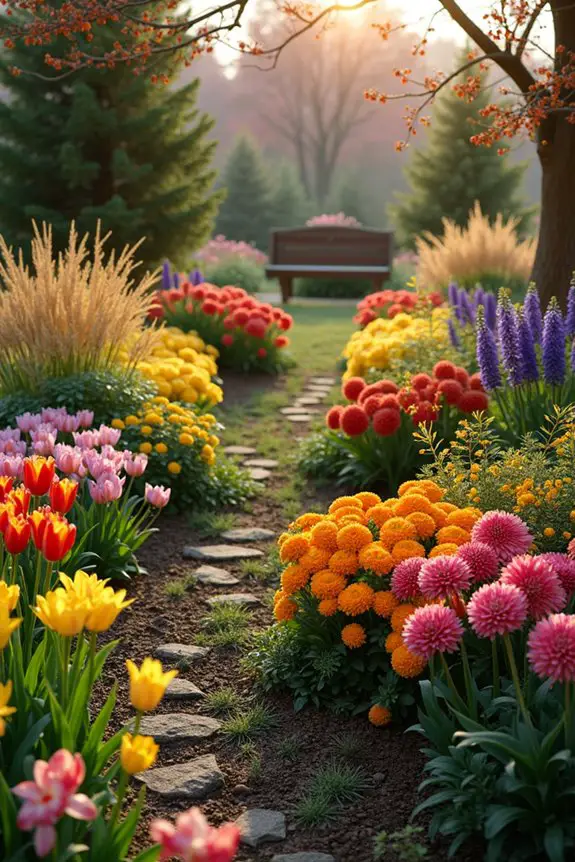
7. Geometric Flower Bed Arrangements

Geometric flower bed arrangements are like a delightful puzzle within your garden, blending design with a touch of whimsy. This concept works wonders as it creates a striking visual impact while also allowing you to maximize space effectively. Imagine stepping into a backyard where the flowers bloom in sharp lines and playful shapes, guiding your eyes to each section like art pieces in a gallery. It not only enhances the aesthetic appeal of your yard but encourages a sense of flow and harmony.
To kick things off, think geometric shapes. Triangles, squares, or circles can all serve as the backbone of your design. Why not grab some garden stakes and string to mark out the shape you want? Get a little creative – maybe a circular flower bed right in the center of your yard or triangular patches slicing through your existing lawn. If you’re like me, you might enjoy shifting things around a few times before you find that perfect fit. Every adjustment allows you to envision how beautiful those blooms will look in their new home.
Once you’ve marked your shapes, let’s talk plant selection. Diversity is the name of the game! Mix perennials with annuals and tall flowers with shorter ones for that dramatic height difference. Think of planting zinnias or marigolds for pops of color in your triangles, while sweet-smelling lavender could work beautifully in a circular bed – perfect for those warm, sunny days when you’re just relaxing outside. Layering plants within your chosen shape creates depth, making it visually enchanting.
As you arrange your flower beds, don’t be afraid to play with color. Imagine a rainbow splashing across your yard; colorful blooms can be grouped by hue or even organized into a gradient effect. It’s like painting with nature – vibrant reds fading into sunny yellows and finally into calming blues. You want the colors to dance together, catching the light and your attention all day long.
And hey, if you live with a budding artist (like my eight-year-old niece who insists on “being part of everything”), invite them to help create the layout. Just prepare for some “unique” placements of flowers, but you never know; their creativity could surprise you.
Finally, consider incorporating some decorative edging around your geometric shapes. Whether it’s bricks, stone, or even a charming wooden border, this will define your flower beds and make them pop even more. It’s the finishing touch—like wearing that perfect accessory that pulls an outfit together.
As you step back and admire your handiwork, you’ll find that these designs not only enhance the beauty of your garden but also invite nature to thrive. And who doesn’t want to stroll through their backyard, feeling like they’ve walked into a piece of art?
8. Colorful Tile Pathway Patterns
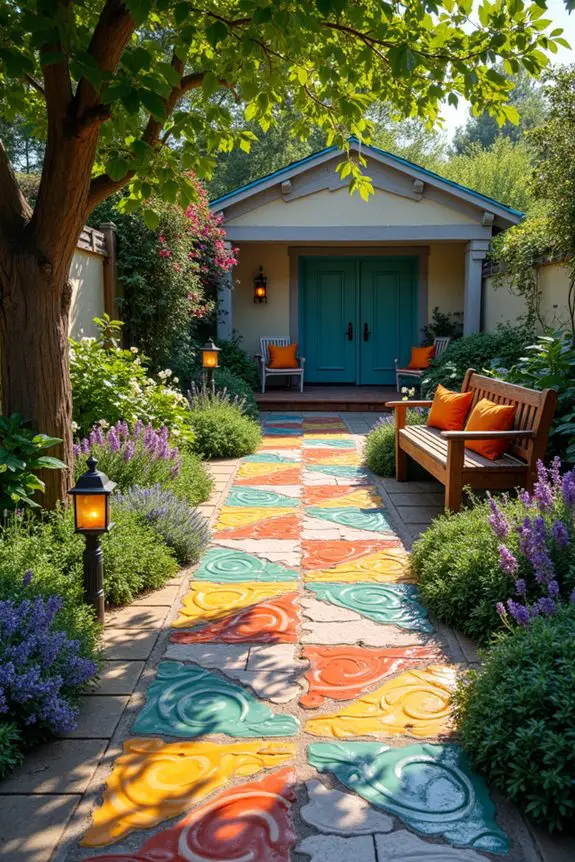
When it comes to crafting a stunning garden, few elements can elevate the ambience quite like a colorful tile pathway. This idea works wonderfully because not only does it guide footsteps through your yard, but it also adds a burst of color and personality. Just picture yourself strolling along a vibrant path, each step leading you deeper into a whimsical wonderland of flowers and plants. It sets a tone, making your outdoor space feel welcoming and adventurous.
First things first, consider the tiles. You can go for ceramic, glass, or even recycled materials depending on what vibe you want—bright and bold or understated elegance. For a funky flair, think about mixing and matching colors or patterns! Imagine red, blue, yellow, and green tiles making a playful mosaic that dazzles the eye. If you feel artistic, grab a few stencils and create your own designs. Want a tile with a cheeky ladybug or sunshine? Go for it. Your pathway should be a reflection of you, after all.
Now, let’s talk layout. You could go straight and narrow for a tidy look or curve it like a gentle river through your garden beds. If you’re feeling a bit daring, create fun patterns like zig-zags or spirals that guide guests on a little adventure.
I once tried to make a spiraling path, only to realize I’d a flair for chaos rather than precision. It turned out great in the end, but all the “are you sure that’s how it’s supposed to look?” remarks gave me a giggle. So embrace the joy of creating; it’s more about the experience than the end product.
Once you’ve laid the tiles, don’t let them sit there looking lonely. Consider planting low-growing flowers or ground cover alongside the edges. Think sweet little creeping thyme or vibrant ice plants that spill over the sides, softening those hard lines of the tile path. It creates a seamless blend of nature and art, beckoning visitors to wander further into your garden’s embrace.
Don’t forget about lighting! Add solar-powered lanterns or fairy lights along the path. It not only adds a magical touch after sunset but keeps your guests from turning around and accidentally walking into a flower bed.
And let’s be honest, who hasn’t tripped over their own two feet while fawning over flowers? A little lighting goes a long way in preventing future embarrassing moments.
9. Symmetrical Herb Garden Design
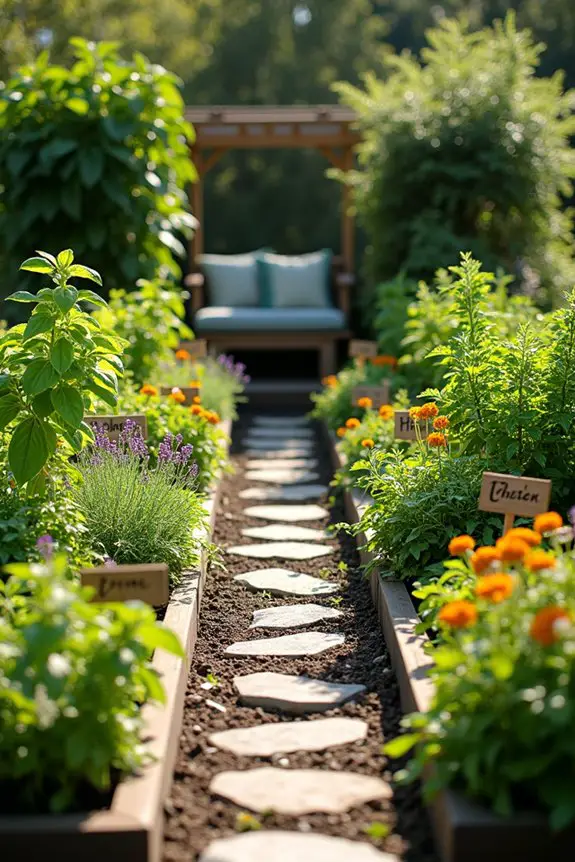
Creating a symmetrical herb garden design is a fantastic way to blend beautiful aesthetics with practical functionality. This idea works like a charm because it organizes your herbs neatly, making them easy to access while also providing a visually pleasing space. Picture a delightful garden with vivid greens and soft scents, where each herb has its own little spot in a well-planned layout. It just feels right, doesn’t it? Plus, who wouldn’t want to step into a garden and smell fresh basil, thyme, and mint all at once? It’s like stepping into a cozy kitchen in the heart of summer.
To get started, let’s think about the layout. A symmetrical garden is all about balance and order. Choose a shape—let’s say a classic rectangle or maybe an elegant circle. I once tried a heart shape, thinking I’d give my garden some flair. Let’s just say my herbs didn’t quite match the romantic vibe I was going for, but it made for a good laugh.
Once you pick your shape, you can divide it into quadrants or sections. This allows you to plant similar types of herbs together—like all the culinary herbs on one side and aromatic herbs on the other. It makes harvesting easier too; just imagine snipping off a fistful of rosemary without having to hunt it down!
Now, let’s talk about your herb selections. Go for a mix of height, texture, and color; you want your garden to be as lively as a summer picnic. Think tall and bushy basil, short and charming chives, and spreading thyme. You can even throw in some colorful flowers like nasturtiums or marigolds for a pop of color and a splash of fun. They’ll attract pollinators and make your garden look like a little piece of paradise.
When planting, give your herbs enough room to breathe—about 12 inches apart should do it. This way, they’re not elbowing each other out of the way when it’s time to reach for a sprig of something delicious. Trust me, overstuffing your garden can lead to a wild jungle of herbs that might make you feel like you’ve stepped into a cooking show gone wrong. Plus, you want your plants to thrive, right?
And don’t forget maintenance! Regular harvests encourage bushier growth, so make it a habit to snip back your herbs, using them fresh in your meals or drying them to preserve their flavors. It’s a great way to show the garden some love while also treating yourself to home-cooked delights. I remember the first time I tossed a handful of my home-grown basil into a pasta dish—it was like tasting summer on my plate.
If you’re feeling a bit fancy, consider adding decorative elements like a trellis or a small water feature to enhance the charm of your herb garden. You could even label your herbs with cute little signs to channel your inner garden guru. Embrace the process—after all, gardening should be as enjoyable as the harvest. Who knows, your beautifully symmetrical herb garden might just become the talk of the neighborhood, or at the very least, the envy of your cooking friends.
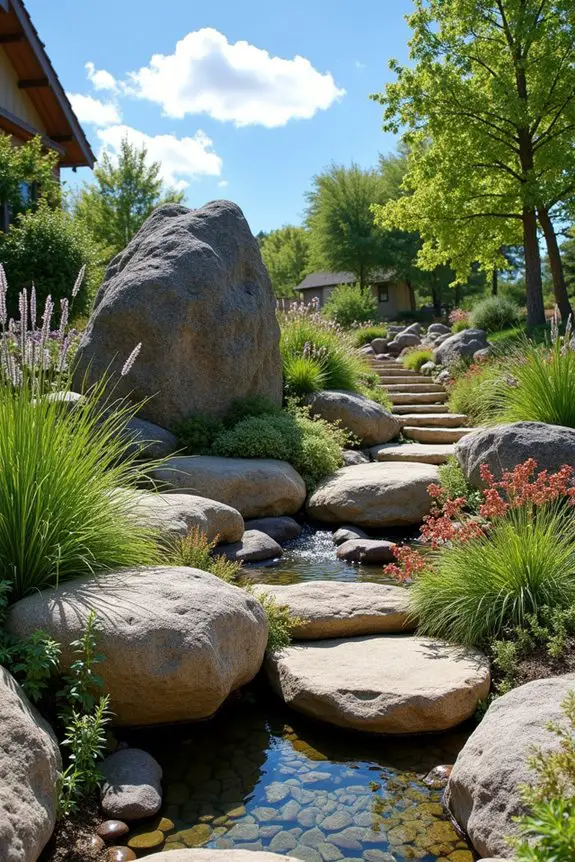
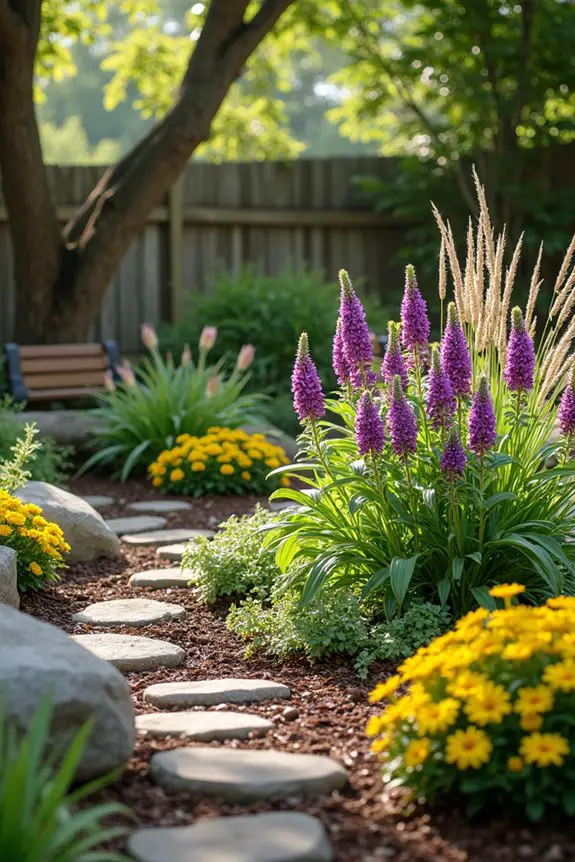
10. Asymmetrical Rock Garden Layout
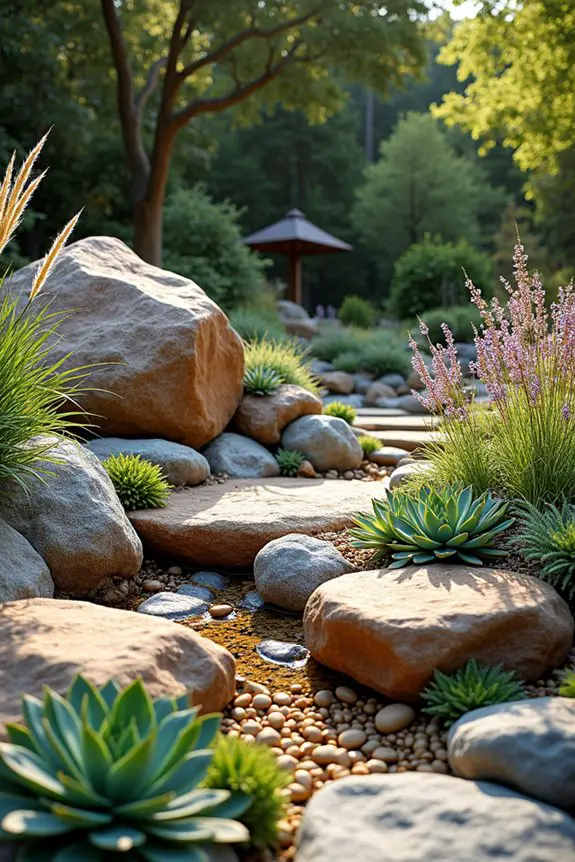
Creating an asymmetrical rock garden layout is a delightful way to bring some wild charm into your backyard. Unlike the neat and tidy feeling of a symmetrical design, an asymmetrical rock garden gives off a laid-back vibe, like a cozy nook found in nature. It works beautifully because it mimics the random beauty of natural landscapes, while also providing you with a unique space to include various plants and natural features, making your garden come alive.
To kick things off, let’s explore the layout. The beauty of asymmetry is that there are no strict rules. You can decide what feels right for your space. Start by choosing a focal point—perhaps a stunning boulder or a quirky piece of driftwood that catches your eye. From there, lay out your rocks in an irregular pattern. Think of designing it like a friendly puzzle where every piece has its own spot but blends harmoniously with the others.
I once tried to be “extra creative” and arranged my rocks in the shape of a lopsided star—it ended up looking more like a confused octopus, but hey, it was a memorable disaster.
Next, let’s discuss plant selection. As you can imagine, you’ll want to choose plants that thrive in rocky conditions and require less water, like succulents, sedums, or hardy grasses. Picture little bursts of color popping through the stones, bringing life and softness to your space. Don’t forget to mix up heights and textures.
Tall ornamental grasses can sway gracefully above short, colorful flowers—it’s like a little dance party for your garden plants. A tip from experience: try to include some trailing plants, like creeping thyme or alpine strawberries; they’ll cascade over the stones, creating a lovely waterfall of greenery.
When laying out your plants, try to cluster them in odd numbers. Really, it’s true—an odd number of plants, like three or five, feels more natural to the eye. Plus, this avoids that slightly awkward feeling of having even plants that look like they’re about to step up and debate the merits of symmetry vs. asymmetry. Seriously, it can get tense out there.
Now, an important part of any rock garden is the drainage. After all, you don’t want your plants swimming in puddles every time it rains. Make sure to choose a sunny spot and consider creating little channels between the rocks for water to flow, helping your plants stay healthy and happy.
I once neglected this part and ended up with a mini swamp that became a new home for the frogs—while adorable, it wasn’t exactly the look I was going for.
Finally, maintain your rock garden with a light touch. Trim back your plants as needed, pulling out the weeds that dare to invade your beautiful oasis. And remember, some rocks may settle over time, shifting or wearing down due to rain and sun. Embrace it! Invest in a few extra rocks to rearrange things whenever the mood strikes; a little bit of rock shuffling can be surprisingly therapeutic.
Creating an asymmetrical rock garden can spark joy, creativity, and a little bit of nature right in your backyard. With each step, you’ll find yourself pulling together a beautiful tableau that not only serves as a functional garden but also as your own peaceful retreat. Now, who’s ready to roll up their sleeves and create some botanical beauty?
Watering Schedule Reminders
Even the most seasoned gardeners can forget about watering their plants amid life’s chaos, right? You’ve got your garden ideas for the backyard all planned out, but suddenly it hits you—the poor plants are parched.
To keep things simple, set up a watering schedule. It can be as straightforward as using your phone’s calendar or an app that sends you reminders. Maybe you’ll decide every Wednesday and Saturday is watering day—that’s easy to remember.
Imagine this: you stroll out with your watering can like a superhero, saving your plants from thirst. Keep a checklist for new additions, ensuring they don’t get left behind.
And hey, a little guilt can motivate you to keep your garden thriving.