Did you know that small gardens can pack a serious punch with the right design? It’s all about creativity, trust me. You don’t need a sprawling backyard to create a vibrant oasis. Ever tried vertical planting or cozy benches? They can change the whole vibe. Since it’s a small space, every inch counts—literally. Imagine blooming flowers, twinkling lights, and maybe even a little water feature. Intrigued? There’s more to explore.
Essential Garden Design Elements
When it comes to designing a small garden, think of it like crafting a delightful recipe; a pinch of creativity, a dash of planning, and let’s not forget those essential ingredients that bring everything together.
First, consider your layout. A small garden needs smart placement—like using paths to create the illusion of space. You might try layering with varying heights to add depth; think of it as stacking flavors in a dish.
Smart layout is key in a small garden; use paths for illusion and layer heights for depth, much like flavors in a dish.
Choose plants wisely—mix perennials and annuals for a splash of color throughout the seasons.
And don’t skip the cozy spots; a bench or a few garden lights can work wonders.
1. Vertical Planting Techniques
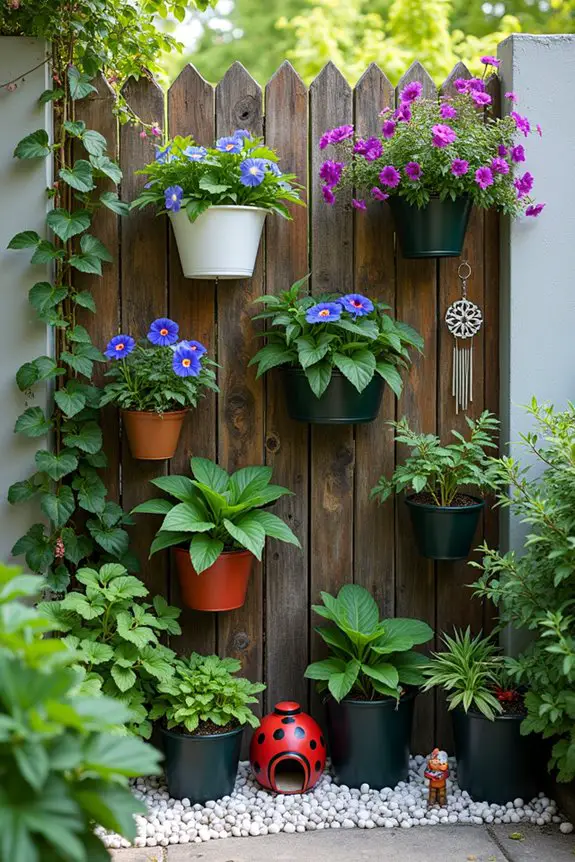
When it comes to small gardens, vertical planting techniques are like adding a secret ingredient to your favorite dish—unexpected yet oh-so-delicious. Not only do these techniques save valuable ground space, but they also make your garden feel like it has sprung to life, transforming those blank walls into vibrant canvases.
Imagine the charm of trailing vines and pops of color climbing up toward the sun, creating a fresh, modern vibe that’s simply hard to resist.
So, how do you plunge into the wonderful world of vertical planting? First, let’s start with the basics. Wall planters and trellises are your best friends here. You can easily hang them on fences or walls, and they add instant character. Additionally, using a quality soil scoop garden can help you efficiently transfer soil to your vertical planters, ensuring optimal planting conditions.
Choose sturdy materials that can hold soil and plants without bowing under pressure—because, trust me, there’s nothing more disappointing than gazing at a sad, droopy planter that couldn’t handle the weight of your ambitions.
Next, think about the plants. Opt for climbers like sweet peas, morning glories, or even strawberries if you’re feeling adventurous. They not only look stunning but can also yield tasty little rewards.
When planting, stagger them in different heights to create depth—yes, just like layering those flavors I mentioned earlier. A helpful tip? Use a good potting mix to guarantee that your plants not only thrive but also stay vibrant and colorful throughout the seasons.
And then there’s the watering magic. Vertical gardens may require a little more attention; you might want to use a drip irrigation system to keep things simple and effective—no one wants to face the wrath of wilting greens after forgetting to water.
It’s like making sure you don’t burn the cookies while trying to multitask in the kitchen; organization is key.
Don’t forget to add some personality! Hanging decorative pots or even art pieces can really spice things up, turning your vertical garden into an eye-catching focal point.
A personal touch can create a welcoming vibe, making your garden feel like an extension of your home. Additionally, consider providing a cozy space for beneficial insects, such as ladybug houses, which can help keep your garden healthy and thriving.
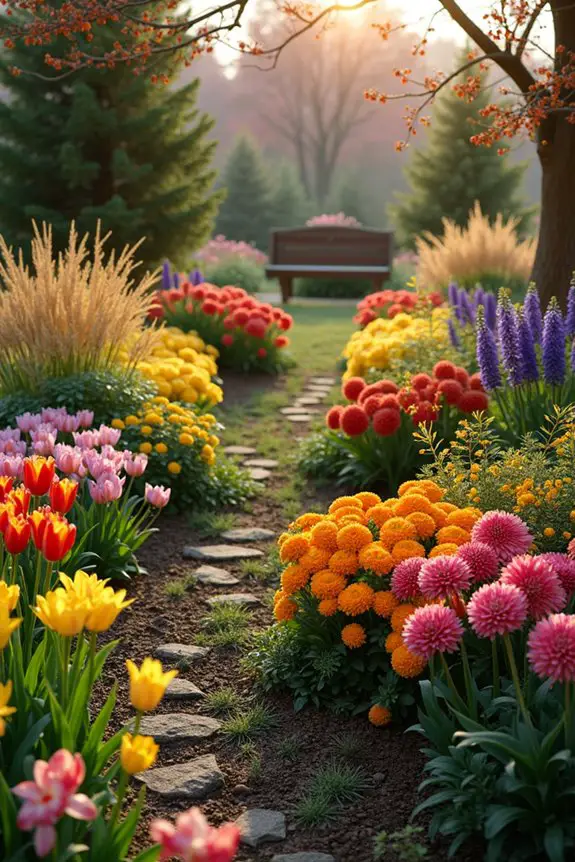
2. Layered Flower Bed Designs
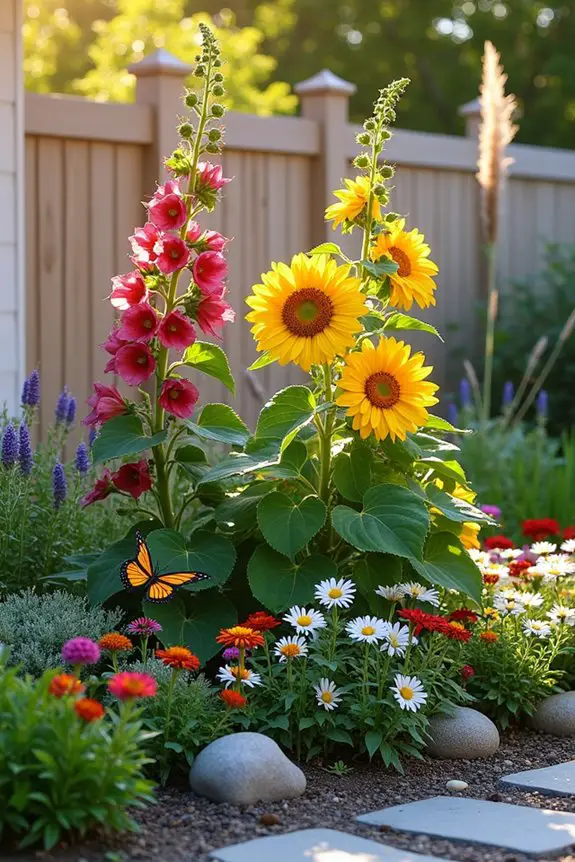
When it comes to small gardens, layered flower bed designs are like the secret sauce that elevates your outdoor space from ordinary to extraordinary. They not only maximize the visual aesthetic but also create a lush, inviting atmosphere where each plant has its moment in the spotlight. Picture a gentle slope of color and texture that beckons visitors to step closer, a delightful blend of flowers that play off one another, creating a kind of harmonious symphony in bloom.
To get started with layered flower beds, think of it as organizing a warm and cozy dinner party—only instead of guests, you’re seating distinct plants in a well-planned arrangement. Begin by selecting a few tiers or layers, which usually consist of a tall centerpiece, mid-height blooms, and lovely ground covers to wrap things up.
For the tall layer, consider sunflowers or hollyhocks; they’re showstoppers, standing proudly as the life of the party. Next, sprinkle in medium-height plants like daisies or zinnias, which provide a lovely middle layer, beautifully framing the taller blooms. Finally, ground covers such as creeping thyme or sedums will fill in the gaps and soften the overall look.
Now for the juicy part: when planting, remember the golden rule of layering. Place taller plants at the back (or center, if it’s a circular design) and gradually decrease the height toward the front. This not only guarantees that every plant gets its fair share of sunlight but also keeps your design from looking like a chaotic jumble—trust me, no one wants a bed that looks like it’s been through a fierce windstorm.
As you dig into the soil, don’t skimp on adding compost. It’s like giving your plants a hearty meal and can really make them thrive without the need for frequent feasts of fertilizer down the line. Using proper tools for soil preparation, like a garden hand fork, can make all the difference in establishing a healthy foundation for your layered beds. Additionally, consider using tree watering bags that efficiently deliver moisture directly to the roots.
Watering your layered bed might sound a bit tedious, but consider a soaker hose that delivers moisture right to the roots. This won’t only save your time but also keep your back from aching as you bend down to water each plant individually.
Now, let’s talk about the fun part—personal flair! Feel free to mix in some decorative stones or garden art to break up the lushness. This could be a quirky statue or even a fun sign that tells a story.
Just like that unexpected ingredient in a recipe, these little touches create layers of interest that can spark joy for you and your guests. And if anything goes awry, or if a plant decides to sulk and not bloom, just embrace it! Every garden has its quirks, just like every great dish has its hiccups.
3. Container Gardening Solutions
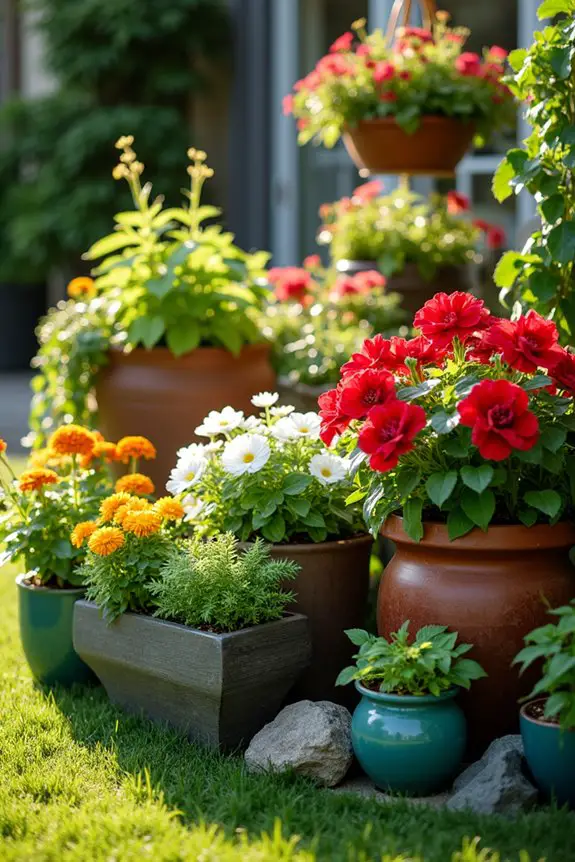
When space is tight, container gardening swoops in like a superhero to save the day. Not only does it allow you to grow a fabulous array of plants in limited spaces, but it also adds a dynamic visual element to your small garden—think of them like the colorful accents on your favorite outfit.
Oh, and the best part? Containers can easily be moved around, giving you the freedom to create a fresh look on a whim.
To explore the world of container gardening, all you need are some pots (or whatever you have lying around that can hold soil), good-quality potting mix, and a sprinkle of creativity. Start by choosing the right containers based on your plants’ needs: if you’re going for herbs, think about shallow pots; for flowers, medium-sized would do the trick; and if you’re feeling adventurous, larger pots can host mini veggie gardens.
Imagine that big, bold tomato plant sitting right on your balcony, waving at your neighbors like the proud parent on the playground.
Once you’ve chosen your pots, prepare them for planting. If your container doesn’t have drainage holes (a serious party foul), now’s the time to drill some. Waterlogged plants can turn into sad, droopy messes, and no one wants that.
Fill your container with that lovely potting mix, allowing for about an inch of space at the top—this is your room for error when watering. Think of it like leaving a little space in your ice cream bowl so you can pile on the sprinkles without them spilling over.
Now comes the planting fun! Layer your plants based on height and sun needs; taller plants at the back, shorter ones at the front. And don’t forget to add a few trailing plants that cascade over the edges for a whimsical touch—not unlike those dramatic hairstyles you tried in the ’90s but hopefully without the hairspray disaster.
Water them in after planting, allowing the soil to settle in nicely, and give your leafy friends a sip of that good stuff.
Want a personal tip? If you’re notorious for forgetting to water (guilty as charged!), look into self-watering pots or add some water-retaining crystals to the soil. Additionally, consider incorporating neem oil concentrate into your gardening regimen to naturally protect your plants from pests.
It’ll keep your plants happy even on those forgetful days. Also, consider playing around with colors—mix and match flowers that complement each other or create a daring vibe. Just go wild, because your containers are like a palette waiting for your artistic touch.
4. Creative Pathway Inspirations
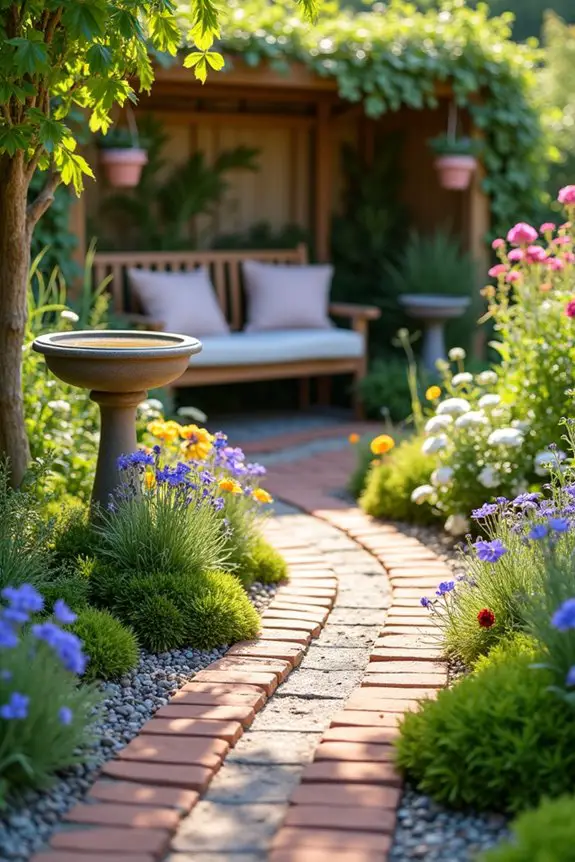
When it comes to small gardens, a creative pathway can work wonders for both functionality and style. Imagine this: not only does a well-designed pathway guide you through your lush sanctuary, but it also adds a touch of elegance that transforms your space from blah to beautiful.
Plus, it creates defined areas in your garden, making it feel more organized—because let’s be real, a little order in our lives can go a long way.
Now, let’s talk about how to design your perfect pathway. First, think about the materials. Whether it’s pebbles, bricks, pavers, or even recycled wood, choose something that speaks to you.
If you’re feeling a bit daring, consider using a mix of materials to create a truly unique vibe—it’s like that time you threw on socks with sandals; confusing, yet somehow, it works.
Next, it’s all about placement. You want to create a natural flow that leads visitors through your garden without any awkward detours. If you have specific points of interest, like a cozy seating nook or a delightful birdbath, let your path gently guide folks to these treasures.
To achieve this, sketch out your design on paper first. It doesn’t have to be Picasso-level art; simple lines will do just fine. Just remember, the goal is to make it inviting.
Once you’ve nailed down the design, prepare the ground. You’ll need to clear the area, removing pesky weeds and debris, just like you’d clear the dining table before a big dinner.
If your pathway materials need it, lay down a weed barrier to keep those little pests from ruining your aesthetic.
Now for the fun part—laying down your chosen materials. If you’re using bricks or pavers, be sure to leave a small gap between them to allow for drainage and plant growth. Yes, I said plants!
Consider tucking in some small flowering plants or ground cover between the stones to create a whimsical look. It’s like letting nature crash your garden party—unexpected, yet so delightful.
And here’s a tip from personal experience: avoid patterns that seem too complicated (unless you want to break out in a sweat trying to remember the placement). Stick to something simple, especially if you don’t want your path looking like a child’s doodle.
Finally, if you want to enhance your pathway even more, think about adding some solar lights along the way. This not only increases safety for nighttime strolls but also turns your garden into a magical wonderland at dusk.
Who doesn’t want to feel like they’re living in a fairy tale? Just remember, keep it light and playful. The pathway should reflect your personality and bring joy as you wander through your green paradise.
Happy gardening!
5. Garden Lighting Enhancements
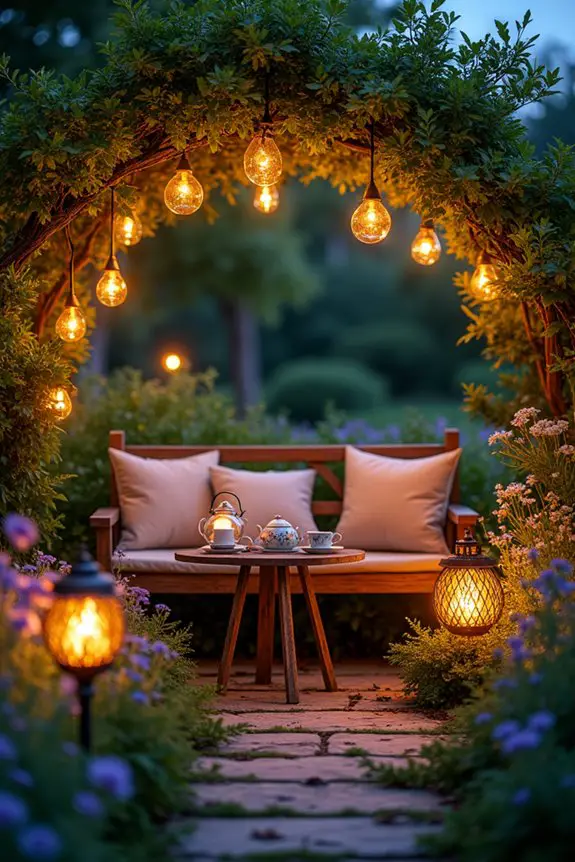
When it comes to small gardens, the right lighting can completely shift the atmosphere, turning your cozy little nook into a shimmering oasis after sunset. Envision this: a soft glow beckoning you outside for an evening cup of tea or a spontaneous gathering with friends, all while highlighting your garden’s beautiful features. It’s like having a cozy hug from your garden, even when the sun goes down.
So, let’s explore lighting up your outdoor haven. First, consider where you want the light to do its magic. Do you want to underline certain plants, mark a pathway, or create an enchanting glow around a sitting area? Start by evaluating your garden’s personality. Is it romantic and whimsical, or wild and earthy? This will guide your choice of lights—think fairy lights for a dreamy vibe and lanterns for something more rustic.
Now that you have your lighting vision, it’s time to plan how to position them. A great tip is to layer your lights—mix up different types for depth and intrigue. You might opt for some solar-powered garden stakes to line your path, string lights draped through trees, and maybe a spotlight to draw attention to a favorite sculpture.
Just imagine, the sparkling fairy lights twinkling above, while the soft glow of the path guides you like an old friend.
When you’re laying out the lights, keep in mind the brightness level. You don’t want your garden looking like a supermarket aisle after dark; instead, aim for that golden hour glow we all know and love. LED bulbs can give you that stunning warm light while being energy-efficient, so it’s a win-win.
Plus, experiment with positioning—try placing lights closer to the ground for a soft ambient effect or higher up for more direct lighting. It’s all about finding your balance.
One of the funniest parts about lighting is having to untangle those fairy lights. You know what I’m talking about. Every year, it’s like wrestling with an octopus in a Christmas-themed horror movie. Pro tip: when you store them, wrap them around cardboard or put them in a dedicated box. Trust me, future-you will thank you.
As you set your lights, test them out in the evening. You might need to adjust a few here and there—maybe that lantern looks better near the bench instead of under the bush you didn’t notice had grown into a small forest overnight.
The key is to enjoy the process and embrace the quirky moments as your garden starts to light up.
With the right lighting, your small garden can take on an entirely new life in the evening, creating a warm, inviting space that feels perfect for any occasion. So grab those twinkly lights, embrace your inner garden designer, and get ready to stun your neighbors with magical nighttime gatherings. What could be better than enjoying a crisp evening in your newly illuminated garden paradise?
6. Miniature Water Features
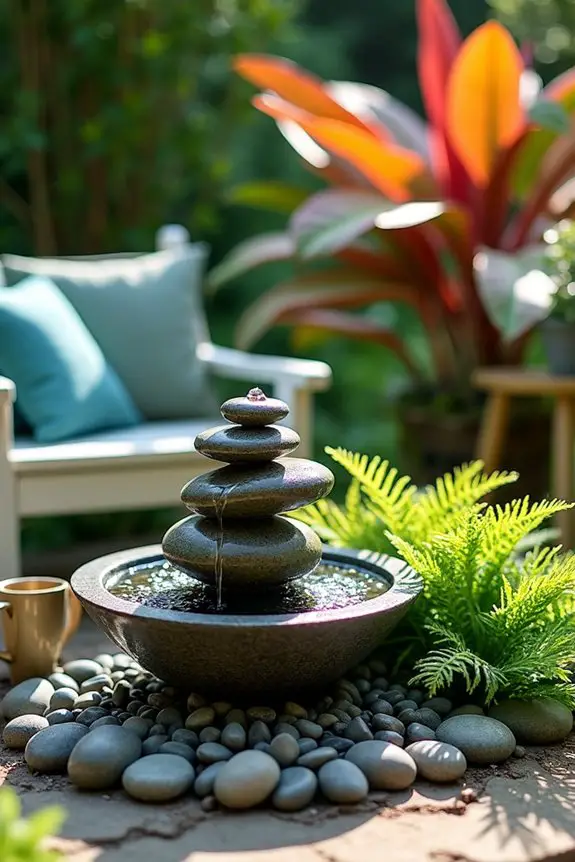
There’s something undeniably soothing about the sound of water trickling in a garden. It transforms your small outdoor space into a retreat, offering both visual appeal and a calming atmosphere. Imagine how lovely it would be to sip your coffee while listening to the gentle splash of a mini fountain, or perhaps enjoying a book while your tiny waterfall dances in the sunlight. It’s like having your very own zen paradise, minus the long haul flight to Bali.
So, how do you bring this serene vibe into your garden? One of the easiest ways is by creating a miniature water feature—think tabletop fountains, pond kits, or even wall-mounted waterfalls. You don’t need a huge yard for this; just a corner or a small table will do.
For starters, I recommend looking for a pre-made fountain. Home improvement stores often have a good selection, and they often come with clear instructions. Just make sure it fits the style of your garden. Is it rustic, modern, or whimsical? Choose something that feels right at home.
Once you’ve got your fountain, set it up in a spot where you can enjoy it! Consider placing it near your favorite seating area or where it catches the light. You want to spot it easily, so it draws your eyes and ears. A little tip: placing some stones or gravel around the base adds a natural touch while also keeping the area tidy.
If you want to take it up a notch, you could surround it with some lovely plants that enjoy the humidity, like ferns or hostas. They’ll appreciate the moisture, and you’ll love the lush look.
As you get everything in place, don’t forget to give that water a little sparkle—literally. Adding some decorative stones or glass beads to the water can enhance the visual appeal, creating a gorgeous interplay of light and movement. Just be careful not to overdo it. You want beauty, not chaos, right?
And if you’re someone who can’t keep houseplants alive, fret not; this mini water feature could be your gateway to becoming the garden guru you’ve always dreamed of.
Now, let’s talk maintenance. Ah yes, the dreaded word. But fear not; a miniature water feature is pretty low-maintenance. Just check the water level from time to time, and make sure to give it a good clean every few months to keep that water looking fresh.
If you notice algae trying to sneak in, a quick scrub with a soft sponge should do the trick. Trust me, as someone who once forgot about my mini pond for weeks, I can assure you, it can happen. And yes, it’s a bit embarrassing to explain to guests how I accidentally created an ecosystem of frog dot com.
7. Repurposed Furniture for Gardens
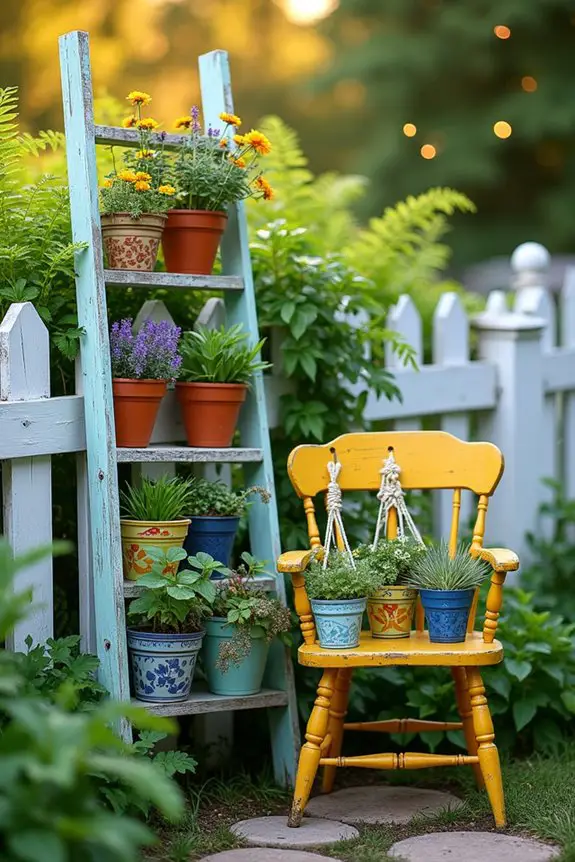
Let’s face it, not everyone has the budget for fancy garden decor, but that doesn’t mean you can’t add some flair to your outdoor space. Enter repurposed furniture: the creative, affordable solution that not only saves your wallet but also adds unique character to your garden. Imagine turning an old ladder into a charming plant stand or a vintage chair into a quirky flower display. It’s a smart way to give life to your tired furniture while also allowing for self-expression and a bit of whimsy in your garden retreat.
Transforming repurposed furniture can add unique charm to your garden without breaking the bank. Embrace creativity and let your outdoor space shine!
So, how do you get started? First, take a good look around your house or visit your local thrift store. Old tables, chairs, dressers—anything can be transformed with a little imagination. For instance, if you have a wooden chair that’s seen better days, sand it down and give it a fresh coat of paint to match your garden’s vibe. Once it’s ready, you can use the seat to hold potted plants or hang plants from the arms for a vertical touch. It’s like giving your furniture a new lease on life.
Another fun idea is to turn an old wooden ladder into a tiered plant stand. Just lean it against a wall or fence, and then fill each step with cute pots. You can even paint the ladder in cheerful colors or leave it rustic for that charming country vibe. When plants cascade down from the steps, it creates a beautiful waterfall effect of greens and flowers, adding a touch of softness and romance.
And hey, if you’re feeling a bit wild, you can try transforming a dresser into a garden planter. Just make sure to remove the drawers. Fill the spaces with soil and plant away. Succulents, herbs, or even colorful flowers can thrive in these unusual beds. Just keep in mind that you’ll need to drill some holes in the bottom for drainage. Think of it as giving your dresser a little makeover; it might just be the coolest addition ever.
As you commence on this furniture-repurposing journey, keep a few tips in mind. Always choose weather-resistant paint or wood sealants for outdoor use, so your creations last through the seasons. You might also want to contemplate adding a layer of landscape fabric or chicken wire in planters to allow for better drainage while preventing soil from spilling out.
And don’t be afraid to mix and match styles to find what speaks to you. Your garden should reflect your personality, so let it be a fun mishmash of colorful, interesting pieces.
Oh, and the best part? Repurposing furniture means you get to flex those creative muscles while preventing waste. Plus, it makes for some great conversation starters when you have friends over. “Oh, this old chair? I rescued it from a life of sitting in the corner collecting dust.” Who wouldn’t appreciate a good save-the-furniture story?
Just remember, embracing imperfection is key. Your garden doesn’t need to look like it came straight out of a magazine; it just needs to feel like home, with a dash of charm and a sprinkle of creativity. Happy repurposing!
8. Herb Spiral Gardens
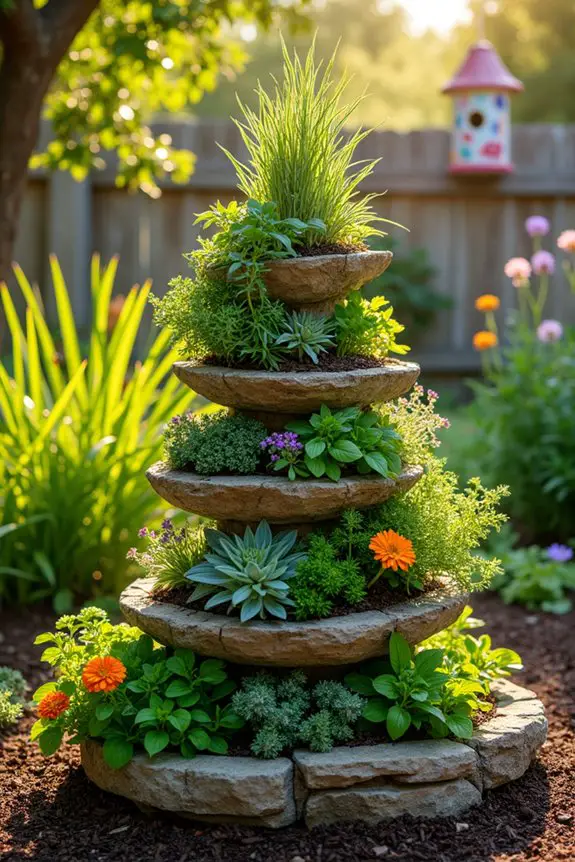
If you’re looking to spice up your garden while maximizing your space, herb spiral gardens are where it’s at. These beautiful, whimsical structures not only look stunning but are also an efficient way to grow a variety of herbs in a compact area. Imagine a spiraling tower of greenery, herbs at different heights, and texture that really draws the eye. It’s like having a mini herb farm right in your backyard—and who wouldn’t want fresh basil or mint at arm’s reach?
Creating an herb spiral is a fun project and it starts with the design. First, map out a circular area that can accommodate your spiral. The size can vary based on your available space; a diameter of around four to six feet is manageable for most gardens.
Once you have your circle, begin by stacking stones, bricks, or even soil to form a spiral shape that winds up from the outside to the center. You can create different heights in your spiral which is perfect because different herbs have different sunlight needs. Taller herbs, like rosemary, can bask in the sun at the top, while shade-loving varieties, like mint, can thrive at the bottom.
Now comes the fun part—planting. As you plant your herbs, think about their growth habits and how much water they need. Place drought-tolerant herbs like thyme at the top and moisture-loving ones like chives or parsley lower down. Not only will this create a mini-ecosystem, but the spiral shape helps with drainage, too.
Tip: don’t forget to include some flowers amongst your herbs; they attract pollinators which are essential for a thriving garden.
You’ll want to keep your spiral well-maintained, particularly in the early stages. A regular watering schedule will help establish the roots, especially during those hot summer months.
But here’s a little secret—overwatering can be a sneaky culprit for wilting plants, so make sure you’re also letting the soil dry out a bit between waterings.
Adding a layer of mulch on top can help retain moisture and keep weeds at bay, which is always a plus—nothing kills the vibe like an uninvited weed invasion. If you really want to personalize your spiral, consider adding decorative touches, like a funky birdhouse or some garden art that reflects your personality.
It’s your garden, after all, let it be a reflection of you—quirks and all.
Creating an herb spiral garden is a project that not only beautifies your outdoor space but also provides fresh herbs for delicious meals year-round. Picture yourself whipping up a homemade pesto using basil from your very own garden.
Just think of the earthy aroma wafting through your kitchen, the comforting anticipation of your next meal, and of course, the sheer joy of knowing you grew it all yourself. Who knew a spiral could be so life-altering?
9. Seasonal Color Schemes
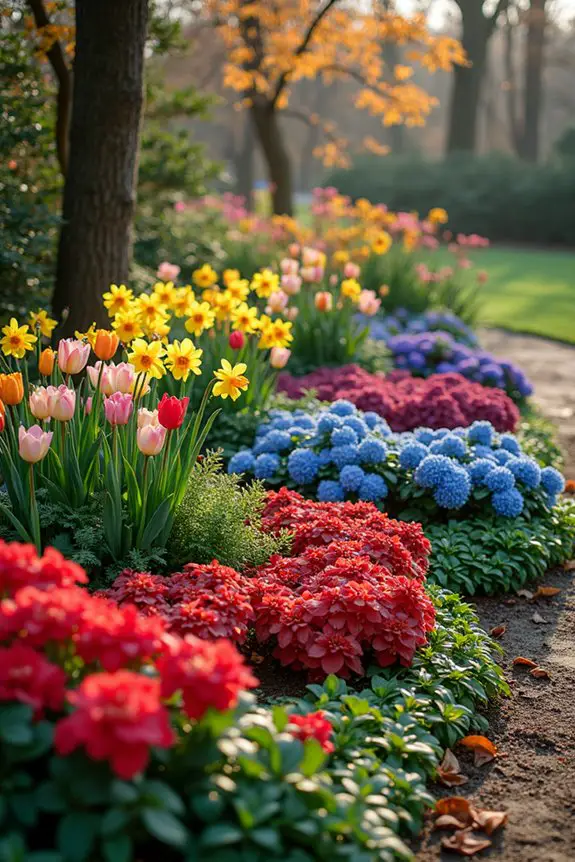
When it comes to small gardens, seasonal color schemes are a fantastic way to bring life and vibrancy throughout the year. Imagine stepping into your garden and being greeted by a kaleidoscope of colors, each one telling a story of the changing seasons. This not only adds visual excitement but makes gardening feel approachable and fun, even for those of us who can barely keep a cactus alive.
Seasonal color schemes transform small gardens into vibrant retreats, making gardening accessible and joyful for everyone.
To create a stunning seasonal color scheme, you’ll want to think about which plants bloom in different seasons and how their colors can complement each other. Start by making a basic plan for your garden layout. For spring, think bright yellows and soft pinks with tulips and daffodils peeking through.
As summer rolls around, switch gears with bursts of vibrant reds and blues using geraniums and petunias. Then, don’t forget about autumn‘s beautiful oranges and deep purples—what could be better than the deep red of maple leaves alongside some golden sunflowers?
Here’s a tip: don’t just rely on flowers. Mix in foliage plants with colorful leaves for a pop that lasts year-round. Plants like purple heucheras and luscious green ferns can add texture and depth.
And if you’re feeling adventurous, consider incorporating perennials that offer different blooming times. You can have your garden bursting with color spring, summer, and autumn, leaving winter to take a nap.
Also, keep in mind the layout and placement. You want to organize your plants based on their sun needs—make sure those sun-loving beauties are front and center to soak up all the light they can get.
And here’s where the fun comes in: as the seasons shift, capture those color changes with pictures. It might surprise you how much joy comes from documenting your plants’ growth.
When you’re deep in winter and your garden appears bare and sad, flipping through a seasonal photo album will remind you of the vibrant oasis you created.
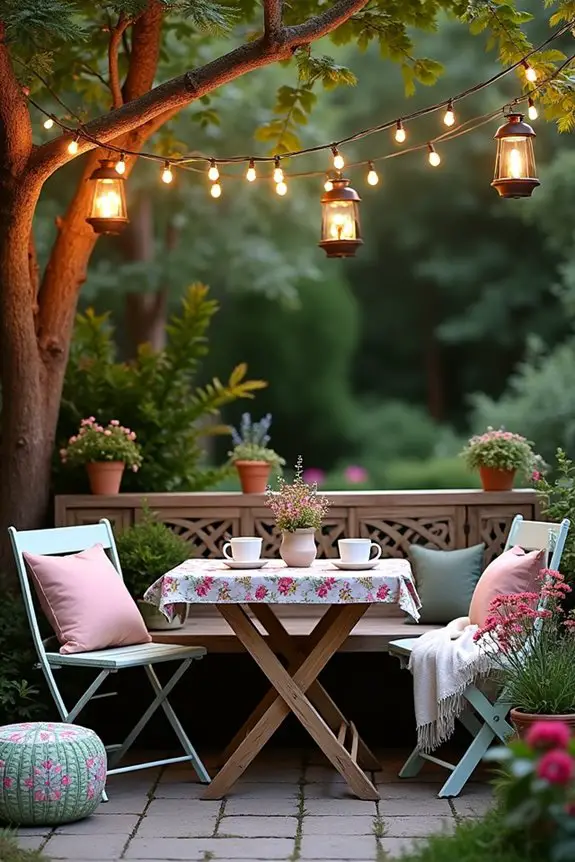
10. Space-Saving Furniture Options
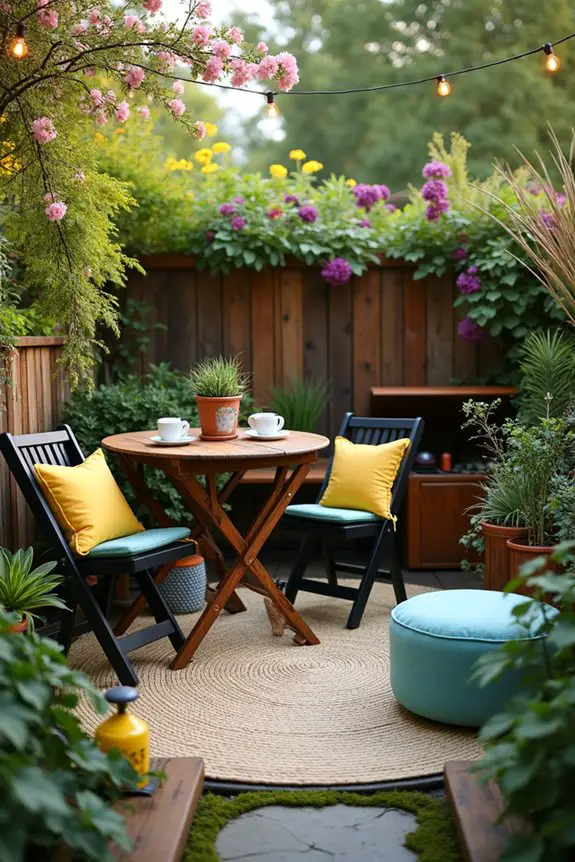
When dealing with a small garden, every inch counts, and that’s where space-saving furniture options come into play. Imagine having a cozy little nook where you can sip your morning coffee while surrounded by your blooming plants, all without sacrificing an ounce of space.
It’s not just about functionality; it’s also about transforming your garden into a welcoming retreat—perfect for relaxation or entertaining friends.
So, how can you incorporate space-saving furniture while keeping a charming vibe? First off, consider folding tables and chairs. They’re like the superheroes of small spaces; when not in use, just fold them up and tuck them away. You can easily set up a delightful outdoor dining area or a tranquil reading spot.
Look for sets that match your garden’s aesthetic—think rustic wood if you want a cozy vibe, or sleek metal for a modern touch.
Another fantastic option is the use of benches with built-in storage. Not only do they provide extra seating, but they also offer a secret compartment for your gardening tools or cozy blankets for cooler evenings.
Deciding on a bench that also doubles as a plant stand can elevate your garden’s look and make the most of your limited space.
Consider multi-purpose accessories too. For instance, an ottoman that can serve as extra seating while also holding your favorite garden supplies. When you’re not using them, you can simply stack them in a corner. How cool is that? Plus, they can often be found in fun colors or patterns—your garden will feel lively and playful, almost like it has a personality.
Here’s a little tip: try to choose furniture that’s lightweight, too. You’ll want to rearrange as your plants grow or to rearrange for different seasons.
Remember that those portable chairs from college? Channel that energy; if they survived numerous backyard BBQs, they can surely handle the occasional drizzle.
Lastly, think about your accessories. String lights or lanterns draped around your furniture create a warm ambiance at night. Imagine sitting there under twinkling lights, a soft breeze rustling the leaves, a glass of lemonade in hand.
Sure, your garden may be small, but with the right furniture, it can feel like a grand escape!
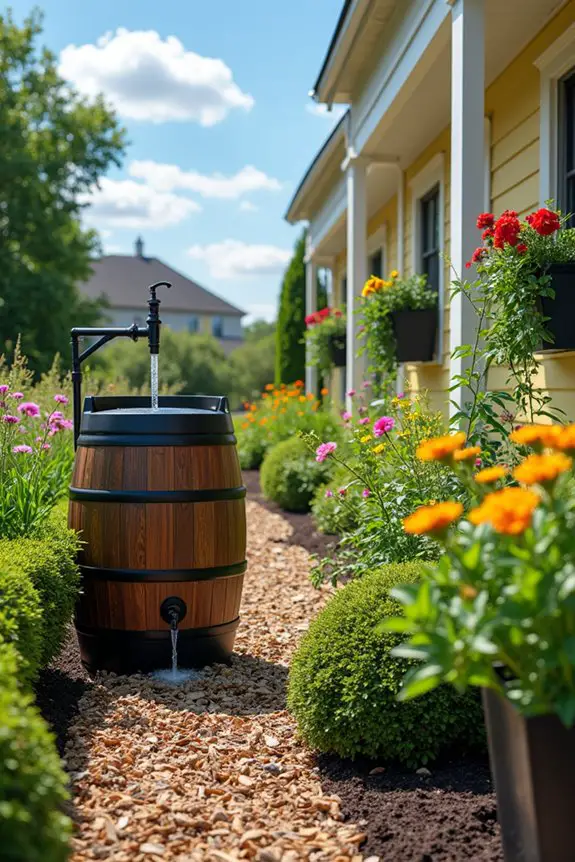
Efficient Watering Techniques
Gardening can be a rewarding experience, but let’s be real—keeping your plants healthy without drowning them can feel like an art form. You’ve got to get your watering game right.
Try using drip irrigation or a soaker hose; they deliver water directly to the roots, which is a lifesaver for small gardens. When you water, do it early in the morning. This helps reduce evaporation—plus, you avoid that awkward mid-afternoon hose dance.
If you’re into timing, set a reminder; trust me, your future self will thank you. And don’t forget to check the soil moisture first—just stick your finger in the dirt. If it’s still damp, hold off.
You’ll save water and keep your plants happier. It’s a win-win.