
If you’re keen on elevating your gardening game, raised garden beds are the way to go! They not only make gardening easier on your back but also allow for better drainage, pest control, and soil quality. Building your own raised beds can be a fun project that enhances your outdoor space while providing fresh produce at your fingertips. Let’s explore some DIY design ideas to help you create the perfect setup!
Incorporating Drainage Solutions
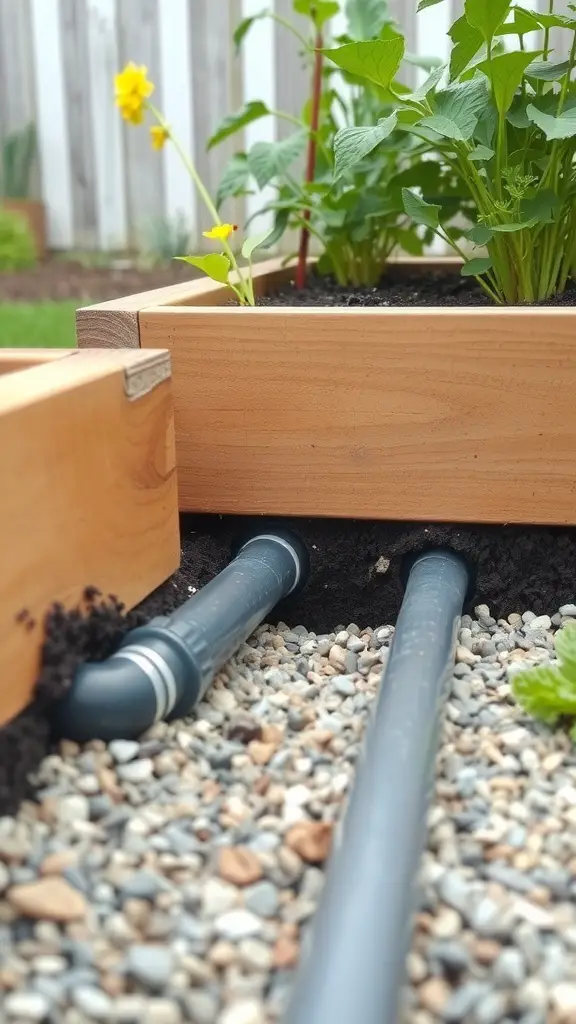
When setting up raised garden beds, drainage is key. The image shows a clever setup with drainage pipes running beneath the beds. This helps prevent water from pooling, which can harm plants.
Using pipes like these allows excess water to flow away, keeping the soil aerated and healthy. It’s a simple way to ensure your plants thrive without drowning.
Incorporating gravel around the pipes can also help with drainage. This setup not only looks neat but also functions well. Remember, healthy roots lead to healthy plants!
Creating Accessible Raised Beds for Everyone
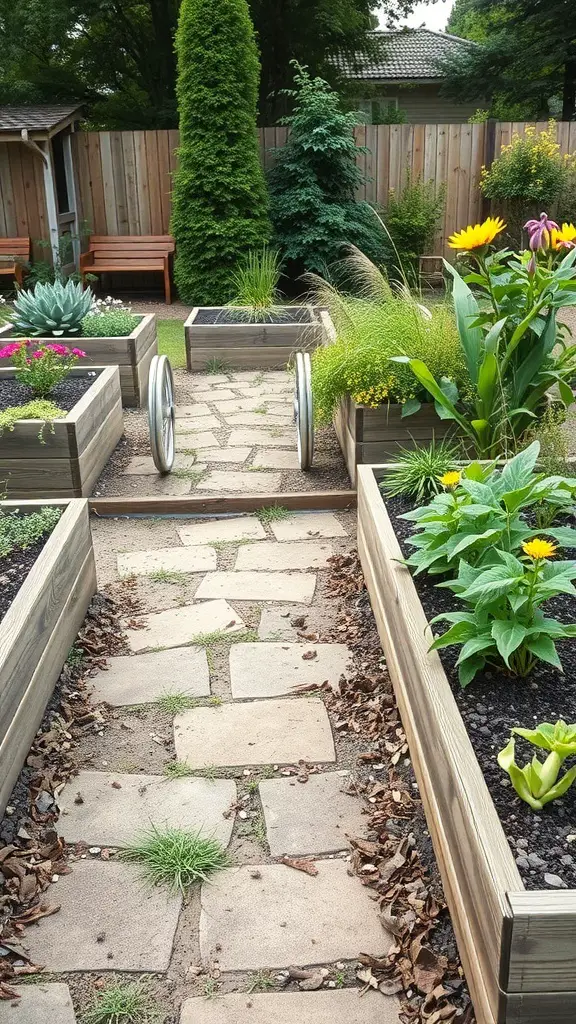
Raised garden beds are a fantastic way to make gardening accessible for everyone. The image shows a lovely garden layout with raised beds on either side of a stone pathway. This design not only looks inviting but also allows easy access for people of all abilities.
The raised beds are at a comfortable height, making it easier to tend to the plants without bending over too much. This is especially helpful for those with mobility issues or back pain. The pathway between the beds is wide enough for a wheelchair or walker, ensuring that everyone can enjoy the beauty of gardening.
Incorporating different plants adds color and texture to the space. The vibrant flowers and lush greenery create a cheerful atmosphere. This setup encourages community gardening, where friends and family can gather to plant, harvest, and share the joy of gardening together.
When designing your own raised beds, consider using materials that are sturdy yet safe. Wood is a popular choice, but make sure it’s untreated to avoid chemicals leaching into the soil. With a little creativity, you can create a beautiful and functional garden that welcomes everyone.
Using Companion Planting in Your Design
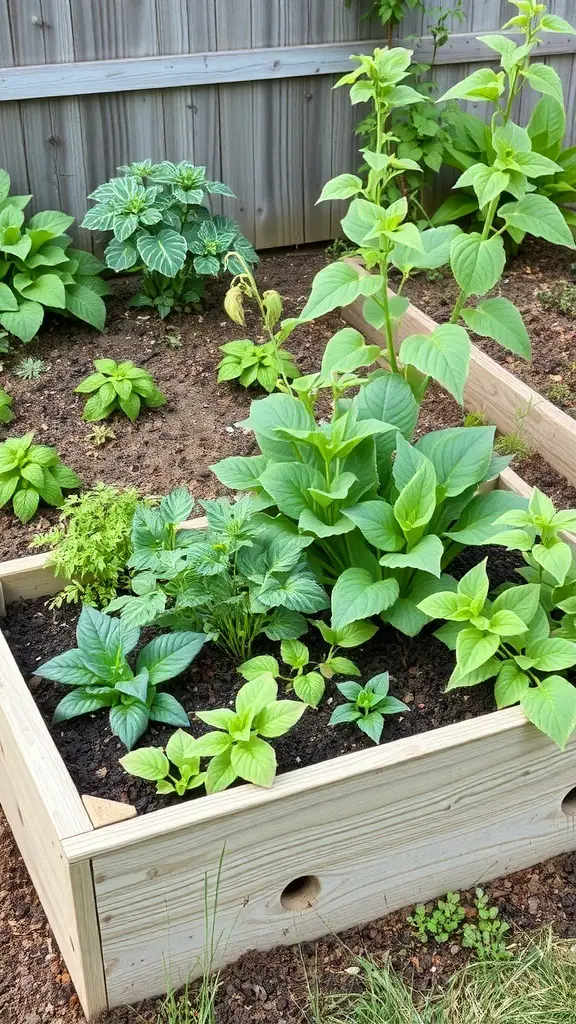
Companion planting is a smart way to boost your garden’s health and productivity. In the image, you can see a raised garden bed filled with various plants. Each plant has a role to play, supporting its neighbors in different ways.
For instance, some plants can repel pests, while others attract beneficial insects. This creates a balanced ecosystem right in your backyard. The vibrant greens in the image show how well these plants can thrive together.
When planning your garden, think about which plants work well together. For example, planting basil near tomatoes can enhance their flavor and help deter pests. This simple strategy can lead to a more fruitful harvest.
Incorporating companion planting into your raised garden beds not only maximizes space but also promotes a healthier growing environment. So, take a cue from nature and let your plants help each other out!
Adding Aesthetic Features to Your Design
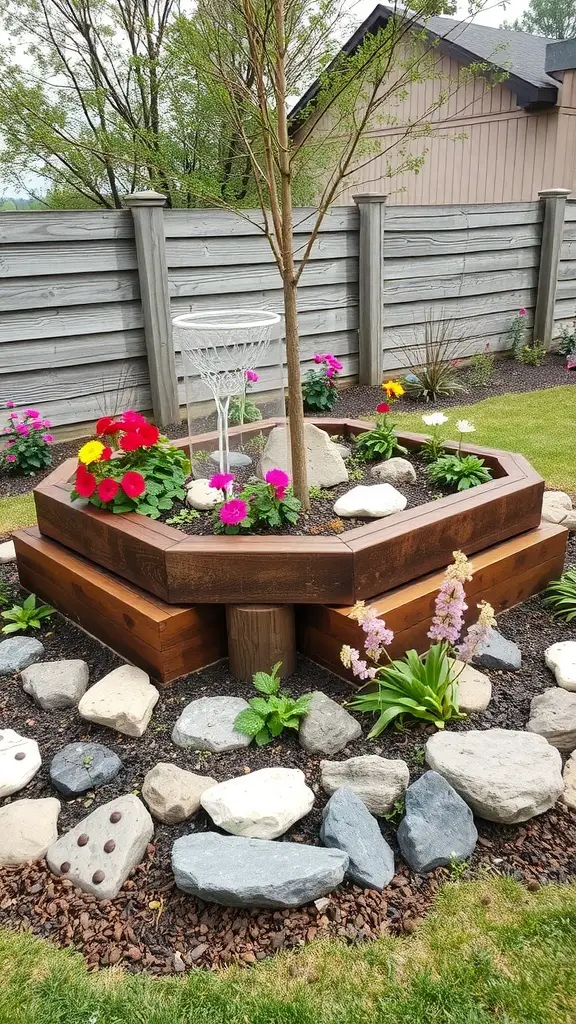
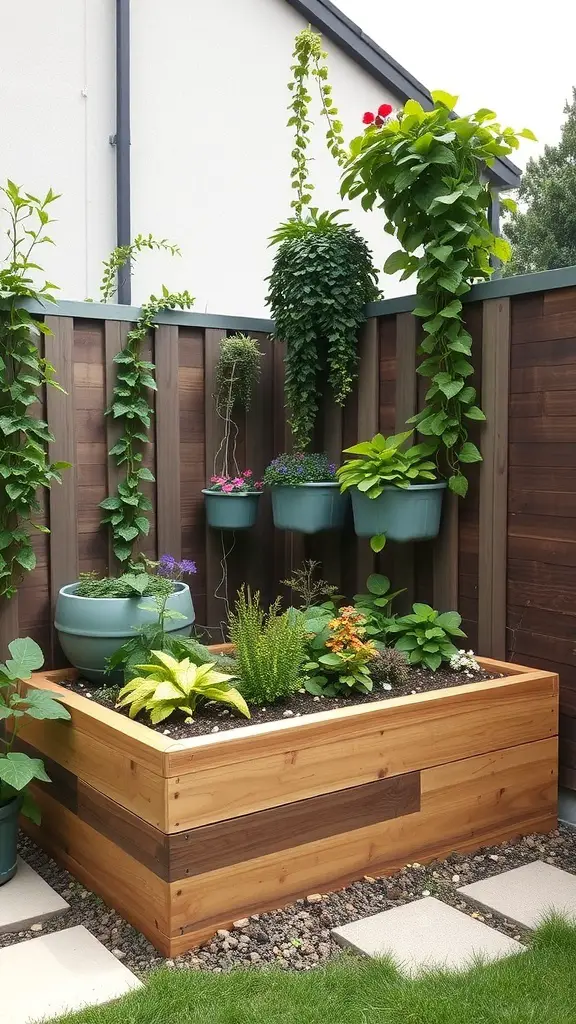
Creating raised garden beds is not just about functionality; it’s also a chance to express your style. The image shows a beautifully designed raised garden bed that combines practicality with visual appeal. The hexagonal shape adds a unique twist, making it a focal point in any yard.
Incorporating colorful flowers around the garden bed enhances its charm. The vibrant blooms, like pink and yellow, contrast nicely with the earthy tones of the wood. This mix of colors draws the eye and invites people to take a closer look.
Using stones around the base adds texture and helps with drainage. The natural stones create a rustic feel, blending seamlessly with the greenery. This thoughtful detail not only serves a purpose but also adds to the overall aesthetic.
Don’t forget about the tree in the center! It provides shade and a sense of maturity to the design. This element makes the garden feel more established and inviting. Adding seating, like a simple chair, can turn this space into a cozy nook for relaxation.
Overall, the combination of shapes, colors, and materials in this raised garden bed design shows how you can create a beautiful outdoor space that is both functional and visually pleasing.
Designing Your Garden Layout
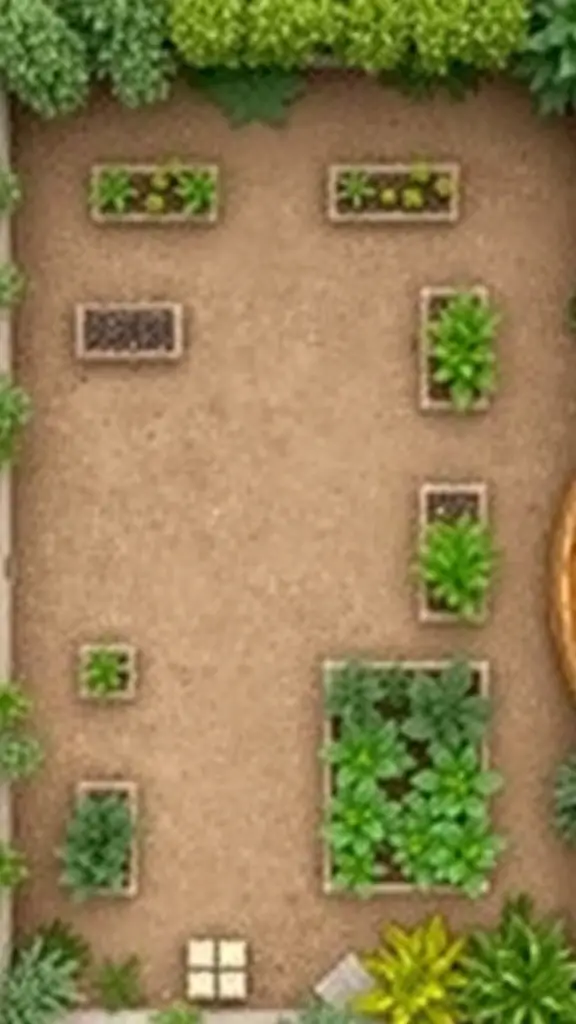
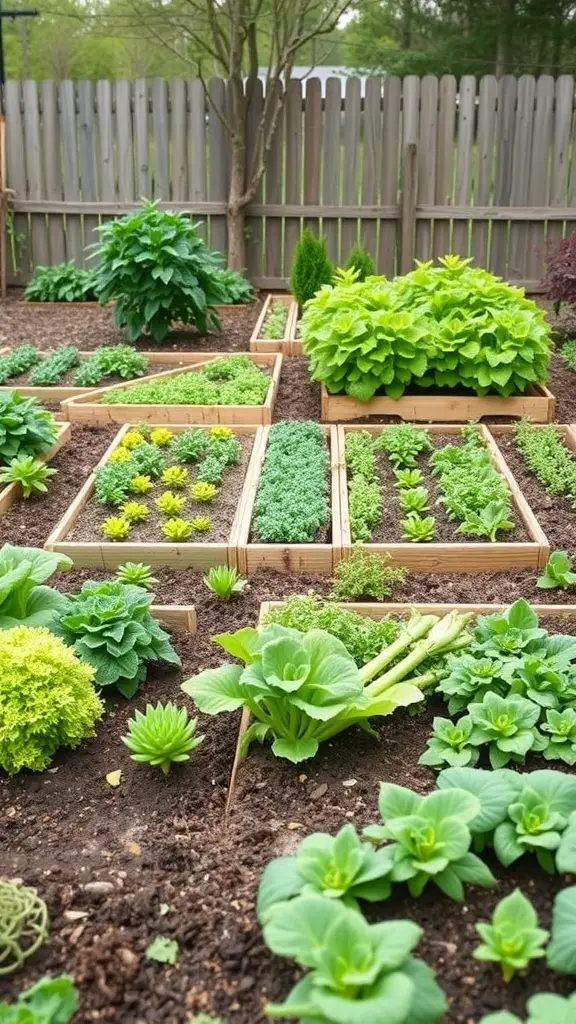
Creating a garden layout is an exciting step in your DIY raised garden bed project. The image shows a well-organized garden with various raised beds arranged thoughtfully. Each bed is filled with different plants, making it easy to visualize how your garden can look.
Start by considering the size and shape of your space. The layout in the image features a mix of rectangular and square beds, which can help maximize your planting area. Think about how much sunlight each section receives, as some plants thrive in full sun while others prefer partial shade.
Spacing is key. The layout shows enough room between the beds for easy access. This is important for maintenance tasks like watering and harvesting. You might also want to include pathways or stepping stones, as seen in the lower part of the image, to make your garden more accessible.
Don’t forget to plan for plant height. Taller plants should go at the back or center, while shorter ones can be placed at the front. This ensures that every plant gets the sunlight it needs. The image gives a great example of how to arrange plants for both beauty and function.
Choosing the Optimal Height for Your Beds
When setting up your raised garden beds, height is a key factor. The image shows a variety of colorful raised beds, each filled with thriving plants. These beds are not just visually appealing; their height can greatly influence your gardening experience.
Typically, raised beds range from 12 to 36 inches high. A lower bed, around 12 inches, is great for growing shallow-rooted plants like lettuce and herbs. If you want to grow deeper-rooted vegetables, consider a height of 18 to 24 inches. This allows for better root development and drainage.
For those who prefer a more comfortable gardening experience, taller beds can be a blessing. Beds at 30 inches or more can reduce strain on your back and knees. This is especially helpful for older gardeners or anyone with mobility issues.
Think about your space and what you want to grow. The vibrant beds in the image show how different heights can work together in a garden. Mixing heights can create visual interest while accommodating various plant needs.
Selecting the Right Materials for Raised Beds
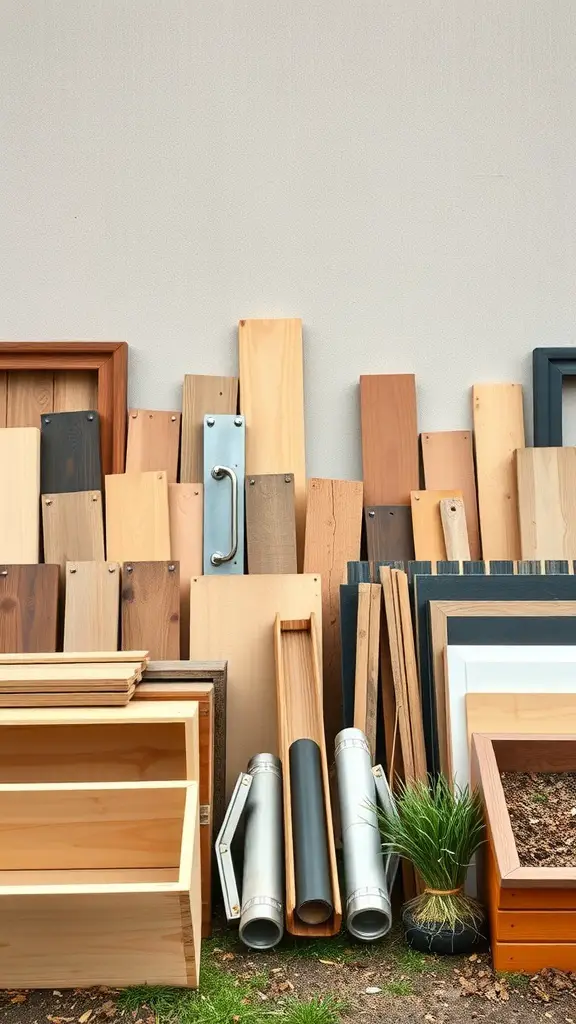
When building raised garden beds, the materials you choose can make a big difference. The image shows a variety of wood and metal pieces, perfect for creating sturdy and attractive beds. Each material has its own benefits, so let’s break it down.
Wood is a popular choice for raised beds. Cedar and redwood are naturally resistant to rot, making them great options. They also blend well with the garden environment. If you prefer a more modern look, consider using metal. Galvanized steel or aluminum can give your garden a sleek appearance while lasting for years.
Another option is composite materials, which combine wood fibers and recycled plastics. These are durable and require less maintenance. Whichever material you choose, make sure it’s safe for growing food. Avoid treated woods that could leach chemicals into the soil.
Lastly, think about the size and shape of your beds. The image shows various dimensions, allowing for creativity in your design. Whether you want long, narrow beds or square ones, the choice is yours!
Integrating Vertical Gardening Techniques
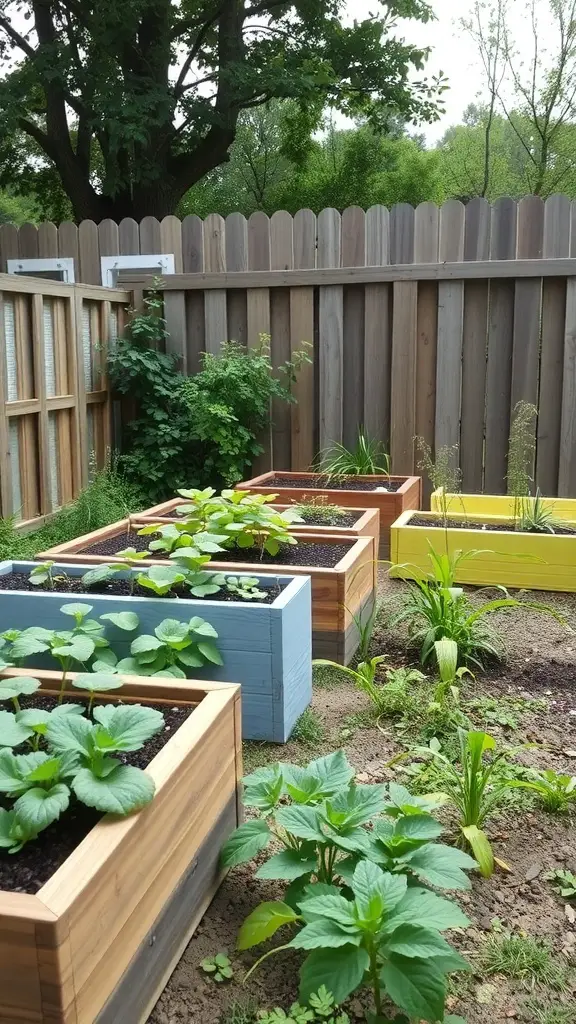
Vertical gardening is a fantastic way to maximize space in your raised garden beds. The image shows a beautifully designed setup where plants grow both in the bed and on vertical structures. This not only adds visual interest but also helps in utilizing every inch of your garden.
The raised bed itself is made of wood, giving it a warm and natural look. It’s filled with a variety of plants, showcasing different colors and textures. This diversity can attract pollinators and create a lively atmosphere in your garden.
Above the raised bed, you can see pots hanging on a wall, filled with trailing plants. This technique is perfect for small spaces, allowing you to grow herbs, flowers, or even small vegetables without taking up ground space. It’s a creative solution that makes gardening accessible, even in limited areas.
Incorporating vertical elements not only enhances the aesthetics but also improves air circulation and sunlight exposure for your plants. This can lead to healthier growth and a more productive garden. Consider adding trellises or wall-mounted planters to your own setup for a similar effect!
Choosing the Right Soil Mix for Raised Beds
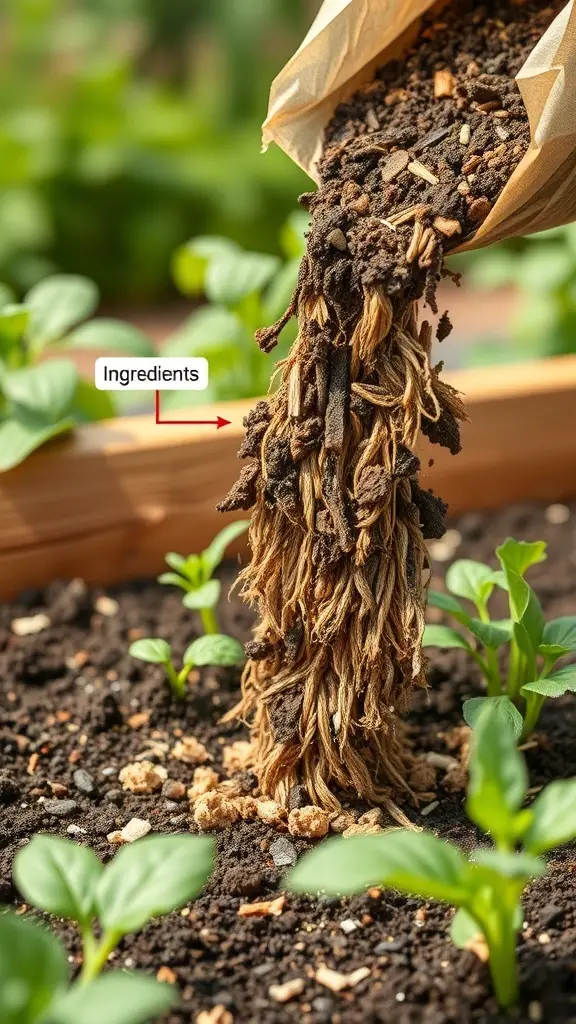
When setting up your raised garden beds, the soil mix is key to healthy plants. The image shows a rich blend of organic materials being poured into the bed. This mix is essential for providing nutrients and ensuring good drainage.
A great soil mix typically includes a combination of compost, peat moss, and vermiculite or perlite. Compost adds nutrients, while peat moss helps retain moisture. The vermiculite or perlite improves aeration, which is crucial for root health.
In the image, you can see the texture of the soil mix. It’s dark and crumbly, indicating it’s packed with organic matter. This is what you want for your raised beds. Healthy soil leads to vibrant plants.
When mixing your soil, aim for a ratio of about 1/3 compost, 1/3 peat moss, and 1/3 vermiculite or perlite. This balance will give your plants the best chance to thrive. Remember, the right soil mix can make all the difference in your gardening success!
Seasonal Planting Plans for Raised Beds
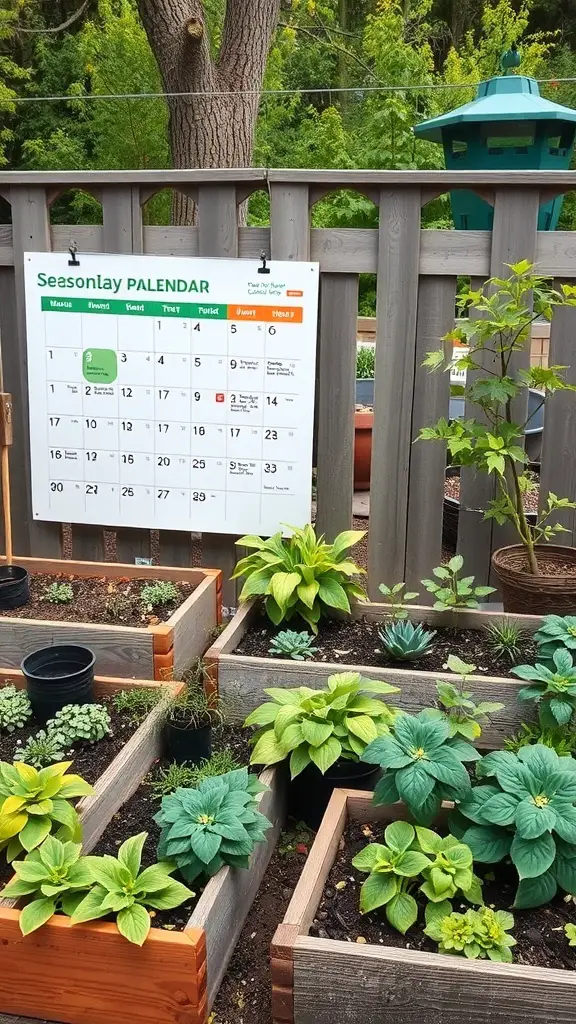
Raised garden beds are a fantastic way to grow a variety of plants throughout the seasons. In the image, you can see several neatly arranged raised beds filled with lush greenery. Each bed showcases different plants, indicating a thoughtful approach to seasonal planting.
The calendar in the background is a handy tool for planning your planting schedule. It helps you keep track of what to plant and when, ensuring your garden thrives all year round. This visual guide can be a lifesaver for both beginners and seasoned gardeners.
Spring is a great time to start with cool-season crops like lettuce and peas. As the weather warms, you can transition to summer favorites like tomatoes and peppers. The beauty of raised beds is that they allow for easy rotation and succession planting, maximizing your yield.
In the fall, consider planting hardy vegetables like kale and carrots, which can withstand cooler temperatures. With proper planning, your raised beds can provide fresh produce from spring through late fall.
Building a Raised Bed with Recycled Materials
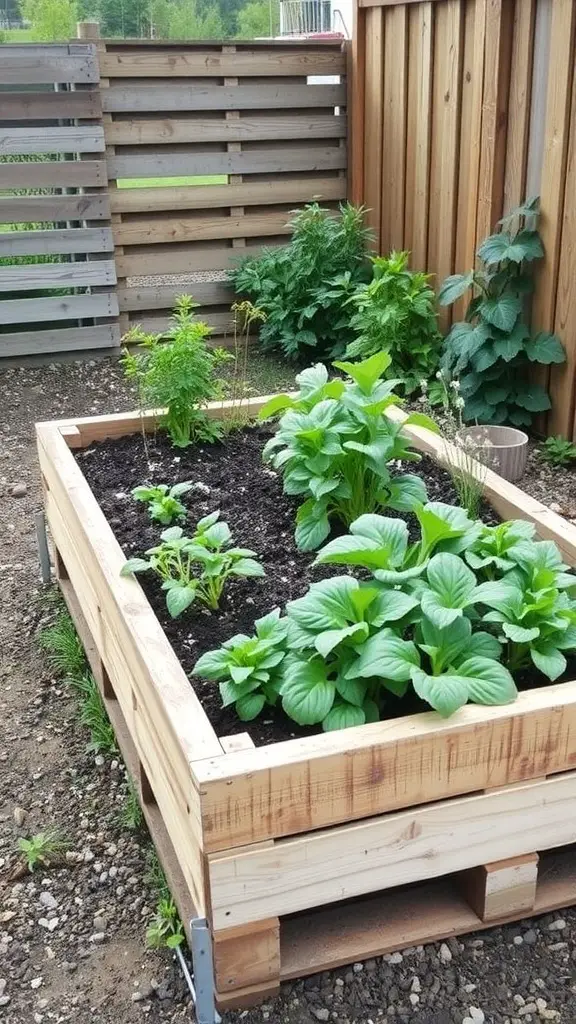
Creating a raised garden bed using recycled materials is a fantastic way to be eco-friendly while gardening. The image shows a sturdy raised bed made from reclaimed wood, filled with rich soil and vibrant plants. This setup not only looks great but also provides a practical solution for growing vegetables and herbs.
Using recycled materials can save money and reduce waste. You can use old pallets, reclaimed wood, or even bricks. The raised bed in the image has a clean, rustic look that fits well in any backyard. It’s a simple project that can be completed in a weekend.
Start by gathering your materials. Make sure the wood is untreated to avoid chemicals leaching into the soil. Cut the wood to your desired size and assemble the frame. Once built, fill it with quality soil and compost to give your plants a healthy start.
Planting in a raised bed offers better drainage and can extend your growing season. The plants in the image are thriving, showing how effective this method can be. Enjoy the process and watch your garden flourish!
Implementing Crop Rotation Strategies
In a raised garden bed, crop rotation is a smart way to keep your plants healthy and productive. The image shows a vibrant garden filled with various leafy greens and herbs, all thriving in their designated spaces. Each section is carefully planned, allowing for easy access and maintenance.
Crop rotation involves changing the types of plants grown in each bed each season. This practice helps prevent soil depletion and reduces the risk of pests and diseases. For example, if you grow lettuce in one bed this year, consider planting tomatoes in that same spot next year.
By rotating crops, you can improve soil health. Different plants have varying nutrient needs. Some plants, like legumes, can even add nitrogen back into the soil. This keeps your garden thriving and ensures a bountiful harvest.
It’s also fun to experiment with different combinations of plants. You might find that certain vegetables grow better together. This can lead to a more productive garden and a greater variety of fresh produce for your meals.
Incorporating Edging and Borders
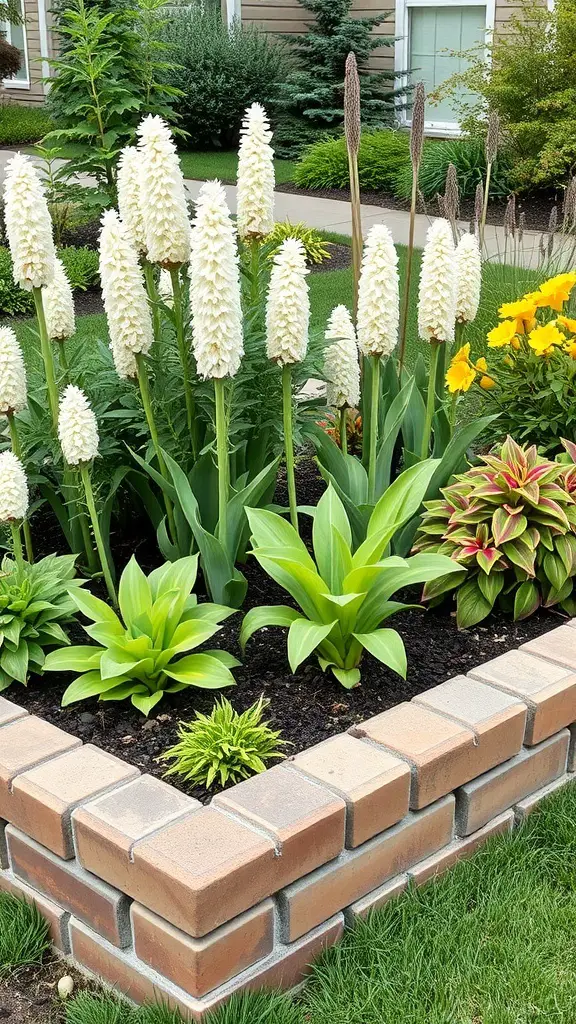
When it comes to raised garden beds, edging and borders play a significant role in defining the space. The image shows a beautifully arranged garden bed with a sturdy brick border. This not only adds a neat appearance but also helps keep soil in place and prevents weeds from creeping in.
The choice of materials for edging can vary. Bricks, stones, or even wood can create a distinct look. In the image, the brick border complements the vibrant flowers and lush greenery, enhancing the overall aesthetic. Each element works together to create a welcoming garden space.
Using borders can also help with organization. You can separate different types of plants or even create sections for vegetables and flowers. This not only looks good but also makes maintenance easier. The clear boundaries guide your gardening efforts, making it simpler to care for each section.
Don’t forget about the height of your edging. A taller border can deter pests and animals from entering your garden. In this image, the raised design adds a bit of elevation, making it harder for critters to reach the plants. It’s a practical choice that adds to the visual appeal.
Overall, incorporating edging and borders in your raised garden beds is a smart move. It enhances the beauty of your garden while providing functional benefits. So, whether you choose bricks like in the image or another material, you’re sure to create a stunning and organized garden space.
Adding Trellises and Support Structures
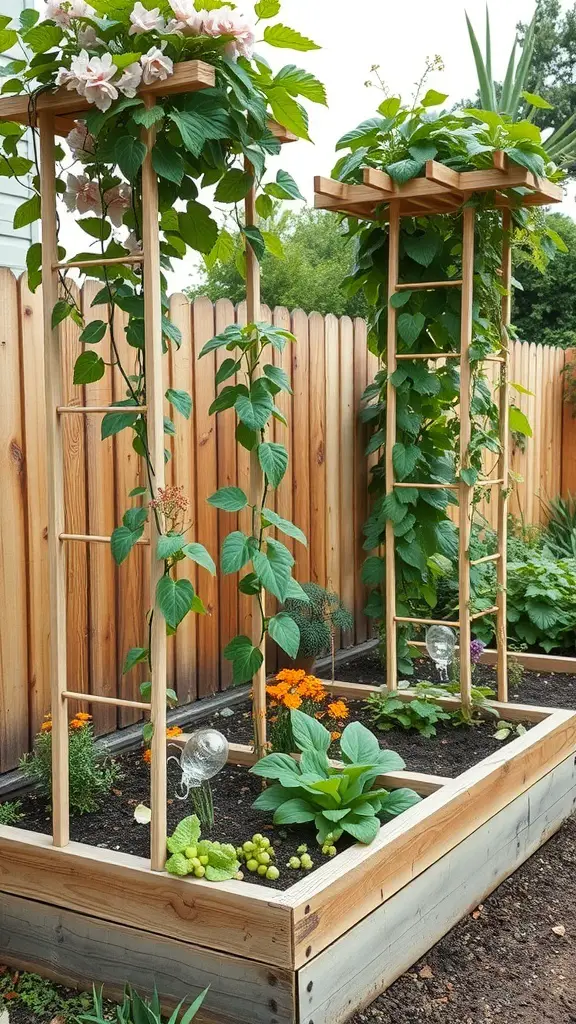
Incorporating trellises into your raised garden beds can really enhance both the look and function of your space. The image shows two beautiful wooden trellises that support climbing plants. These structures not only save space but also allow plants to grow vertically, making it easier to manage your garden.
Using trellises can also improve air circulation around your plants, which is great for their health. The flowers and greenery climbing up the trellises add a pop of color and texture to the garden. You can plant a variety of climbing plants, such as beans or peas, which will thrive with this support.
Don’t forget to consider the materials for your trellises. Wood is a popular choice, as seen in the image, but you can also use metal or even repurpose old furniture. The key is to ensure that the structure is sturdy enough to support the weight of the plants as they grow.
Adding decorative elements, like the glass ornaments in the image, can also give your garden a unique touch. This makes your garden not just a place for growing food, but also a lovely outdoor space to enjoy.
Creating a Drip Irrigation System
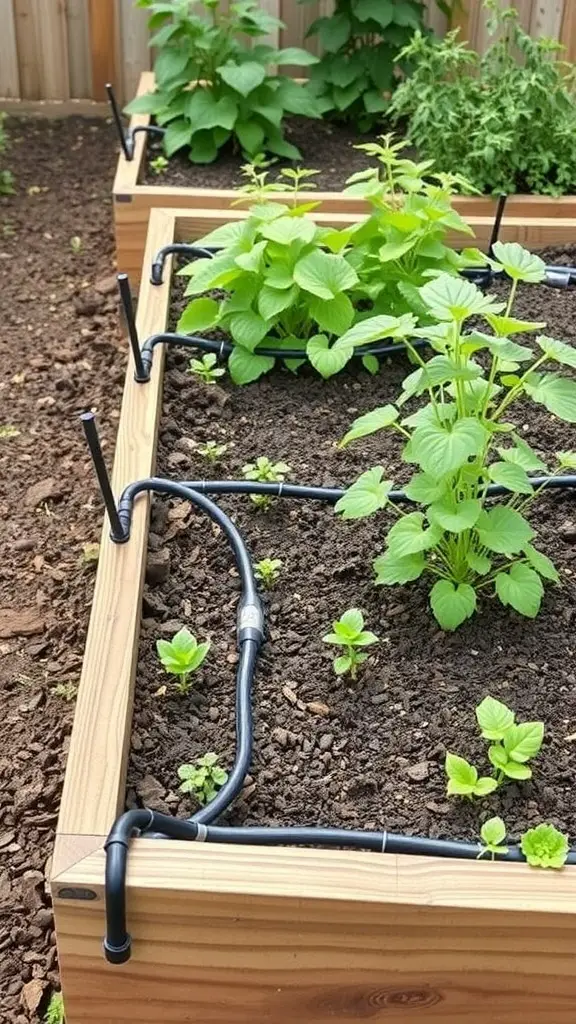
Setting up a drip irrigation system for your raised garden beds is a smart way to keep your plants healthy and hydrated. The image shows a well-organized setup with black tubing running through the soil, delivering water directly to the roots of the plants. This method is efficient and minimizes water waste.
To create your own drip irrigation system, start by measuring the length of your garden beds. You’ll need enough tubing to reach each plant. Cut the tubing to size and lay it out in your garden. Make sure to position it close to the base of each plant for the best results.
Next, install emitters or drip heads along the tubing. These will control the flow of water, ensuring each plant gets just the right amount. Once everything is in place, connect the tubing to a water source. A simple timer can make this system even easier, allowing you to set specific watering times.
With your drip irrigation system in place, you can enjoy the benefits of less manual watering and healthier plants. Plus, it frees up your time to enjoy your garden!

