
Creating a no-drip chicken waterer using a 5-gallon bucket is a smart and easy DIY project that every chicken keeper can tackle. This simple setup helps keep your feathered friends hydrated without the mess, making it perfect for both backyard and small farm situations. Let’s get started on how to turn that bucket into a reliable water source for your chickens!
Why Make A Diy Chicken Waterer?
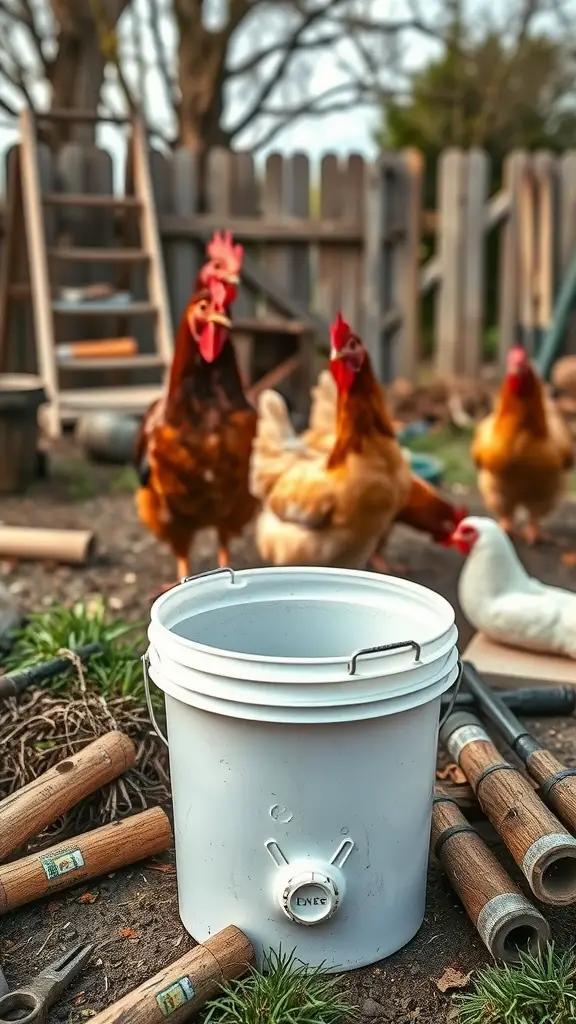
Creating a DIY chicken waterer from a 5-gallon bucket is a smart choice for any backyard chicken keeper. This simple project helps ensure your chickens always have access to fresh water without the mess of spills.
The image shows a sturdy white bucket surrounded by tools and chickens in the background. This setup highlights the practicality of using a bucket for your chicken watering needs. The design minimizes drips, keeping your coop dry and clean.
Using a bucket is also cost-effective. You can repurpose an old bucket, saving money while providing a reliable water source for your flock. Plus, it’s easy to refill and maintain.
With a DIY waterer, you can customize it to fit your space and needs. Whether you have a few chickens or a larger flock, this solution can be adapted to suit your setup.
What You’Ll Need (Materials List)
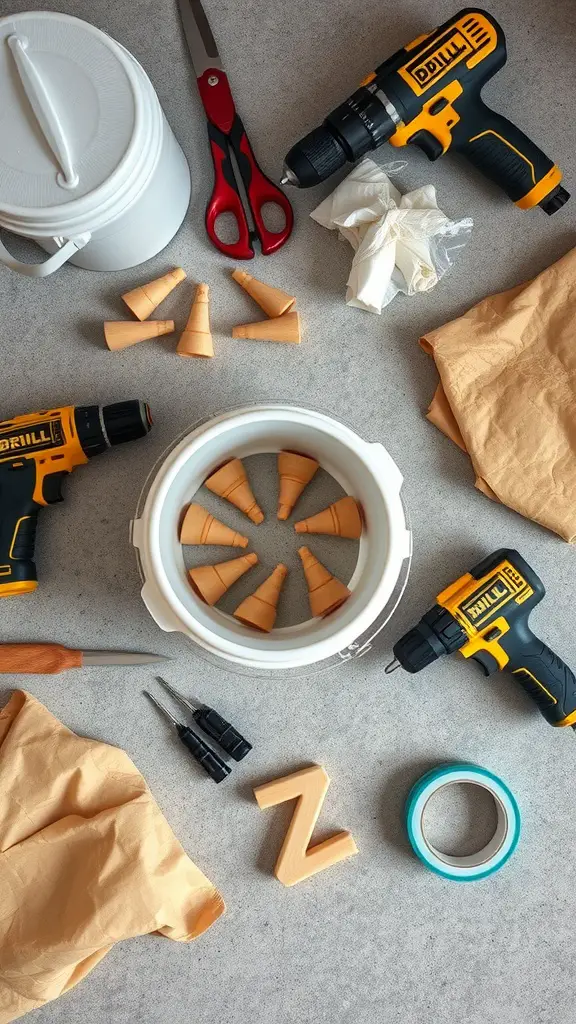
Creating a DIY chicken waterer from a 5-gallon bucket is a fun and practical project. To get started, you’ll need a few essential materials that are easy to find.
First, grab a 5-gallon bucket. This will be the main body of your waterer. Make sure it has a lid to keep the water clean. You’ll also need some small plastic cones, which will help control the water flow. These can often be found at craft stores or online.
Next, gather some tools. A drill is necessary for making holes in the bucket. You’ll also want a pair of scissors for cutting any materials. A utility knife can be handy for precise cuts, too. Don’t forget some waterproof tape to seal any joints and prevent leaks.
Lastly, a few screws and a screwdriver will help secure the cones in place. With these materials, you’re all set to make a no-drip chicken waterer that will keep your feathered friends hydrated!
Choosing The Right Bucket For The Job
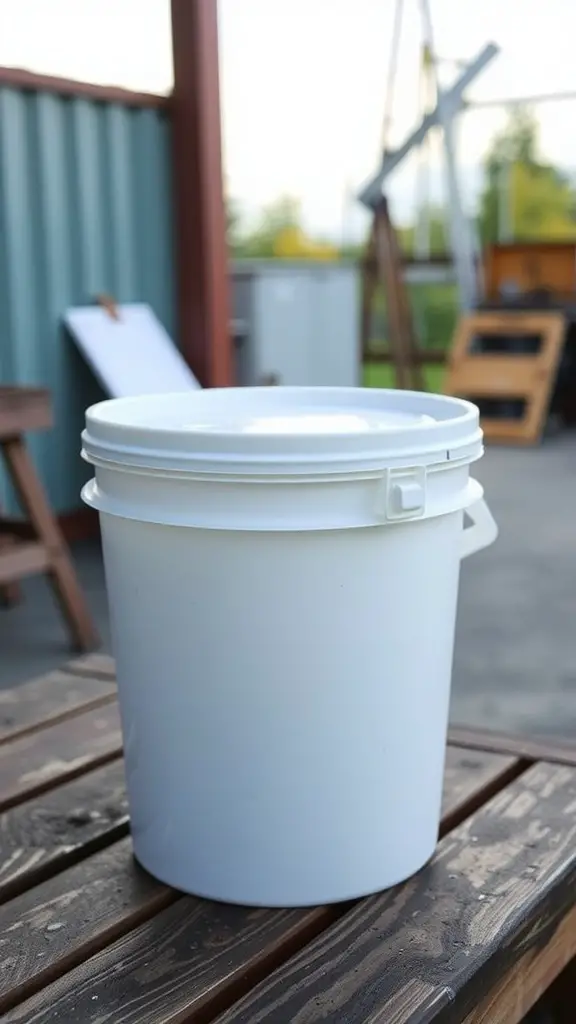
When it comes to making a DIY chicken waterer, the bucket you choose is key. The image shows a sturdy 5-gallon bucket, which is a popular choice for this project. It’s big enough to hold plenty of water but not so heavy that it’s hard to manage.
Look for a bucket that’s food-grade. This ensures that it’s safe for your chickens. Many buckets are made from plastic that can leach harmful chemicals, so checking for food-grade labeling is a smart move.
Also, consider the condition of the bucket. A clean, new bucket is ideal, but if you’re using a second-hand one, make sure it’s free from any residues or strong odors. A quick rinse and a mild soap wash can help prepare it for your feathered friends.
Lastly, think about the lid. A bucket with a tight-fitting lid can help keep the water clean and free from debris. This is especially important if your chickens are free-ranging and might kick up dirt.
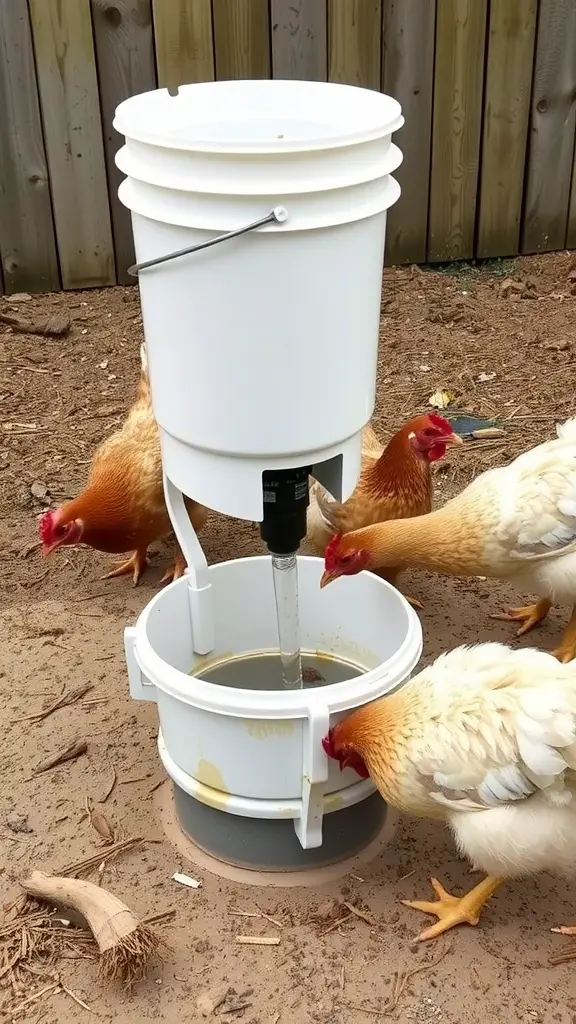
Step-By-Step: How To Install Poultry Nipples
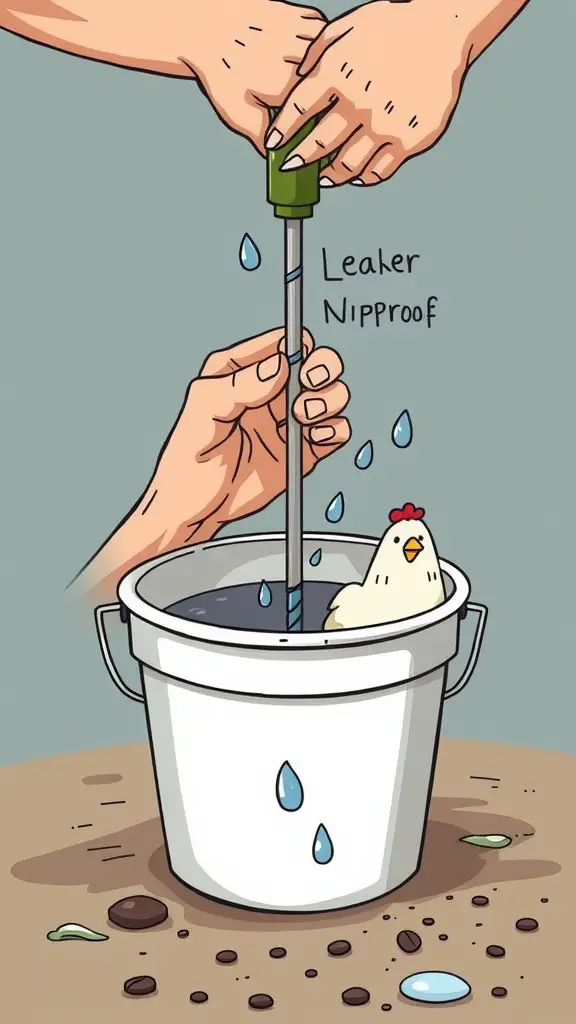
Installing poultry nipples in your DIY chicken waterer is a simple and effective way to keep your chickens hydrated without the mess. The image shows hands working on a poultry nipple, demonstrating the installation process. You can see a 5-gallon bucket filled with water, making it clear that this setup is designed for easy access.
Start by selecting the right poultry nipples for your setup. These nipples are designed to prevent leaks, ensuring that your chickens get the water they need without creating a soggy environment. In the image, you can see the nipple being inserted into the bucket, which is a crucial step in the process.
Next, drill holes in the bucket where you want to place the nipples. Make sure the holes are the right size to fit snugly around the nipples. Once the holes are ready, simply screw the nipples into place. The hands in the image illustrate this step perfectly, showing how to tighten them securely.
After everything is installed, fill the bucket with water. The design allows the chickens to drink without spilling, keeping your coop clean. The little chicken in the bucket is a cute reminder of how effective this system can be. With this setup, your chickens will have a reliable source of water, and you won’t have to worry about constant refills or messes.
How To Keep It From Dripping
Creating a DIY chicken waterer from a 5-gallon bucket is a smart way to keep your flock hydrated without the mess. The image shows a simple setup where chickens are happily drinking from a bucket system that prevents drips.
To keep it from dripping, start by ensuring the bucket has a tight seal where the water flows out. Use a rubber gasket or silicone sealant around the spout to prevent leaks. This will help maintain a steady flow without creating puddles around the waterer.
Another tip is to elevate the bucket slightly. This allows gravity to help control the water flow. Make sure the base is stable so it won’t tip over. The chickens will have easy access to the water while keeping the area dry.
Regularly check the water level and refill as needed. A well-maintained waterer will keep your chickens happy and your yard clean. With these simple steps, you can enjoy a hassle-free watering system!
Raising The Bucket: Diy Stand Or Hanging Option
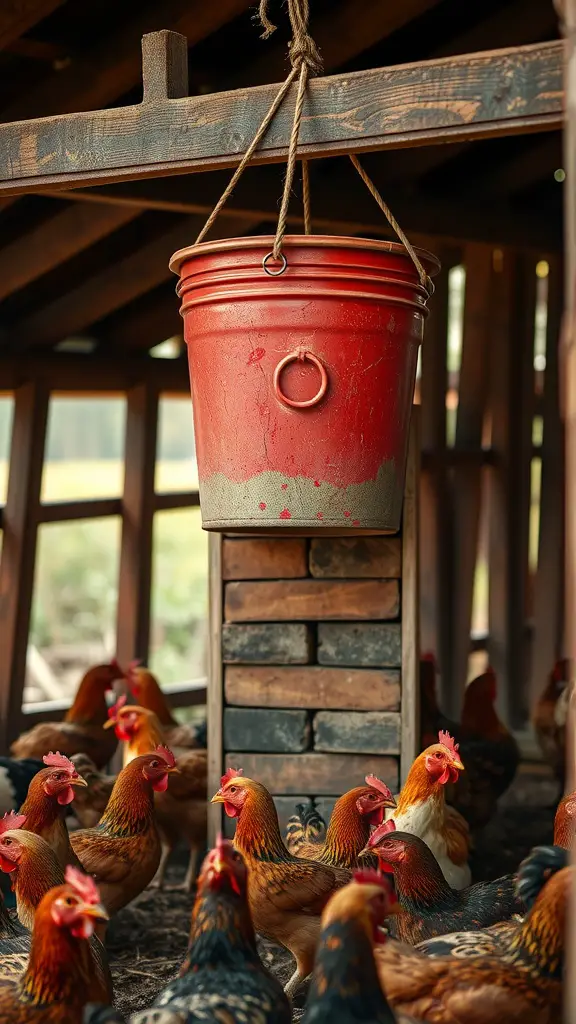
Creating a waterer for your chickens can be simple and effective. In the image, you see a red 5-gallon bucket suspended from a sturdy wooden beam. This setup allows for easy access for the chickens while keeping the water clean and off the ground.
Hanging the bucket is a great option. It prevents spills and keeps the water fresh. You can use strong rope or chain to secure it. Make sure it’s at a height that your chickens can easily reach. This way, they won’t have to bend down too far, which can be uncomfortable.
If hanging isn’t your style, consider building a stand. A simple wooden frame can elevate the bucket. This keeps it stable and prevents tipping. Just ensure the stand is sturdy enough to hold the weight of the water-filled bucket.
Both options are effective. Choose what works best for your setup. Happy chicken keeping!
Cold Weather Tips: No-Freeze Modifications
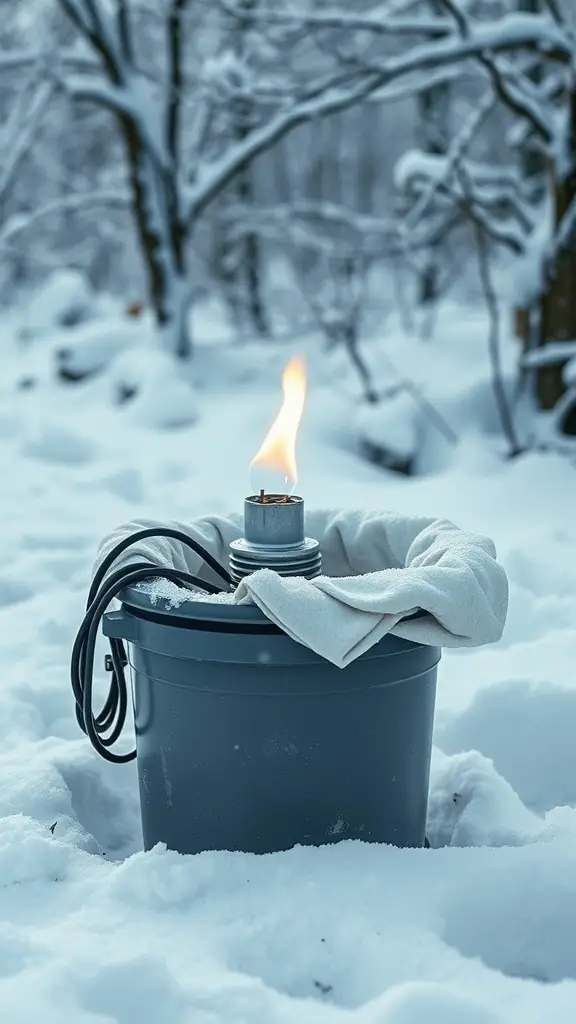
Winter can be tough on our feathered friends, especially when it comes to keeping their water from freezing. The image shows a clever setup using a 5-gallon bucket with a heating element to ensure that the water stays liquid, even in the coldest temperatures.
To create a no-freeze chicken waterer, start by placing a small heater or a heat lamp above the bucket. This will provide enough warmth to prevent ice from forming. Make sure the heating element is safe and designed for outdoor use to avoid any hazards.
Another tip is to insulate the bucket. You can wrap it in an old towel or blanket, which helps retain heat. Just be cautious that the material doesn’t touch the heating element directly to prevent any fire risks.
Regularly check the water level and the condition of the heater. Keeping an eye on these details will help ensure your chickens have access to fresh water throughout the winter months.
Cleaning & Maintenance Tips
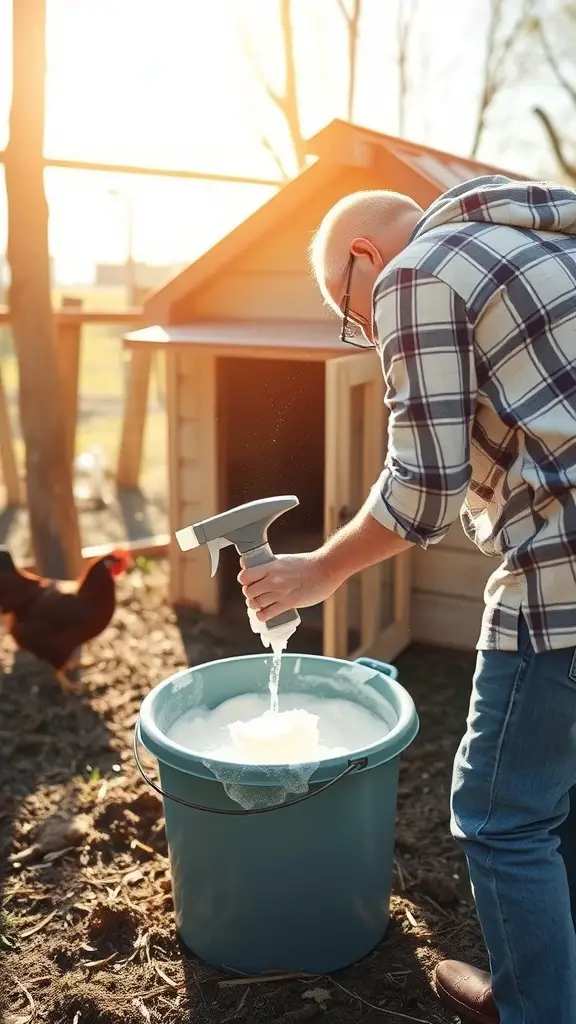
Keeping your DIY chicken waterer clean is key to ensuring your chickens stay healthy and hydrated. In the image, you can see someone pouring a cleaning solution into a 5-gallon bucket, which is a simple yet effective way to maintain your waterer.
Start by emptying the bucket and rinsing it out with water. This removes any leftover debris or residue. Next, use a mild detergent or vinegar solution to scrub the inside. A soft brush can help reach those tricky spots. Rinse thoroughly to ensure no soap remains.
It’s a good idea to clean the waterer at least once a week. If you notice any algae or buildup, increase the frequency. Regular maintenance will keep the water fresh and your chickens happy.
After cleaning, refill the bucket with fresh water. Make sure the waterer is positioned securely to prevent spills. This setup helps avoid messes and keeps your chickens’ drinking area tidy.
Cost Breakdown: Is It Worth It?
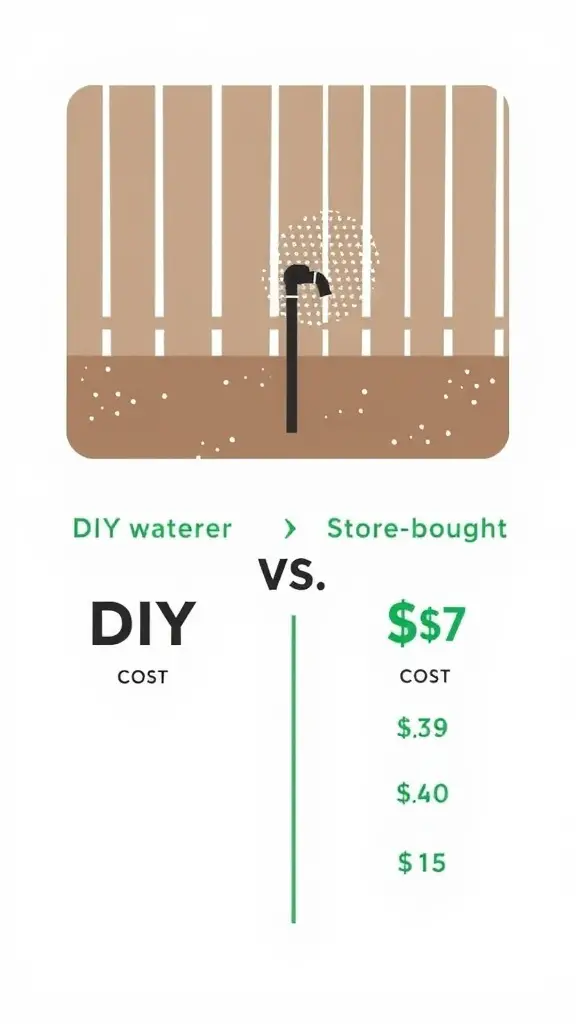
Creating a DIY chicken waterer from a 5-gallon bucket is not just a fun project; it can also save you some cash. The image shows a clear comparison of costs between making your own waterer and buying one from the store. The DIY option is significantly cheaper, with costs adding up to just a few cents, while a store-bought version can hit around $7.
Breaking it down, the DIY waterer costs around $0.39 for one component, $0.40 for another, and a total of $15 for all necessary parts. In contrast, the store-bought option is a flat $7. This means that making your own waterer can be a smart choice for those looking to keep expenses low while ensuring their chickens have a reliable water source.
Not only does this DIY project save money, but it also allows you to customize the waterer to fit your specific needs. If you enjoy hands-on projects, this could be a rewarding way to provide for your flock without breaking the bank.
Common Mistakes To Avoid
When creating a DIY chicken waterer from a 5-gallon bucket, it’s easy to make a few missteps. The image shows a simple setup with a red bucket and a water source, highlighting how things should look. Let’s go over some common mistakes to steer clear of.
One mistake is not sealing the bucket properly. If there are any leaks, your waterer will create a mess instead of providing a clean water source. Make sure all connections are tight and secure.
Another issue is using the wrong type of bucket. Not all buckets are food-safe. Always choose a bucket that is safe for your chickens to avoid any harmful chemicals leaching into their water.
Don’t forget about the height of the waterer. If it’s too low, your chickens might struggle to drink comfortably. Aim for a height that allows them to access the water easily without straining.
Lastly, remember to check the water level regularly. A common oversight is letting the water run dry. Keeping an eye on it ensures your chickens always have access to fresh water.
Conclusion
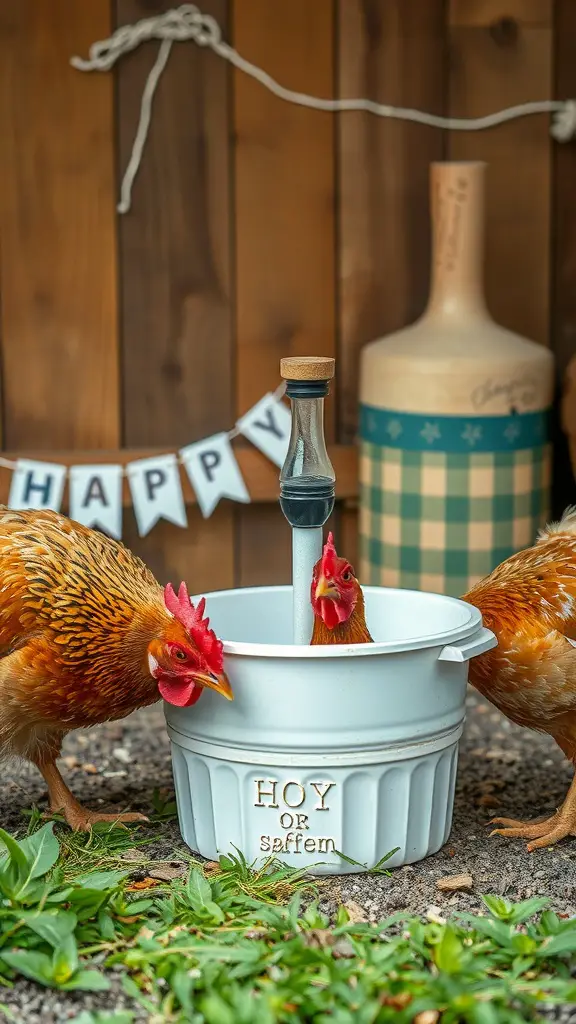
Creating a DIY chicken waterer from a 5-gallon bucket is a simple and effective solution for keeping your feathered friends hydrated. The image shows two curious chickens peering into a white bucket, designed to prevent spills and drips. This setup not only saves water but also keeps the coop cleaner.
With just a few materials and some basic tools, you can make this waterer in no time. It’s a practical project that benefits both you and your chickens. Plus, watching them enjoy fresh water is rewarding!

